Charging dock for Nintendo New 3DS
thingiverse
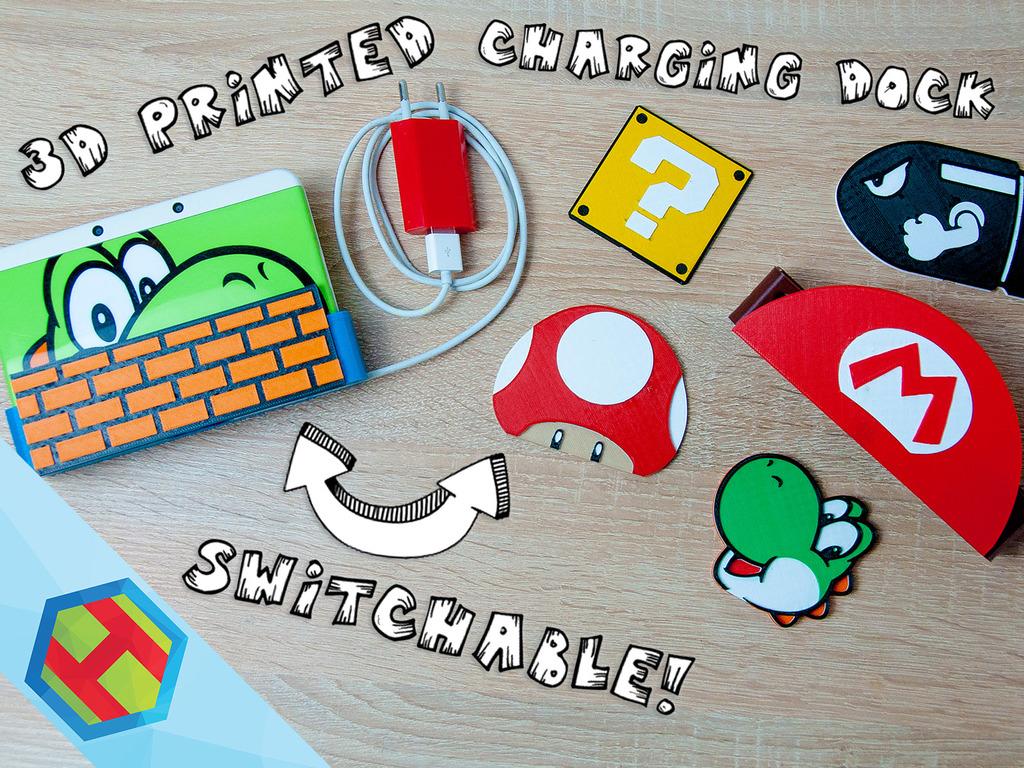
This is for the **New 3DS**! If you're looking for New 3DS XL version, [go here.](https://www.thingiverse.com/thing:4229093) A fully functional charging dock for the New 3DS! It also comes with swappable plates that you can print in multiple colors. Best of all, this works with most printers, because you simply have to change filament at certain heights. I took extra care and designed it in such a way that you don't need any special tools or components, just a bit of wire and spring from an old pen. Everything is also printable 100% without any supports. I've also made a build video if you're interested: https://youtu.be/3dQFI1BClfM Beside the STL files, I'm including the full Fusion360 project file as well. **Adjusting the pin contacts** When you're adjusting the contacts on top of the charger, try to shape it in such a way to create a V shape. It can be a bit tricky and you'll probably have to try it a few times before it makes a good contact. Don't despair! **Adjusting the spring** The stiffness of the spring is very important. If the spring is too strong, it will tilt the 3DS and lose contact. If it's not strong enough, it won't push against the charging contacts. You will have to tinker with the spring until you get a good fit. I did it by cutting away one loop at a time, putting the spring back in and trying if it works. Keep doing it until you get a reliable contact. **Multi-color printing** For printing in multiple colors, you need to slice the model and save it as normal gcode. Then, you have to insert the M600 command. You can do this manually by opening the gcode, but the easiest way is to use the ColorPrint tool by Prusa. You simply upload the file, set height changes and save the new gcode. Here's the tool: https://www.prusaprinters.org/color-print/ If you're intereseted on how to design things for multi-color printing, you can watch my video that explains everything: https://youtu.be/KsbE2vEzS7U I'm also including a blank plate so that you can design your own. Import it into CAD of your choice (I recommend Tinkercad or Fusion360). The first layer is 2mm thick, every subsequent layer should be 0.8mm. Here's a list of heights and colors for each particular plate: **Question block** Start with BLACK, then at z2.2 change to YELLOW, at z3.0 change to WHITE. **Mario hat** Start with RED, then at z2.2 change to WHITE, at z3.0 change to RED. **Brick** Start with BLACK, then at z2.2 change to BROWN. **Bullet Bill** Start with WHITE, then at z2.2 change to BLACK, at z3.0 change to WHITE. **Yoshi** Start with ORANGE, then at z2.2 change to RED, at z3.0 change to WHITE, at z3.8 change to GREEN, at z4.6 change to BLACK. **Mushroom** Start with BEIGE/SKIN, then at z2.2 change to WHITE, at z3.0 change to BLACK, at z3.8 change to RED, at z4.6 change to WHITE.
With this file you will be able to print Charging dock for Nintendo New 3DS with your 3D printer. Click on the button and save the file on your computer to work, edit or customize your design. You can also find more 3D designs for printers on Charging dock for Nintendo New 3DS.