Charlie's Bath Interferometer
thingiverse
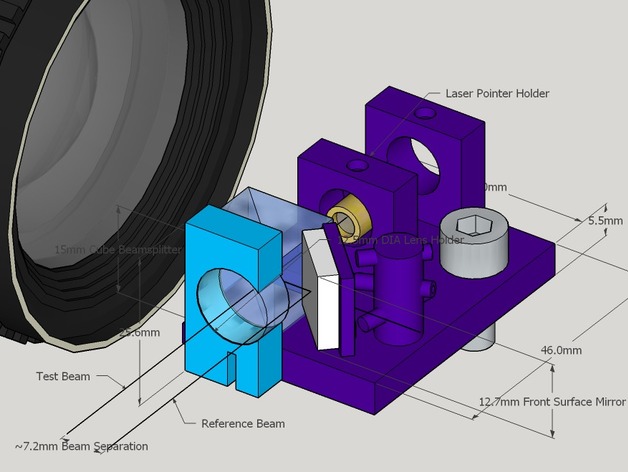
A DIY interferometer designed to be constructed for under $100. Amateur telescope makers can use it to analyze their homemade mirrors using OpenFringe or other free software. Current parts list: * Thorlabs ME05S-G01 - 1/2" Square Protected Aluminum Mirror, 3.2 mm Thick ($11.30 plus shipping) * Surplus Shed L2046D - 15mm Coated 50/50 Cube Beamsplitter ($19.00 plus shipping) * Surplus Shed PL1009 - 12.5mm dia. X 14.2mm FL precision coated BCX lens ($6 plus shipping) * Red (650nm) Laser Diode ($1-3 depending) Possible cheap XYZ stages: * Manual 3d printed based on http://www.thingiverse.com/thing:144838 * DVD player DC 5v linear slider Mini Stepping Motor 2-phase 4-wire Stepper with linear rails e.g. http://r.ebay.com/RTt4zA Changelog: 2017-02-06 - Redesigning in Fusion 360 aiming for easier printing, construction, and use. 2016-10-26 - Enlarged the tip/tilt mirror/prism adjustment post and the laser diode/pointer set screw holes. Added a 1/4" / M6 hole for mounting to XYZ stage. 2016-10-21 - First printing assembled with some kinks to iron out but seems like my design is on the right track. 2016-10-19 - Trimmed the edge of the lens holder completely off to allow for maximum unobstructed return laser beam. Improved design of mirror/prism tip tilt post. Print Settings: * Printer: Solidoodle 2 - Pro * Rafts: Doesn't Matter * Supports: Doesn't Matter * Resolution: .2 * Infill: 15% * Notes: Printing in ABS with hexagon infill pattern for strength Post-Printing Steps: 1. Drill holes in mirror/prism tip/tilt post. * Drill three holes in the mirror/prism tip/tilt post. The first should be near the top of the mirror/prism support plate and will tip the mirror/prism forward if necessary. The second two holes should angle towards either end of the bottom of the mirror support plate. These will allow minor adjustments to the mirror tilt/angle. 2. Mount the laser. * Remove laser pointer end cap and adjust lens stop with flat screwdriver until beam is well collimated. Insert into laser pointer holder and orient laser dot at a 45 degree angle for best fringe contrast. 3. Mount the mirror. * Using some double-sided tape mount the mirror to the mirror support as diagrammed. It can be helpful to place the cube beamsplitter in place and measure the beam separation until it is as small as possible while not being vignetted by the lens holder. 4. Place the beamsplitter. * The beamsplitter is designed to sit freely with no adhesive so that it can be rotated or shimmed to orient the beams perfectly. Set it in the recessed space such that the split is oriented at 45 degrees same as the mirror/prism (see diagram). 5. Install the lens. * Insert the lens into the lens holder. If the fit isn't snug secure the lens in some manner. Helpful References: * http://www.starryridge.com/interferometry/BathAnalysisV2.1.pdf * http://atm.udjat.nl/tester/bathtester.html * Comparison Between the Bath and the 4D 6000 Instantaneously Phase Shifted Interferometershttp://projects.imaps.aber.ac.uk/library/proj_162_375rp_12505.pdf
With this file you will be able to print Charlie's Bath Interferometer with your 3D printer. Click on the button and save the file on your computer to work, edit or customize your design. You can also find more 3D designs for printers on Charlie's Bath Interferometer.