Cheap $10 Macro Pad
thingiverse
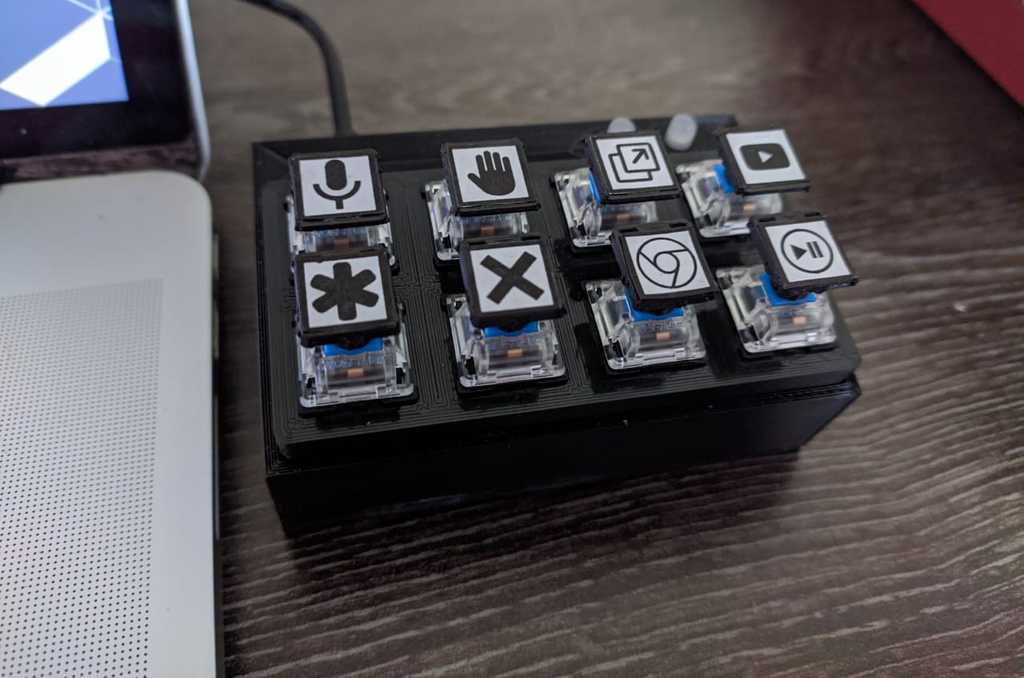
###A macro pad for under $10. ##Parts Required: - macropadv444.stl (included) *1 - Key_Switch_Tester_4x2.stl from https://www.thingiverse.com/thing:4120804/files by riskable - Arduino Pro Micro (or any other 32U4 based microcontroller) *1 - Cherry MX compatible Switches (I used gateron blue switches) *8 - Cherry MX keycaps (I used https://www.thingiverse.com/thing:2288281/files) *8 - 5mm LEDs (dual colour is also supported) *2 - 100ohm resistors *4 - Wires - Solder - 2mm PVA foam - 1 sheet - A printer (2 dimensional) - Micro USB cable - Double sided tape ##Aliexpress Links: - Switches: https://www.aliexpress.com/item/32980039972.html?spm=a2g0o.productlist.0.0.61842dccx8ussy&algo_pvid=c2cc961b-a046-474d-9074-c3145b3b3ff9&algo_expid=c2cc961b-a046-474d-9074-c3145b3b3ff9-1&btsid=0b0a556816068266191712219eb92b&ws_ab_test=searchweb0_0,searchweb201602_,searchweb201603_ - Pro Micro: https://www.aliexpress.com/item/32978678381.html?spm=a2g0s.9042311.0.0.fd4d4c4dNQ62Or - LEDs: https://www.aliexpress.com/item/1868332975.html?spm=a2g0o.productlist.0.0.5e7a753amrqRqZ&algo_pvid=9bd2a24d-fe3a-4698-a512-a0d817964e22&algo_expid=9bd2a24d-fe3a-4698-a512-a0d817964e22-1&btsid=0b0a557016068268425278370e6785&ws_ab_test=searchweb0_0,searchweb201602_,searchweb201603_ - Resistors: https://www.aliexpress.com/item/32526023399.html?spm=a2g0o.productlist.0.0.2a1527cetRDlvj&algo_pvid=f66d5d12-5d56-445c-b81c-088d92789ebd&algo_expid=f66d5d12-5d56-445c-b81c-088d92789ebd-14&btsid=0b0a556f16068268942781706e86e4&ws_ab_test=searchweb0_0,searchweb201602_,searchweb201603_ ## Try and get as much as you can locally for cheaper shipping and to support local business. ##Assembly Instructions: - Attach all switches to the plate - Connect a single wire (preferably bare copper) across one row of 4 switches and solder it to one pin of each switch - do the same for the other row, and connect these 2 together. This will be the ground. - Solder wires from the other pins of the switch to your preferred pins on the pro micro. - Solder LEDs and use resistors as required - Insert the LEDs into the holes - *important* Use a strong piece of double sided foam tape to stick the pro micro to the included mount (3M might be a bit more expensive but it works much better) I've left enough clearance for thicker/thinner tapes - Push the plate into the top. You might need a bit of filing based on your printer. With a well tuned ender 3, I got a perfect snap in fit. - Test whether all buttons are functional. (You can use a simple arduino sketch that prints to the serial monitor when a button is pressed) - Get a sheet of foam, put a thin line of superglue across the bottom of the case, and place it on the foam sheet. It shouldn't take more than a few seconds to dry. - Cut off the excess foam around. - Have a donut because you're done! Wiring Instructions: Connect one side of all switches to ground, and use the Input pullup. LEDs can be connected to the other pins. Once you're done, you superglue a piece of foam to the bottom. If the top plate is too loose, use a bit of PVA glue. You can use any cherry compatible keycaps. I used Keyboard.h, not sharing my code because it's shit and others can probably do better.
With this file you will be able to print Cheap $10 Macro Pad with your 3D printer. Click on the button and save the file on your computer to work, edit or customize your design. You can also find more 3D designs for printers on Cheap $10 Macro Pad.