Cheap DSLR Table Dolly
thingiverse
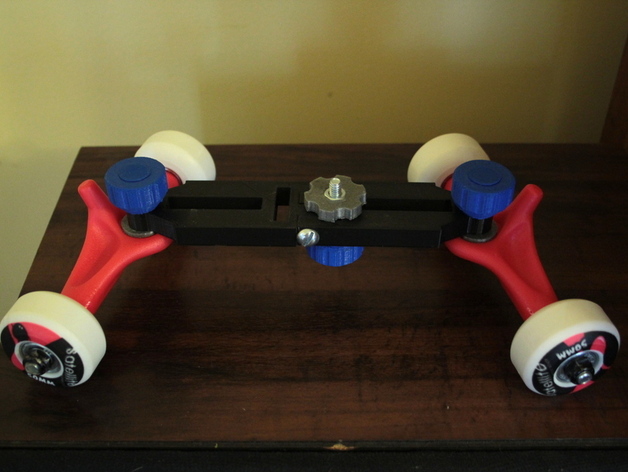
This is a cheap (~$25) table dolly for shooting DSLR video. It is made from a canabalized $20 K-Mart skateboard, a few nuts and bolts, and printed parts. The dolly rolls smoothly, and can go straight, at an angle, or in arcs or circles. It is very easy to adjust, or to tighten down. For some related information, and hopefully soon some video, see: http://www.protoparadigm.com/2012/03/what-to-do-with-a-3d-printer-video-production-field-use/ Also, yes, this could be made cheaper by making the trucks printed too so it just needs some wheels and bearings, but the goal with this one was to get up and running quickly. The skateboard and other parts were bought, files designed, drafts printed, and the unit assembled and tested all in one evening, the evening before a presentation about special purpose and home-made camera supports for video. Instructions You'll need to get a skateboard. I got a $20 skateboard from K-Mart, the second to cheapest one they had (the wheels would hardly turn on any of the cheapest one, but you might have better luck). Some of the small parts for this may need to be adjusted to fit the exact skateboard parts you're using. Print out three of these: http://www.thingiverse.com/thing:11405 And one of this: http://www.thingiverse.com/thing:7979 And then two of each of the parts for this thing. That's two sleds, two washers, and two nut locks. I printed the washers at 100% infill, and the sled and nut locks at 50% infill with good results. The overhang feature on the nut lock needed a little cleanup with some tweezers, but not much, and what surface finish problems it still has are hidden by the nut that gets pressed down into it. Assemble the bolt knobs with 1/4" - 20 hex bolts, I think I used 1 1/2" long. Press 1/4" - 20 nuts into the nut locks. Use a 1/4" - 20 bolt to attach the two pieces of the sled as shown. This should friction-fit just fine, but if you want to use a bolt that's long enough to put a nut on the other end, that should be fine too. After removing the trucks from the skateboard, attach the sled. At each end, you should have the sled on top of the washer, which rests in the truck, which has the captive nut underneath. The square side of the nut lock piece should fit into the hole in the truck and keep the washer from turning. Edit - I've added a picture of the skateboard the trucks came from. When I bought mine, only this design was available, but it appears there are several designs with different colored trucks that are the same skateboard. I've also uploaded a photo of its barcode that you can scan with your phone or copy the sku from. Edit - When storing the unit, I keep the parts arranged as pictured so none of the parts get lost. When using it, the big nut on top goes under the sled. Since most cameras can only accommodate a little bit of the bolt, you screw the bolt into the camera as far as it will go, then tighten the nut to secure it. The idea being that the camera sits directly on the sled and the nut screws up from underneath to tighten it down after the bolt is tightened.
With this file you will be able to print Cheap DSLR Table Dolly with your 3D printer. Click on the button and save the file on your computer to work, edit or customize your design. You can also find more 3D designs for printers on Cheap DSLR Table Dolly.