Cheap Hall effect sensor endstop
thingiverse
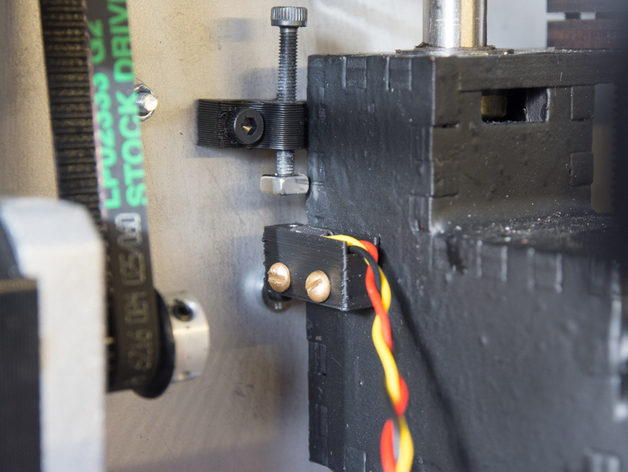
A small holder for cheap, integrated Hall effect sensors, usable as magnetic endstops. Uses the same mounts as the mechanical endstops in the Solidoodle 2. Instructions -- Backgroud -- Always on the lookout to improve my Solidoodle, I was send this link where John elaborates his use of cheap Hall effect sensors as endstops. (See 1.) These things are very exact, completely without wear and really easy to exchange with the mechanical switches. Different to the Hall-O (See 2.), they trigger on a fixed strength of a magnetic field and can't be calibrated. Even more different they only cost 20c per piece. John used A3144 sensors (which are temperature resistent, which is good) but I used OHN3019 for no other reason then availability and price. Both have an integrated voltage regulator and can be driven with 4.5 - 24V. This allows the part to be directly attached to the endstop connector of the sanguinololu without any extra logic. Only downside so far: depending on the used parts you get a notable hysteresis. An example: You drive your axis to the endstop, the sensor triggers at a specific distance. Then you drive your axis 0.2mm back. If you now try to drive these 0.2mm back, it's not possible because the endstop is still triggered. It needs some distance that the sensor pulls the signal down again. This distance is 0.5mm in my current setup, but I'm using a small neodym magnet which is properly a bit to strong for the application. I measured the accuracy after installation with an cheap micrometer. I made 10 tries, always driving a few steps down and full up again. It seems to differ by about 0.01mm (I got between 835,2 - 836,1). -- Part -- I made this part in Sketchup 8 to be a replacement for the mechanical endstops used in my Solidoodle 2. I printed mine with 2 layers and 0.3 infill. There should never be any force on this part so it can be printed pretty weak. -- Installation -- These steps need to be made to exchange an endstop with a magnetic one: 1.) Print the part (I forgot to do that first. ;-) ) 2.) On the back of the sanguinololu, by the endstop connectors are solderpads which need to be closed to choose the supply voltage of the endstops. This depends on your sensor. I chose 5V. 3.) You need to change a firmware parameter (See 3). In the file "Configuration.h" set '_ENDSTOPS_INVERTING' to true on the axis you are modifying. 4.) Take three 35cm long wires and solder them to the sensor pins. 5.) You can reuse the connector of the old mechanical endstop, just pull the old wires out. 6.) insert the new wires in the back and fasten with a small screwdriver. The pinout again depends on the sensor. Look at my pictures, I used red for voltage, black for ground and yellow for signal. 7.) Use Pronterface to see if the endstop reacts to a magnet. Mine only reacts on the side with the imprinted dot, and only in one direction of the magnet field.Make lots of dry tests, if the endstop does not pull you will damage your printer! You have been warned! 8.) Glue the sensor into the part and install it and a matching magnet. 9.) Carefully test again -- Links -- (1): http://notanumber.net/archives/66/upgrading-my-reprap-with-cheap-hall-effect-sensors (2): http://reprap.org/wiki/Hall-%CE%98 (3): http://www.solidoodle.com/how-to-2/how-to-update-firmware/ -- Bla -- I'm not responsible for any losses, damages, zombie apocalypses or other liabilities which could happen while using this part.
With this file you will be able to print Cheap Hall effect sensor endstop with your 3D printer. Click on the button and save the file on your computer to work, edit or customize your design. You can also find more 3D designs for printers on Cheap Hall effect sensor endstop.