Cheesebox Pico midi controller (Hackspace magazine #48)
prusaprinters
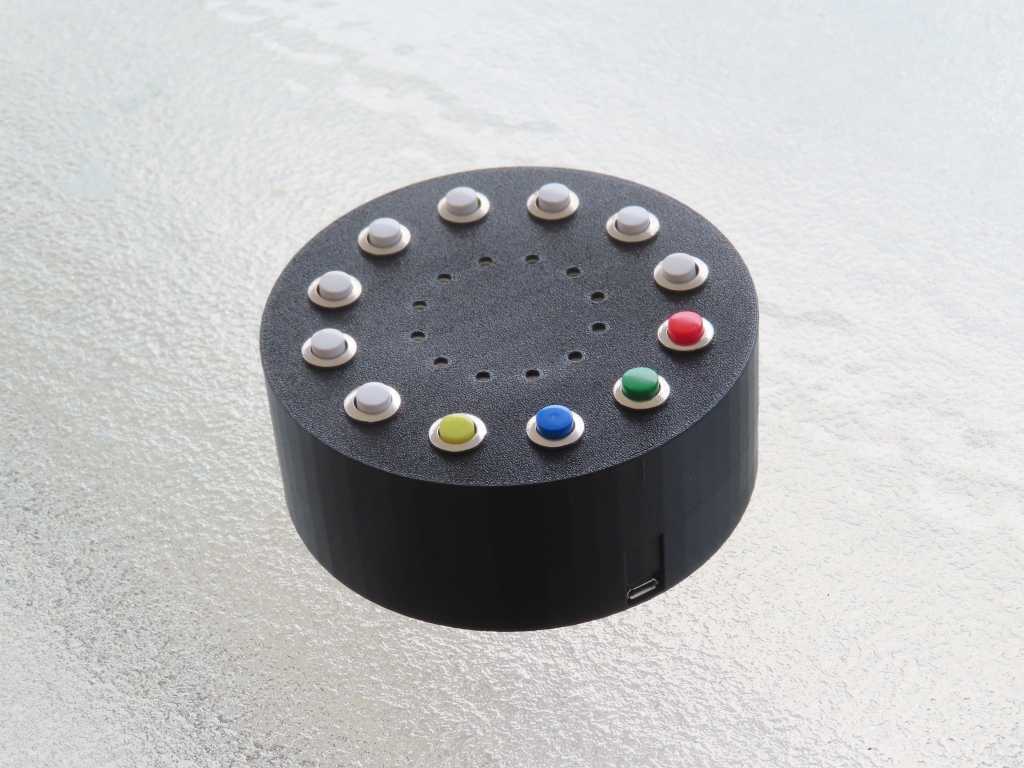
<p>Hackspace magazine published a project in issue 48, using a round cheesebox to house a MIDI controller driven by a Pico microcontroller. Although the article mentioned a printable cheesebox, the link to Github included only a box for the little Pico and not for the whole project.<br/><a href="https://github.com/CrazyRobMiles/PICO-MIDI-Cheesebox/tree/main/case">https://github.com/CrazyRobMiles/PICO-MIDI-Cheesebox/tree/main/case</a><br/><a href="https://hackspace.raspberrypi.com/issues/48">https://hackspace.raspberrypi.com/issues/48</a></p><p>This Thing is my first attempt at anything using OpenSCAD, and the result works for me! The scad and stl files are for my own project, but they will probably need customising to fit your own components.<br/>The box is in two parts - the files called 'cheesebox' print the top, which houses the 12 push-buttons, and a 12-piece neopixel ring. The project author's print (pictured in the magazine) appears to have been done in white plastic so it's possible to see the LEDs through the print. I'd only got black PLA lying around so I've provided small holes through which to see the LEDs.<br/>The files called 'cheesebottom' print the bottom part, which houses only the Pico, and provides access to its micro-USB socket.<br/>All the parameters are named in OpenSCAD so it should be simple to alter the sizes to suit your own neopixel ring, push buttons, and so on. The overall diameter of the box is also easy to change (you'll need to make the "liddiam" parameters the same in both files). You can simply choose whether to include posts on which to mount the neopixel ring and the Pico, and whether to have view holes for the LEDs - just comment out the lines of code that I've indicated in the scad files.<br/>Unfortunately OpenSCAD doesn't always preview the box bottom correctly - but that is only an issue with the program's graphics generation. The actual model renders properly and the output stl file works as it should.<br/>I chose to print with visible sides - 64. That enables the two sections to fit together and resist rotary movement, reducing the risk of the wires being twisted, pulled and breaking.</p><h3>Print Settings</h3><p><strong>Printer Brand:</strong></p><p>Prusa</p><p> </p><p><strong>Printer: </strong></p><p>I3 MK3S</p><p><strong>Rafts:</strong></p><p> </p><p>No</p><p> </p><p><strong>Supports: </strong></p><p>No</p><p><br/><strong>Filament:</strong><br/>PLA (I used eSun PLA+)</p><p><strong>First - get the components</strong></p><p>I tried and failed to design this cheesebox in Tinkercad so decided to try OpenSCAD. To get the final design I needed to measure all the pushbutton switches, the neopixel ring, and the Pico. My pushbuttons needed 10mm clearance holes - yours may differ. I opted to name all the parameters in something like plain words so they'd be easy to find and change.</p><p> </p><p> </p><p>Category: Electronics</p>
With this file you will be able to print Cheesebox Pico midi controller (Hackspace magazine #48) with your 3D printer. Click on the button and save the file on your computer to work, edit or customize your design. You can also find more 3D designs for printers on Cheesebox Pico midi controller (Hackspace magazine #48).