Chitauri Scepter (Loki's Short Staff) - Mk 2
thingiverse
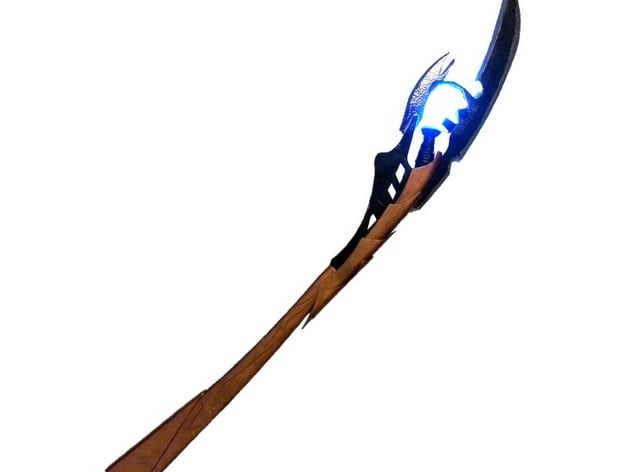
Loki's Chitauri Scepter from The Avengers (2012) This a replica of the short staff Loki used to mind control Hawkeye and several others, and escape from the S.H.I.E.L.D. compound. This item is approximately 96 cm long (36 in). This version is redesigned to increase the ease of building and strength of the joints. It also uses an Arduino Pro Mini with an Addressable RGB strip to animate the crystal and give this item more power. Notice: This device will not grant you the ability to fire energy blasts or take over the minds of your enemies. Such upgrades are welcome as derivatives. ** I initially designed the Scepter when cosplaying as Loki for the Avengers movie release. I decided that every villain needs a weapon and my 3D printer (Replicator Dual, MKI) needed to start earning its keep. It went well but eventually the lights burned out. I decided to do better. I designed the scepter in SketchUp by taking a side on picture of the Scepter from the movie previews and tracing it. I added what detail I could eck out of the relatively grainy footage. From there, I started until I had a solid block model. I keep all my designs saved in git repositories so that I can back up to any point I have saved and adjust the design from there on. That is what I did with this version of the scepter. My first scepter used a modified light bulb, a 9v battery, and some blue ant farm gel to make the illuminated crystal. This time, I wanted to do better. I decided that I wanted to try out RGB LEDs and arduino technology inside of a piece for the first time. I browsed through SparkFun's website for hours reading up on LEDs, arduinos, batteries, everything. Eventually, I settled on using an arduino pro mini, a dip switch, and an RGB LED strip. I went back to the 3D model to design in hollow spaces and access points for the electronics. It took me hours and several prints to get the final spacing right for the components. I hadn't learned the joy of rechargeable batteries yet, so this piece had four AA batteries jammed into the body. That was one of the most difficult design parts. Making the body hold all the batteries in a hidden but accessible compartment. I printed nearly 15 different structures before I finally had something that worked. ** Video: https://www.youtube.com/watch?v=PCbkO0hRC_I If you want to view the full model in 3D space, check it out on Fusion 360. This model can be rotated around and exploded as needed. Lastly, want to upgrade your Loki costume to the Ragnarok era? Check out this helmet by Crixos. Instructions Print Assemble (not the heroes) ??? Take over the world I printed the staff with ABS, 2 shells, 0.2 layer height, and 10% infill. Some pieces do require support. Included is the staff sliced to fit a Makerbot Replicator in .stl files (may not be oriented for minimal support). If you need to slice it differently, I've also included the .skp file with the original designs in it. If you do not own a 3d printer, the design files should allow you to make your own scepter out of wood or other carvable material. Much of the process after cutting out the segments will be the same. The software I'm using to run the sceptor is available at via the online Arduino Editor here Parts LED RGB Strip - Addressable, Bare (1m) OR LED RGB Strip - Addressable, Sealed (1m) Arduino Pro Mini 328 - 5V/16MHz 2 X AAA Holder DIP Switch Toggle Switch wire, multiple strands, 1m approx (4 strand phone line cable works great) 3D Printed Staff Electronics If you have a bit of skill at electronics/code, the comments in Loki_Ravestick.ino (see the arduino sketch in the instructions) should help you figure out the basic wiring I used. The LED strip should be connected to ground and +5v at the arduino. From the arduino, the data line of the LED strip should connect to pin 12. For the DIP switch, one pin of each switch should be connected to arduino pins 2 through 9. The other pin should be connected to ground and +5v as is standard for buttons on the arduino (see this for a guide) The wires for the LED strip should be about 1m in length, long enough to run up the length of the staff. Assembly Join the A sides of the Haft together. Join the B sides of the Haft together. Wire up the electronics and place everything but the unattached LED strip in position. ** Do not do final connections of the LED strip to the length of wire running down the Haft. This is done at a later stage. Join the A & B sides of the Haft together. Join the rest of the A & B sides together with the exception of the Gem. Join all the pieces of the large blade. Join all the pieces of the small blade. Optional paint everything individually Run the wire through the the Codpiece. Connect LED strip to wire. Arrange LED strip inside of Gem and join halves of Gem. Attach Gem to Codpiece to the Haft. Attach Blades to Haft. Attach Neck pieces to Haft and Large Blade. Affix magnets to Haft Cover and Haft. Place Haft Cover on Haft. The magnets allow for easy removal to adjust LED modes and replace the batteries.
With this file you will be able to print Chitauri Scepter (Loki's Short Staff) - Mk 2 with your 3D printer. Click on the button and save the file on your computer to work, edit or customize your design. You can also find more 3D designs for printers on Chitauri Scepter (Loki's Short Staff) - Mk 2.