Christmas Ornament - 2013 - 3D Printer
thingiverse
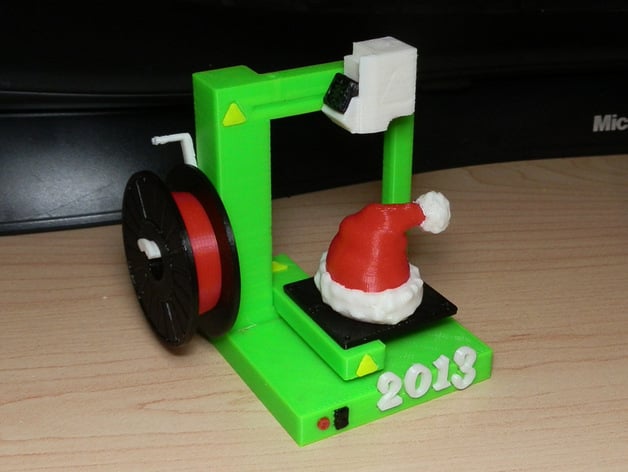
This is the first of what I hope to be many annual Christmas Tree Ornaments I design and print on my 3D printer. This depicts an Afinia H479 (or Up!) printer, having just completed a Santa Hat. UPDATED December 13, 2014 - I was asked if I could remove the date, which makes total sense, so I did. The file Printer_NO_DATE_Green.stl is the printer without the dents to insert the date. (This was originally designed as a 2013 Christmas ornament, so the file with the date indentations is still available, but for those who just want to print an Afinia printer, this is the file for you.) Instructions This is a 1/4 scale model of an Afinia H-479 printer with some of the pertinent detail in place. (There are no ports on the back, and no body screws.) Print the pieces in the orientation of the files (or don't. That's up to you, it should print fairly well anyway) and glue them however youlike. I used Krazy glue on this one which seems quite sturdy. There is a hole at the top left for a screw eye (or I found a small cotter pin works better, cut down to about .8cm in length and Krazy-glued in place) which will allow you to hang it on a tree using string, ribbon or a wire ornament hanger. First, glue the Z-Axis motor to the Z-Axis arm (underneath in back.) Then glue the groove under the Z-Axis arm to the printer body where the lower ridges meet the main Y-Axis arm. Glue the bed heater to the underneath of the plate Glue the plate to the Z-Axis arm Glue the LED into the small hole at front left Glue the Initialize switch to the rectangular hole next to it Glue the three warning labels into the triangluar shaped grooves Glue the spool holder to the Y-Axis arm side Place the filmanet onto one of the central cylinders of the spool parts, then glue the two spool parts together. If this is intended as a standing prop, you can feel free to leave the spool loose. However as a tree decoration it is better glued to the spool holder. Glue the tassle to the hat, the hat to the fringe, and glue the fringe down to the print plate (again, if this is intended as a standing prop or toy, you don't have to glue the hat to the bed.) Glue the numerals in place Hang your ornament. (Or place it on your GI Joe's desk, or your American Girl's workbench, or Barbie's table, or do what you like with it. Except don't sell it. If you wish to market it, I wanna cut! :-)
With this file you will be able to print Christmas Ornament - 2013 - 3D Printer with your 3D printer. Click on the button and save the file on your computer to work, edit or customize your design. You can also find more 3D designs for printers on Christmas Ornament - 2013 - 3D Printer.