Christmas Pudding Tree Decoration
thingiverse
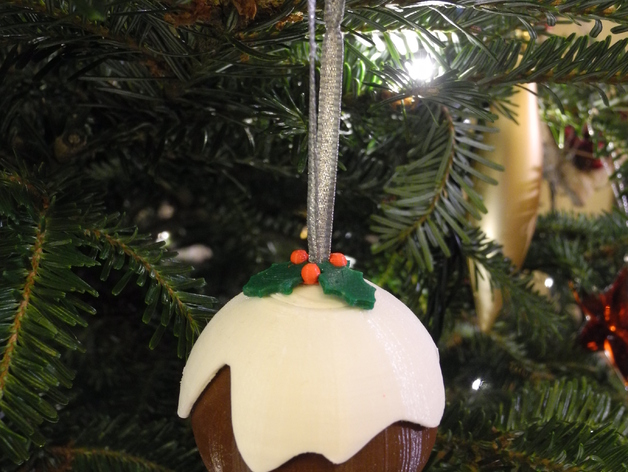
This thing has moved to Youmagine: https://www.youmagine.com/designs/christmas-pudding-tree-decoration A 3D printed Christmas pudding tree decoration. A friend asked if I could make a Christmas tree decoration with my 3D printer, and this is what I came up with. I ended up making a dozen of these because so many people wanted one once they heard about it. We got some 65x65x65mm gift boxes and some tissue paper so we could make them into gifts. Instructions This thing has moved to Youmagine: https://www.youmagine.com/designs/christmas-pudding-tree-decoration To make this thing, print: 1 x "main" icing 1 x "top" icing 1 x Pudding 1 x Berries 3 x Leaf The berries and leaves on the top of the pudding are optional, but they help hide a join between two parts, so make the thing look a lot more professional, and honestly, without them it looks a bit unfinished. Clean up all parts with a craft knife to get rid of any strings or lumps. You may also want to use a bit of sandpaper on the wavy edge of the main icing part so that it looks smoother when it's set against the dark colour of the pudding. The two icing parts glue together. I used a few tiny drops of super glue for this. Try to get the top aligned as well as possible on the main icing so that the join doesn't show too much. Next, preprepare the berries and leaves. The leaves print with a flat bottom and a slightly curved top. They also have a slight recess in the "fat" end of the leaf. The berries are quite small and are printed on a thin ring. This is quite fragile, but also slightly bendy. The trick is to glue the leaves onto the ring (top side downwards) so that the recess is over the ring. The idea is that the leaves will lay on to the icing (and can be glued in place if desired). I found that a tiny amount of super glue applied to the the berries ring was just enough to get the leaf to stick to it without "glooping" out and sticking to anything else. I was then able to get the angle of the leaves just right by laying them on top of the icing until the glue had stuck. It's all a bit fiddly, so take your time! Once done though, the berries and leaves should form a reasonably solid structure with a small hole in the middle for the string to go through. Next, take a piece of decorative string or narrow ribbon. Tie the ends together to make a loop and hook the loop around the arrow shape in the flat part of the pudding (with the knot inside the pudding). You may want to put another knot in the string just above the arrow shaped hook to ensure the string doesn't come off the hook later on. The icing has a small hole in the top. This was enough for me to thread a thin ribbon by pushing it through the hole with a strightend-out paper clip. However, if the hole is too small, then open it out with a craft knife or gently with a drill. Thread the string that's attached to the pudding through the underside of the icing so that the two parts interlock nicely. There's no need to do so, but you may want to glue the two parts together at this point (personally, I didn't do this as it's fun to show people how it's constructed). Lastly, carefully thread the berries/leaves assembly onto the string and push it down so that it sits directly on the icing. Be gentle so that you don't accidentally break any of the the leaves off the berries though. Congratulations! You just made a christmas pudding on your 3D printer! I'd recommend printing the two icing parts, the berries and the leaves in as high quality as you can manage. On my machine the icing parts took about 90 minutes to print in high quality; the berries and leaves just take a few minutes each. The pudding part takes about an hour in normal quality, although I tend to use Cura's "skin" option to make it look it's higher quality. You could use high quality for it too, but it'll take over two hours to print (and doesn't actually improve it all that much). I'd also recommend starting with the lightest colour fillament and working towards the darkest - since quite a few colour changes are required, avoiding having a dark patch in your white icing is rather a good idea! The pudding part is hollow, so don't worry about infill settings too much (true for all parts - something like 15 - 30% infill is plenty). I used PLA for all parts. I've included the Sketchup source files in case anyone wants to make any derivatives. It's possible you could scale up the berries and leaves to make them a bit less fiddly (it might even be possible to do this directly with the STL files - I'm not sure).
With this file you will be able to print Christmas Pudding Tree Decoration with your 3D printer. Click on the button and save the file on your computer to work, edit or customize your design. You can also find more 3D designs for printers on Christmas Pudding Tree Decoration.