Christmas tree Lamp
prusaprinters
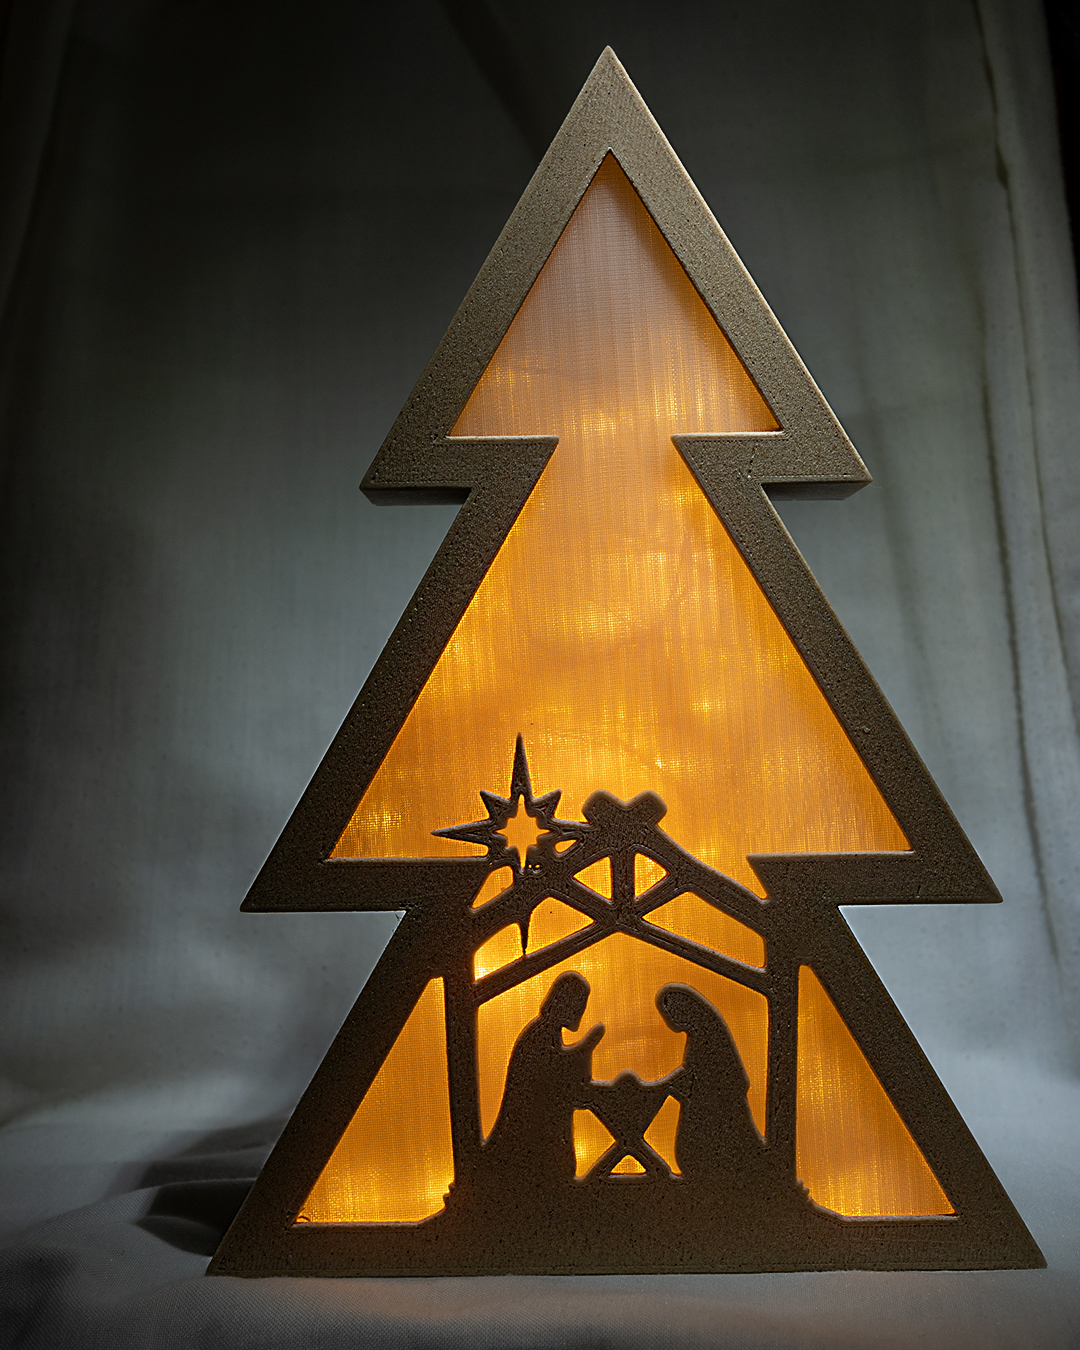
<h3><strong>Christmas tree Lamp.</strong></h3><p>The "<strong>Christmas tree Lamp</strong>" is designed as a decorative element for these holidays, giving warmth to the room.</p><p>The print is made up of 3 elements designed to be printed horizontally and diagonally to fit on the bed.</p><ul><li>The Main Body with the silhouette of the "Manger" touching the bed.</li><li>The front cover with either side touching the bed.</li><li>The Back Cover with the stepped part touching the bed and with supports only on the base without raft.</li></ul><p>The printing rules that I used are:</p><ul><li>Main body Pla-Wood material.<ul><li>Layer height 0.3mm.</li><li>Perimeters 3.</li><li>Fill density 10% Gyroid.</li><li>Without supports</li><li>Speed 35mm / s.</li></ul></li><li>Front cover material Pla850-Natural.<ul><li>Layer height 0.3mm.</li><li>Perimeters 2.</li><li>Solid layers top 2 bottom 3.</li><li>Fill density 50% Archimedean chords.</li><li>Without supports.</li><li>Speed 50mm / s.</li></ul></li><li>Back cover Pla-Recycled material<ul><li>Layer height 0.3mm.</li><li>Perimeters 2.</li><li>Solid layers Top 2 bottom 3.</li><li>Fill density 10% Archimedean chords.</li><li>With support material on the base only.</li><li>Contact Z distance (supports) 0.25mm.</li><li>Speed 40mm / s</li></ul></li></ul><p>The printing times of each module:</p><ul><li>Main body 5h11m.</li><li>Front cover 1h41m.</li><li>Rear cover 2h39m.</li></ul><p>For the lighting I used a 10m wire with 100 LEDs powered by 3 AA batteries.</p><p>To close the back cover, use three screws like those used to hold an SSD or HD disk inside the PC.</p><p>The assembly is simple, the front cover is inserted inside the main body until it touches the silhouette of the crib and is anchored by the tabs of the main body. Then we fill the cavity with the well distributed LED wire and close with the back cover putting the three small screws.</p><p>In the lower part of the back cover is the hole so that the battery compartment is outside and you can stick it with double-sided tape to the cover.</p><h3><strong>Christmas tree Lamp.</strong></h3><p>La “<strong>Christmas tree Lamp</strong>” esta pensado como elemento decorativo para estas fiestas, dando calidez a la estancia.</p><p>La impresión se compone de 3 elementos diseñados para ser impresos en horizontal y en diagonal para que quepan en la cama.</p><ul><li>El Cuerpo Principal con la silueta del “Pesebre” tocando la cama.</li><li>La Tapa frontal con cualquiera de sus caras tocando la cama.</li><li>La Tapa Trasera con la parte escalonada tocando la cama y con soportes solo en la base sin balsa.</li></ul><p>Las reglas de impresión que e utilizado son:</p><ul><li>Cuerpo Principal material Pla-Wood.<ul><li>Altura de capa 0,3mm.</li><li>Perímetros 3.</li><li>Densidad de relleno 10% Giroide.</li><li>Sin soportes</li><li>Velocidad 35mm/s.</li></ul></li><li>Tapa Frontal material Pla850-Natural.<ul><li>Altura de capa 0,3mm.</li><li>Perímetros 2.</li><li>Capas solidas superior 2 inferior 3.</li><li>Densidad de relleno 50% Acordes de Arquímedes.</li><li>Sin soportes.</li><li>Velocidad 50mm/s.</li></ul></li><li>Tapa Trasera material Pla-Recicled<ul><li>Altura de capa 0,3mm.</li><li>Perímetros 2.</li><li>Capas solidas Superior 2 inferior 3.</li><li>Densidad de relleno 10% acordes de Arquímedes.</li><li>Con material de soporte en la base solamente.</li><li>Distancia Z de contacto (soportes) 0,25mm.</li><li>Velocidad 40mm/s</li></ul></li></ul><p><br>Los tiempos de impresión de cada modulo:</p><ul><li>Cuerpo principal 5h11m.</li><li>Tapa frontal 1h41m.</li><li>Tapa trasera 2h39m.</li></ul><p>Para la iluminación e usado un alambre de 10m con 100 LEDs alimentado por 3 pilas AA.</p><p>Para cerrar la tapa trasera usa tres tornillos como los que se usan para sujetar un disco SSD o HD al interior del PC.</p><p>El montaje es sencillo se introduce la tapa frontal dentro del cuerpo principal hasta que esta toque con la silueta del pesebre quedara anclada por las pestañas del cuerpo principal. Luego llenamos la cavidad con el alambre de LED bien repartido y cerramos con la tapa trasera poniendo los tres tornillos pequeños.</p><p>En la parte baja de la tapa trasera esta el agujero para que el compartimiento de las pilas quede fuera y lo puedas pegar con cinta de doble cara a la tapa.</p>
With this file you will be able to print Christmas tree Lamp with your 3D printer. Click on the button and save the file on your computer to work, edit or customize your design. You can also find more 3D designs for printers on Christmas tree Lamp.