Cintiq 13 HD VESA adapter
thingiverse
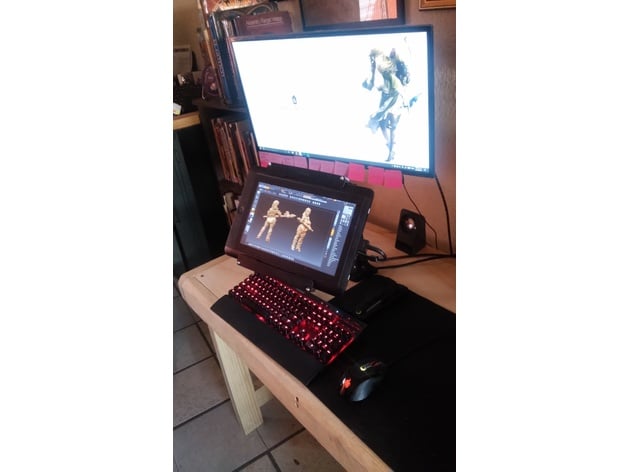
I bought a mounting arm for my Cintiq 13 HD. As any owner of that tablet knows, the device does not include a VESA mount behind, making it impossible for it to be strapped to a monitor mount, ergotron/some other brand's arm, or a support of any sort that uses the VESA standard. I figured there was an easy, cheap way to do this safely, and I'm sharing it so others can do it as well. The tablet is held from top and bottom, and when correctly assembled: No hardware actually touches the tablet. You won't damage it. I've stress-tested it to and fro and it works like a charm. ¡Enjoy! Disclaimer: READ THE INSTRUCTIONS. If you like the projects on my Thingiverse, consider giving a tip. Not only I will appreciate it immensely, I promise to put it to good use. Thanks for your consideration! Instructions MATERIALS: I used 3 mm MDF. Acrylic can work, but I liked the fact that MDF has some more give and is cheaper. I spray-painted it before the laser-cutting. CUTTING: Cut at your laser cutter of choice. Gather the pieces. An important note: The "brackets" that repeat several times to produce thickness do have a right side up. make sure that the bolts enter without much hassle. HARDWARE FOR ASSEMBLY: You're going to need some extra hardware for this. It's very cheap though. -Washers (I used neoprene and steel washers for a better grip) -Wing Nuts or just nuts to strap it on the back. -IMPORTANT: Adhesive rubber stoppers. These separate the cut hardware from the tablet and protect it from wear and tear. I used steel caps for aesthetics, but it sure is not a requirement. ASSEMBLY: First, Add bolts and washers to the largest part. the Engraved side goes towards you. Paste rubber stoppers at all corners, and at equal distances. You want the rubber stoppers to be TALLER than the bolts that'll strap this to the Vesa mount. I used Flat head screws to make this easier. Put the tablet over this. Make sure it fits snugly. Take the TOP bracket (With the Märchen logo) and orient it. You'll need to paste more rubber stoppers at the lower corners, and at least at two places in-between. Make sure that the stoppers are near the lower border. Do the same for the lower bracket. Find out how many separators (remember: they have a right side up) you'll need. Test-assemble the entire setup and find out how many you need. The Rubber stoppers might change how many you need, but my setup uses 4 per side. Assemble and make sure everything is snug, but not too tight. use wing nuts to secure everything in place. Mount your tablet on the VESA mount or arm. Use wing nuts to tighten. Give it a whirl and make sure the tablet does not fall. TRY to separate it to make sure all works. -ENJOY! and send me a picture. ADAPTING: You can use this with other devices! Just adapt and re-measure, the principle works the same way.
With this file you will be able to print Cintiq 13 HD VESA adapter with your 3D printer. Click on the button and save the file on your computer to work, edit or customize your design. You can also find more 3D designs for printers on Cintiq 13 HD VESA adapter.