Circuit Maze Project
thingiverse
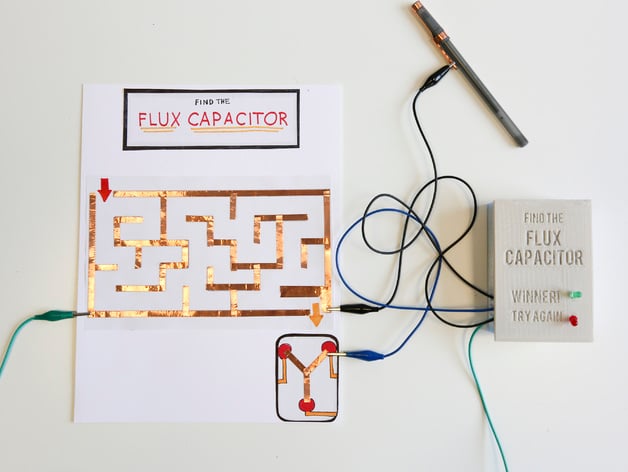
Human: Electrical engineers work on various devices that carry electricity. They design many things you use daily, like computers and cell phones. For this activity, students become electrical engineers to learn about open and closed circuits by designing a Circuit Maze with simple materials. Print Settings: Printer Brand: MakerBot Printer: MakerBot Replicator (5th Generation) Rafts: Yes Supports: No Resolution: 0.2 mm Infill: 10% How I Designed This I designed the 3D printed parts in Tinkercad, but other programs should also work well for this activity. You can find examples of 3D modeling programs included in the Thing Files. Design Your Own Maze Ask students to design their own 3D Printed Circuit Enclosure - see a sample below. Overview and Background The goal is for students to design a maze out of conductive material that you can navigate with a conductive object. The objective is not to touch the material as you pass it through the navigator. If you do, a light or sound should signal that the circuit has been closed. The bulk of the circuit should be housed within a 3D printed custom circuit enclosure. Objectives Students should understand: Basic circuit design Creating a proper circuit diagram Designing and building a custom enclosure using 3D printing Skills Learned (Standards) High School HS-PS3-3: Design, build, and refine a device that works within given constraints to convert one form of energy into another. Middle School MS-ETS1-1: Define the criteria and constraints of a design problem with sufficient precision to ensure a successful solution, taking into account relevant scientific principles and potential impacts on people and the natural environment that may limit possible solutions. MS-ETS1-2: Evaluate competing design solutions using a systematic process to determine how well they meet the criteria and constraints of the problem. MS-ETS1-3: Analyze data from tests to determine similarities and differences among several design solutions to identify the best characteristics of each that can be combined into a new solution to better meet the criteria for success. MS-ETS1-4: Develop a final product or system that meets the criteria and constraints of the problem. Materials Needed Conductive “Maze Material” - Ex) Non-insulated wire, metal hanger, tin foil, copper tape Conductive “Maze Navigator” Ex) Paperclip, nail, tin foil-wrapped pen Base Material: Ex) Cardboard box, foam board, Wire – for creating circuit Use wires with alligator clips (or a breadboard) to avoid the need for soldering Light or Buzzer – for signaling when the circuit is complete: Ex) LED, simple buzzer, etc. Battery CAUTION!! - Teacher should double check circuit design BEFORE connecting battery or power supply 3D Printed Circuit Enclosure - a custom enclosure built to house the main parts of the circuit design. More instructions on this below. Rubric and Assessment Grading Rubric attached in the Thing Files, along with Student Handout. References https://www.tinkercad.com/ https://circuits.io/ Sample Circuit Maze Design
With this file you will be able to print Circuit Maze Project with your 3D printer. Click on the button and save the file on your computer to work, edit or customize your design. You can also find more 3D designs for printers on Circuit Maze Project.