Clark-y wing test section (similar to 3dlabprint)
thingiverse
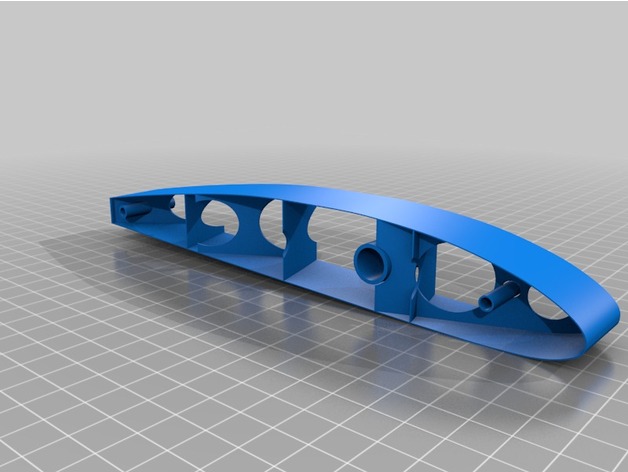
NEW Complete Wing: A Simplified Approach http://www.thingiverse.com/thing:2022750 This innovative design is inspired by the concepts of 3DLabPrint, with the goal of creating a wing for an "ugly" stick aircraft that will be primarily 3D printed. The fuselage is designed and ready to be shared once test prints are completed. The unique wing printing method involves setting Slic3r to print at 100% infill, one perimeter, no top or bottom layers, and no supports. This approach has proven effective with a .35mm tip on my Prusa I3 using PLA. While the complete wing panel has not been printed yet, the design files are available for download. The included files cover a 175mm wide panel with a 200mm chord and a 35mm aileron. Software Used: * 123D Design * Inkscape The design process is straightforward but requires patience and attention to detail. It's essential to save frequently, especially at major stages, to avoid frustration. Design Overview: I began by creating two 200mm x 500mm grids in 123D Design, spaced 25mm apart. I then laid out a 2D drawing of straight ribs on one grid at a 30-degree angle and the other at a 70-degree angle. Using these lines, I created a 3-point curve for each line and removed the straight lines. Next, I built each rib individually using the extrude tool to create the space between two ribs, then modifying that area by pulling it 1mm to the right. This process was repeated for each rib on both grids, resulting in a series of 0.6mm ribs. The next step is to obtain a template of the airfoil you intend to use. I utilized AirfoilTools (http://airfoiltools.com/plotter/index) to generate the Clark-Y airfoil. On AirfoilTools, select clarkyh-il ClarkY from the drop-down list and adjust the chord length to 200mm + 35 for the aileron. After obtaining the airfoil template, clean it up in Inkscape or directly within 123D Design. Mark out the aileron, spar location, lightening holes, and any additional pin locations. I also added a 10-20mm frame around the entire airfoil. With the prepared airfoil drawing, align it with the wing ribs about 25mm away and extrude it once toward the ribs to create holes and once away from the ribs to form the structure. Split the extrusions, expand the outer perimeter of the farthest extrusion by 0.35mm (which will become the skin), and re-extrude through it. Next, select the 2D frame outline and extrude it across the entire rib set, cutting away everything that isn't a rib or wing structure. Use the closest extrusion (the holes) to extrude it through the ribs. This should result in a complete rib set shaped with holes through it. Finally, extrude the skin and structures using the face closest to the ribs, and pull it through the ribs to create a wing complete with ribs, skin, and other structures. The ailerons can be extruded later using the same process. The last steps involve trimming the wing to the proper length and combining the layers into one 3D object. Export, slice, print, build, and hopefully fly! I have included some of the 123D Design files and will attempt to create a video or more comprehensive set of instructions in the future.
With this file you will be able to print Clark-y wing test section (similar to 3dlabprint) with your 3D printer. Click on the button and save the file on your computer to work, edit or customize your design. You can also find more 3D designs for printers on Clark-y wing test section (similar to 3dlabprint).