Climate Sensor and Display
thingiverse
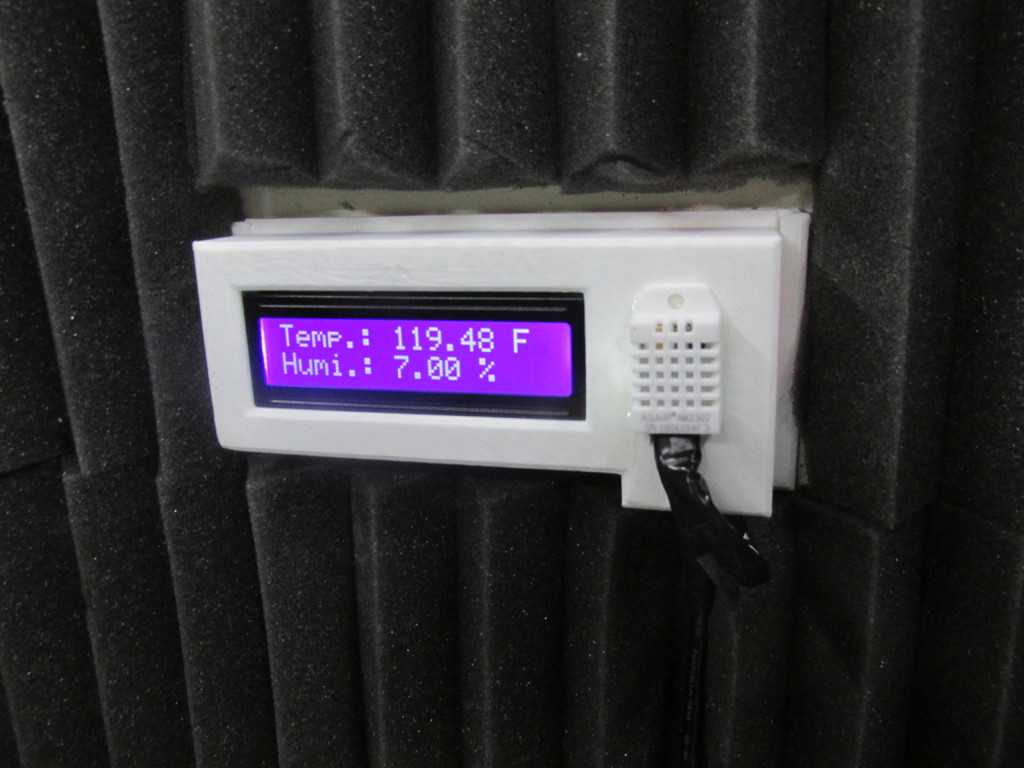
I wanted to create a Temperature and Humidity sensor just so I could monitor the ambient temperature when I do prints. I specifically made a separate front and back so it can easily be removed from the wall. This is really useful when I decide to let the ambient temperature rise before I start my print, just to ensure I get the best quality I can get. I provided the diagrams for the circuits, as well as some pictures. Hopefully, it should be pretty straightforward. I decided to use an epoxy to glue the temp/humidity sensor to the front of the enclosure, although I realize not everyone would want to do that. So I included models that have a hole that allows you to fasten the sensor to the front of housing. I also included a back plate with mounting screws as well. I glued this to the wall of my enclosure, but again, I realize not everyone would want to do the same. Bill of Materials/Instructions: 1x Arduino Nano Pretty self-explanatory. I included the program I used in the file. Feel free to change it however you want. I decided to power this device using the USB mini-b, which I plugged into a surge protector that had usb slots. I ordered a bunch of these at once for my projects. https://www.banggood.com/ATmega328P-Nano-V3-Controller-Board-Compatible-Arduino-p-940937.html?rmmds=buy 1x 16x2 LCD The one I used is linked below. If you wanna use one with different dimensions, feel free to alter the model. https://www.banggood.com/1Pc-1602-Character-LCD-Display-Module-Blue-Backlight-p-978160.html?rmmds=search&cur_warehouse=CN 1x DHT22 There are a lot of different sensors, and you're welcome to choose any of them. I just can't promise they will work flawlessly with the system. I specifically used the DHT22. I broke the pins off one because I messed up the solder a few times, so I ordered extra just incase. https://www.banggood.com/5Pcs-DHT22AM2302-Digital-Temperature-Humidity-Sensor-Replace-SHT15-Logger-p-1044847.html?rmmds=search&cur_warehouse=CN Heat shrink tubing or electrical tape is also a must. Once the wires are all soldered together, you're going to have to prevent them from touching, so I just put some tubing and/or some tape around the joints. 1x Power device and switch: There's a bit of leeway here. I chose to use the usb to mini-b cable to power it. If you want to leave it on all the time, then you can stop there. However, if you'd like to be able to turn the arduino and lcd off, then you're going to need a switch. I used one from the link below. https://www.amazon.com/gp/product/B01N2U8PK0/ref=ppx_yo_dt_b_asin_title_o03_s00?ie=UTF8&psc=1 Now to connect the switch, you're going to have to cut the usb cable. If you can get the outer coating off without damaging the inner wires, then more power to you. Or you can just cut it in half, in which case you're gonna have to do some repair soldering. All the wires can remain connected except the red one. Once the red wire was cut, I added some of my own wire to give a bit more length, and soldered both ends to the switch. I also printed my own housing for the switch (as well as another switch for my LED lights) Final Tips: Solder the wires to the LCD and sensor first. Make sure you leave enough wire length so that it's not hard, but not too much so that you're jamming all the wires in. Make sure the solders aren't weak. I had a lot of problems and had to redo them a few times because the LCD kept acting up. Sidenote, if the wiring on the LCD doesn't work, feel free to comment and let me know, and I'll help you out. I've had experiences with LCD's acting up depending on whether or not the backlight has the right voltage. Hopefully everything goes well! I'm contemplating adding some climate control in the future possibly, although that's a strong maybe.. Feel free to leave comments and suggestions, I'd love to know ways that I could improve my design. Also if you're having trouble, I'm more than happy to help troubleshoot. If you're interested in the original solidworks files, just let me know. Thank you!
With this file you will be able to print Climate Sensor and Display with your 3D printer. Click on the button and save the file on your computer to work, edit or customize your design. You can also find more 3D designs for printers on Climate Sensor and Display.