Clipper Cage: Trap your friend's filament clippers inside filament
prusaprinters
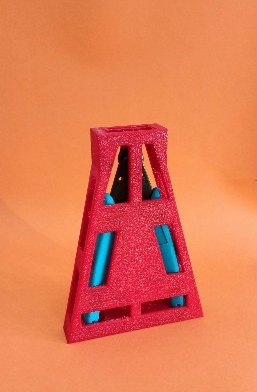
<p>(Skip to bolded text is you want a tl;dr)</p><p>So this design is just for jokes, I got the idea from a post I saw a long time ago. It was some guy giving his friend an angle grinder for Christmas but the angle grinder was inside of a steel cage, which means you need to buy an angle grinder to get the angle grinder inside. I decided to adapt that idea into 3d printing, we all have that filament clipper/plier that comes with the printer idk why but it's kinda gotten universal so i used that design as the template and created this in FreeCAD <img class="image_resized" style="width:94.4%;" src="https://media.printables.com/media/prints/165342/rich_content/f19b7ac2-8248-4f19-8d29-f2728900d1fb/screenshot-109.png#%7B%22uuid%22%3A%225e79dc7d-7b54-48e0-a044-fd67d34aa260%22%2C%22w%22%3A1920%2C%22h%22%3A1080%7D"></p><p>the bridging is weird so I extruded the outline and horizontal parts to fix it(so it's kinda like bridging on bridges). There's 14 mm of space for “clipper cage4 wire-Body” if you think you have a different type of clippers than mine, In the photos the print you see is actually “clipper cage3 wire-Body” version 4 actually has a higher clearance because I found that the hole was too shallow so i recommend version 4, if you also have that issue you can do what I did and remove the grips, you can put them on again after it's finished printing(via the holes in the bottom). And is you really wanna print this but have a different type of clipper then I've provided the .FCStd (freecad) files. <strong>In terms of printing you can use Cura or PrusaSlicer(I'm not sure if other slicers can do the same). You can follow the videos below and set the filament change to be on the layer before it starts bridging.</strong></p><figure class="media"><oembed url="https://youtu.be/QEYQesc8X2A"></oembed></figure><p>(Skip to 2:50 for highlight)</p><figure class="media"><oembed url="https://youtu.be/1nBnVtOEAiY"></oembed></figure><p>(Skip to 0:37 for highlight)</p><p><strong>After the print reaches the desired layer rather than putting in new filament(although you can) just press “heat nozzle” wait and keep pressing “purge” until you see the filament coming out, wait till the filament stops extruding(which might take a while) remove the extruded filament and press “resume” to resume printing.</strong></p><p>This should be enough info to print it yourself but if you have any questions</p><p>and excuse my trash 3d modeling if you're modifying it.</p><p>p.s if you really wanna traps your friend's clippers then make your nozzle temp higher during the filament change there's a visible seam that is a weak point, the high temp will help with that(for prusaslicer at least the “reprint last layer” setting in cura chuck used might help with it).</p>
With this file you will be able to print Clipper Cage: Trap your friend's filament clippers inside filament with your 3D printer. Click on the button and save the file on your computer to work, edit or customize your design. You can also find more 3D designs for printers on Clipper Cage: Trap your friend's filament clippers inside filament.