Clothes Drying Rack - Wäscheständer
prusaprinters
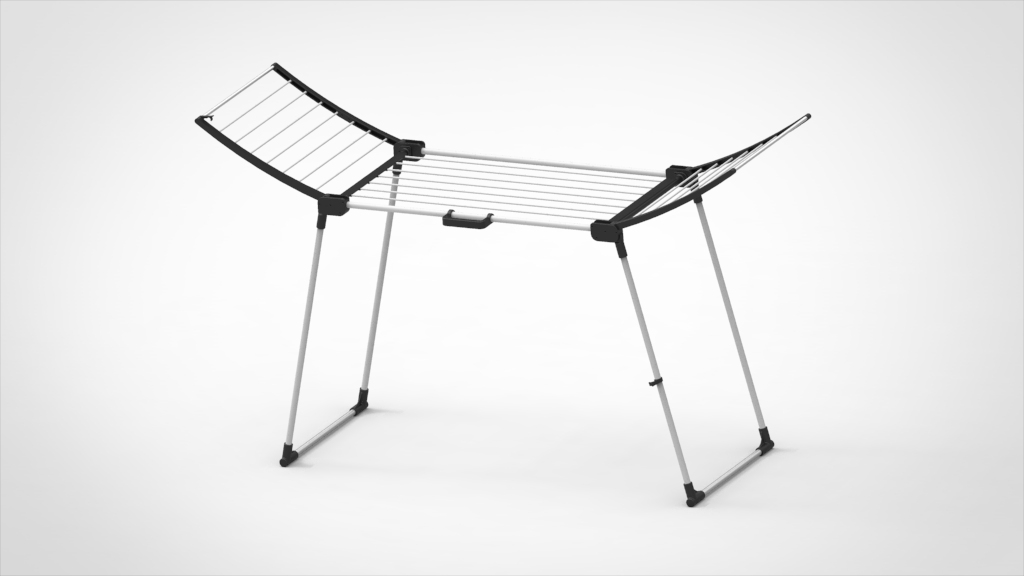
<p><strong>Purpose:</strong></p><p>We recently got a new surface for the balcony floor. This is resistant to everyday wear and tear, but we got warned that rust stains are not completely removable.<br>So a stainless clothes drying rack became necessary.<br>Most commercial ones just have powder-coated steel tubes which rust after some time.<br>Stainless models have not made a stable impression or even had deformed wires already at the time of purchase, as I could see after a check on the Internet.</p><p>That's why I decided to build an absolutely rust-free clothes drying rack myself with anodized aluminum tubes and printed parts.</p><p> </p><p><strong>Comments:</strong></p><p>Wing_1 is the only part which needs support (only if you want to have the same pattern from the print sheet on the outer surface for both wings, which is highly recommended). After removing the support, a slight reworking is required to ensure that the front of Wing_1 is colinear to the front of Wing_2. It's a bit tricky to place it right on the printer plate. It's very borderline on a Prusa i3MK3S. But if you print it without raft it fits.</p><p>The bores for the tubes are designed to have press-fit, but depending on manufacturing tolerances of the tubes and of course of the printed parts, a slight rework of the bores is necessary. In case of backlash you can live with it or glue the tubes.</p><p>Here a little helper for the rework of the tube bores: <a href="https://www.prusaprinters.org/de/prints/103557-sanding-tool">https://www.prusaprinters.org/de/prints/103557-sanding-tool</a></p><p>Plug the Load_Cube between Housing and Flange. It absorbs the shear forces. Letter “O” is the top side.</p><p>Melt the thread inserts into the blind holes of the handle.</p><p>Use a 1,5mm or 2mm drill bit to pre-drill holes for the countersunk screws. I recommend to pre-assemble the parts, mark the position, disassemble it and make the holes safe on a drill stand.</p><p>Please notice that after assembly of the flanges, the bores for the 6mm tubes are not exactly in horizontal line. They are in a small angle to ensure that the long tubes are slightly bended to be pre-tensioned.</p><p> </p><p><strong>Parts list:</strong></p><p>Parts to be printed:</p><ul><li>2x Foot_corner.stl</li><li>2x Foot_corner_mirrored.stl</li><li>4x Joint.stl</li><li>2x Housing.stl</li><li>2x Housing_mirrored</li><li>2x Cover.stl</li><li>2x Cover_mirrored</li><li>2x Flange.stl</li><li>2x Flange_mirrored</li><li>4x Load_Cube.stl</li><li>2x Wireholder.stl</li><li>2x Wireholder2.stl</li><li>2x Wing_1.stl</li><li>2x Wing_1_mirrored.stl</li><li>2x Wing_2.stl</li><li>2x Wing_2_mirrored.stl</li><li>1x Handle.stl</li><li>1x Handle_halfshell.stl</li><li>1x Clamp_Leg.stl</li><li>1x Clamp_Wing.stl</li></ul><p>Bought parts:</p><ul><li>14x Tube Aluminum anodized, ø6x1x545 mm (source: Alfer) → wings transversal</li><li>7x Tube Aluminum anodized, ø6x1x935 mm (source: Alfer) → wireholder longitudinal</li><li>2x Tube Aluminum anodized, ø12x1x546 mm (source: Alfer) → end of wing_2 transversal</li><li>8x Tube Aluminum anodized, ø12x1x31 mm (source: Alfer) → axis for wings and joints</li><li>2x Tube Aluminum anodized, ø16x1x477 mm (source: Alfer) → rack transversal</li><li>2x Tube Aluminum anodized, ø20x1x930 mm (source: Alfer) → rack longitudinal</li><li>4x Tube Aluminum anodized, ø20x1x835 mm (source: Alfer) → legs longitudinal</li><li>2x Tube Aluminum anodized, ø20x1x500 mm (source: Alfer) → legs transversal</li><li>52x Countersunk screw 3x16, Torx T10, WIROX corrosion protection (source: SPAX)</li><li>2x Hexagon socket head screw M3x16, stainless steel → handle</li><li>2x Hexagon nut M3, stainless steel → handle</li><li>2x thread insert M3, (source: ruthex) → handle</li></ul><p> </p><p><strong>Print settings:</strong></p><p>Material: PETG or ABS/ASA. My recommendation: <a href="https://www.prusa3d.com/de/produkt/prusament-petg-prusa-galaxy-black-1kg/">Prusa Galaxy Black PETG</a>. It looks perfect to the grey Aluminum and due to the star mica, the layers are invisible already on a small distance and the parts do not look like printed.</p><p>Print sheet: of course, any does it. But a structured PEI-sheet gives a perfect look for the outer surfaces.</p><p>Layer height: 0,2mm</p><p>Infill: 25%</p><p>Perimeters: 3</p><p>Brim: no</p><p>Support: no, only for Wing_1</p><p> </p><p><strong>Additional information:</strong></p><p>Required filament quantity: ~1250g</p><p>Total print time: ~138h</p><p>Full size: Length: 1865 mm, Width: 570 m, Height: 1121 mm </p><p>Collapsed size: Length: 1040 mm, Width: 608 mm, Height: 131 mm</p><p>Usable length for drying: 14,4 m plus the 2 long outer tubes if you want</p><p>Total weight: 2927g</p><p> </p><p><strong>Update from 2021-12-26:</strong></p><ul><li>Link to the sanding tool added</li></ul>
With this file you will be able to print Clothes Drying Rack - Wäscheständer with your 3D printer. Click on the button and save the file on your computer to work, edit or customize your design. You can also find more 3D designs for printers on Clothes Drying Rack - Wäscheständer.