Cloudray K40 Laser Head Mount
thingiverse
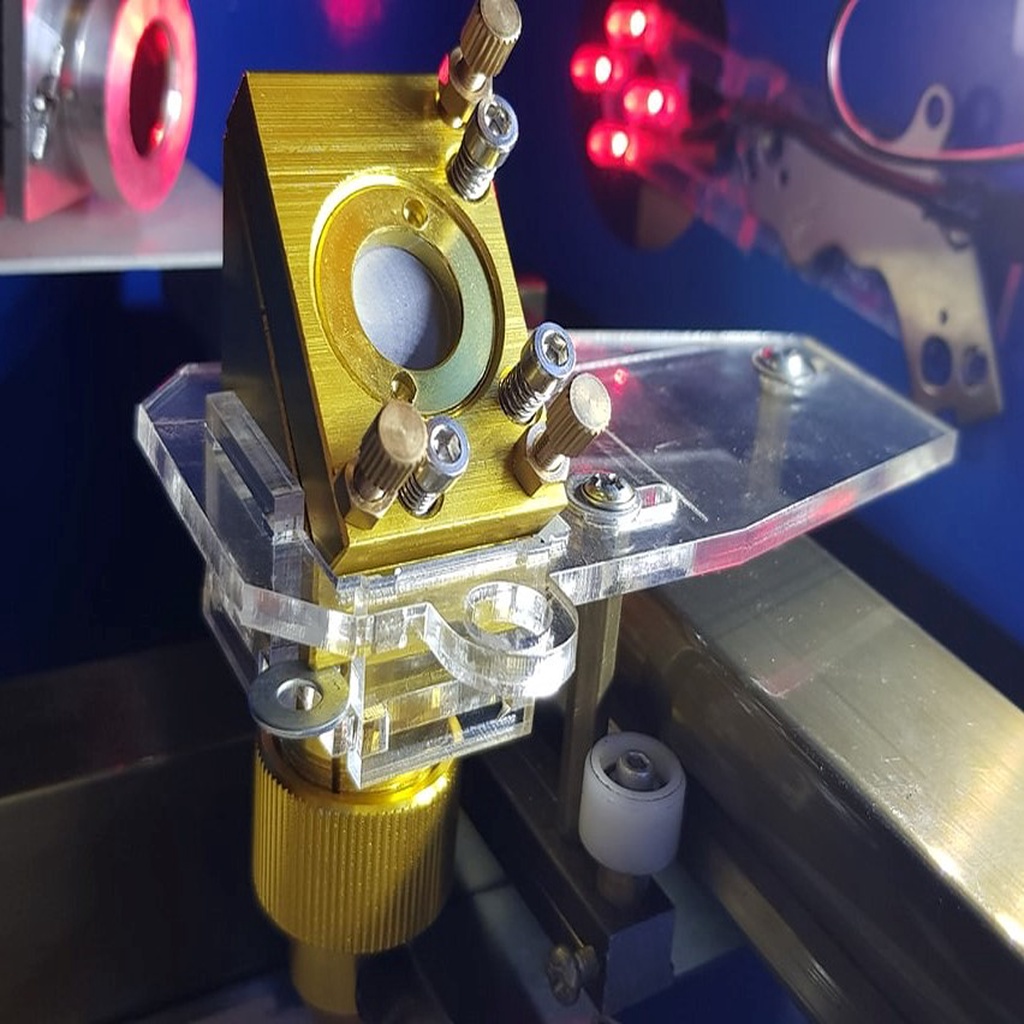
I bought a Cloudray head mount to replace the stock K40 head, which adds two features I wanted, air assist nozzle and adjustable focus. I knew it wasn't a drop-in replacement, and there are 3D printed designs (like https://www.thingiverse.com/thing:3386731) which you can print or buy to lower it by 8-9mm. But I don't have a 3D printer, and it made sense to me that there should be a laser-cut one! I couldn't find any, so I made it! I've been using my mount now through several projects and it's been just fine. The hardest part is aligning the beam through the small air hole, which is irrespective of mount. Warnings for the Cloudray head: * it is of course longer than the stock head, which means you can ram it into the right and front sides unless you keep designs to A4 size. This could damage the head and mount. * the air assist connection is at a right angle which makes the above problem worse * some sources recommend installing a rubber washer between the lens and the screw-in lens holder to stop air/smoke from dirtying the lens due to the venturi effect. * you'll have to experimentally determine the new optimum distance from nozzle to material - my targeting design helps somewhat: https://www.thingiverse.com/thing:4076480 The base plate which the head sits on is cut out of the main mount. It has 4 holes to screw the head into. The mount also has a guide for air assist tube but this was just an idea and I haven't made use of it yet - I need to install a drag cable first anyway. The "scaffold" file is what I use to align everything before using difference/intersection tools to create the final path to cut. ** Warning - read all of this before you remove the original head! ** Required: * screws that match the base of the head * some skill at laser cutter mirror alignment * you may also want to drill out the laser opening at the bottom to 4mm; 2mm is too hard to align. * you may need to measure your existing head mount screw positions and adjust them, as every machine is different, and I did mine twice and it still wasn't right. * suggested - some kind of alignment test design to run before and after. Assembly instructions: * cut out all pieces on a working laser cutter - it does not require great precision. The blue vector engrave line helps with alignment. * use the 4 small pieces to mount the cut-out piece in the middle. Use 2 opposing pieces at a time. A little force may be necessary. * insert the head into the hole, facing the right way, and screw it in place. If you want to adjust the height, either add some small pieces under the head, or cut the holders at different sizes. * it should hold itself together fairly well, but a small amount of glue is a good idea, just keep it out of the head area. * look at where your existing laser head is positioned, measure the distance from the rail to the center of the beam entrance - you want to maintain that distance. * if you want to run an alignment test to compare results, do so now before removing the existing head. * remove the existing head and position the new mount so it is parallel to the rail and the beam entrance center is the same distance as it was - to minimise alignment problems. * use the screws on the head to raise the mirror by about 1 mm and then start aligning. A beam guide may be of help, such as my design: https://www.thingiverse.com/thing:4076480 Other links This thing has some measurement details https://www.thingiverse.com/thing:3713770/files in a PDF ie https://cdn.thingiverse.com/assets/ac/bf/e2/b9/57/cloudray_k40_parts_Rev01.PDF
With this file you will be able to print Cloudray K40 Laser Head Mount with your 3D printer. Click on the button and save the file on your computer to work, edit or customize your design. You can also find more 3D designs for printers on Cloudray K40 Laser Head Mount.