CNC 3018 Pro Limit Switch Set
thingiverse
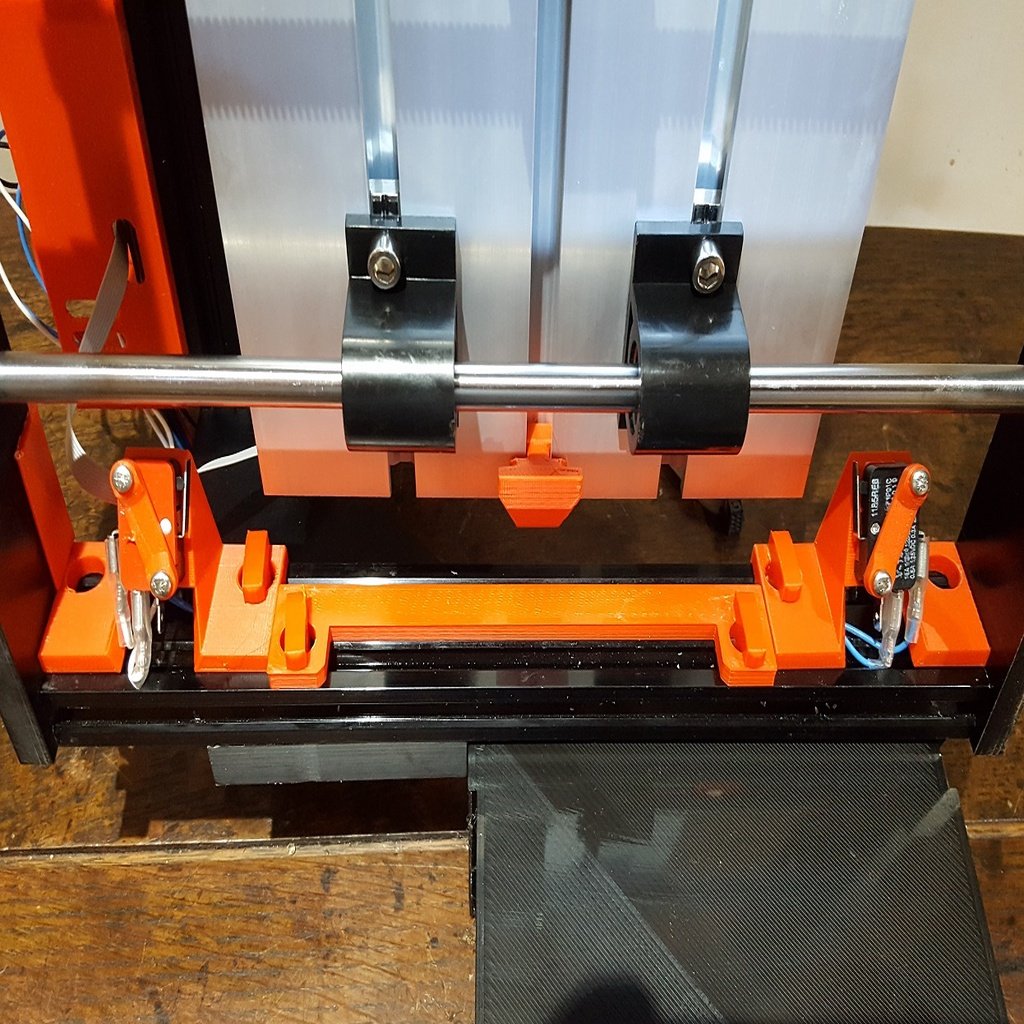
CNC 3018 Pro Limit Switch Set =========== Add limit switches to the CNC 3018 Pro. Additional hardware required: --------------------- Quantity 2 - Limit Switch model: V-153-1C25 with long arm Quantity 2 - Limit Switch model: V-153-1C25 with short arm Micro Limit Switch Long Straight Hinge Lever Arm SPDT Snap Action (Search the part number on Amazon, Aliexpress or elsewhere. I bought 4 of the long arm version and cut off two of the arms back to the top of the switch body with wire shears). Quantity 8 M3 x 16mm machine screws and nuts (I had 20mm screws in stock so I printed 4mm washers to take up the extra length, which go on top of the switches as you can see in the photos.) Quantity 8 6.3mm (1/4") female crimp terminals, cable, female pin connectors and connector blocks as required. X axis -------- I copied the X Axis Switch holder from FastKite's version [thing:3625249](https://www.thingiverse.com/thing:3625249) and modified it with half turn fasteners so that they can be fitted without dismantling your 3018. There is a small clip to hold the wires from the +X switch onto the vertical Bakelite frame of your 3018. There is a 230mm long trunking to carry the wires from the -X switch which will fit on most print beds if you print it diagonally. If the cable trunking is too long for your print bed then there are small cable clips available on SkyTake's Collection [thing:3291676](https://www.thingiverse.com/thing:3291676). These clips gave me the idea for the twist fasteners which I use in this Thing. Y axis -------- My Y Axis switch holders fit to the corners of the 3018 frame underneath the print bed. A single twist fastener for each is sufficient to hold them in place. Slide the Limit Switch Stop onto the middle groove of the machine bed and adjust the position so that it correctly contacts the limit switches. Glue in place if necessary with a contact adhesive. The cable trunking is 160mm long. If this will not fit on your print bed then use SkyTake's cable clips as for the X Axis. Print the flexible trunking and two trunking fasteners. You may need to rotate the trunking across the diagonal of your print table to get it to fit. Alternatively if you have a very small build table then I have provided the trunking in two halves (A and B) which should push fit together. After printing you may need to apply gentle pressure to ensure that all segments articulate freely. You will probably need pliers in order to grip the fasteners to secure them into the top rail of the 3018 frame. Position the trunking and then take each faster with the grip aligned along the top rail, push it fully through the hole on the trunking into the 3018 top rail. Give it a quarter turn clockwise to lock it. Once the trunking is in place, thread the Z axis cables through it. I adapted the Z Motor Cable Guide from the one in SkyTake's Collection [thing:3291676](https://www.thingiverse.com/thing:3291676) to make it stronger, easier to print and take a bigger cable tie. There are table clamps and other useful items in that collection which is worth checking out. I took the idea and some nodes from SkyTake's cable clips for my fasteners. Wiring ------- My circuit board has pairs of pins for each of the +X, -X, +Y and -Y switches so each cable attaches to its corresponding pin on the circuit board. If your board has fewer pins then you will need to wire the switches in series as described and illustrated in FastKite's version [thing:3625249](https://www.thingiverse.com/thing:3625249) My CNC 3018 Pro Things ============== * Circuit board housing [Thing:3886992](https://www.thingiverse.com/thing:3886992) * Cable Tidy Set [Thing:3888299](https://www.thingiverse.com/thing:3888299) * Limit Switch Set [Thing:3896500](https://www.thingiverse.com/thing:3896500) I design these things for myself but I have published them for you. If they make your life easier or save you money then please do not forget to "Tip Designer"!
With this file you will be able to print CNC 3018 Pro Limit Switch Set with your 3D printer. Click on the button and save the file on your computer to work, edit or customize your design. You can also find more 3D designs for printers on CNC 3018 Pro Limit Switch Set.