Cocktail Arcade
thingiverse
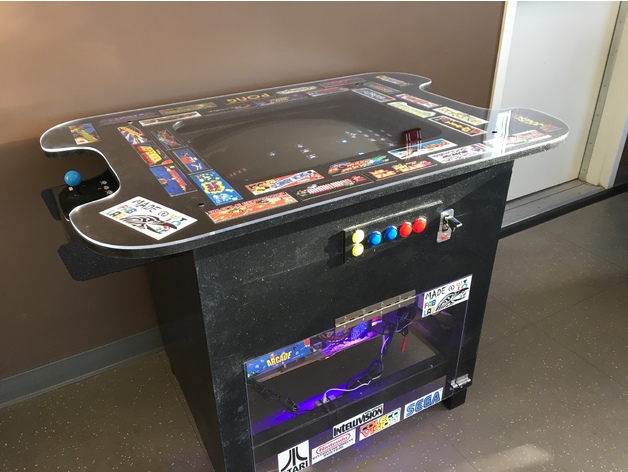
This project is a full size Cocktail Arcade cabinet. There were no designs or plans used in the creation of this... Parts used included an older Phillip's CRT 28" TV, Raspberry Pi 3, COWEEN HDMI to AV Adapter, Easyget LED Arcade Buttons/Joystick, various 2x4's & MDF board (whatever we had available in the shop), Famowood Glaze Coat and lots of paint. Print Settings Printer: ShopBot Rafts: Doesn't Matter Supports: Doesn't Matter How I Designed This Step 1 The first thing we did was remove the CRT monitor from its housing. Very carefully we discharged the CRT and removed the circuit boards. The initial structural designs were planned on the fly with wood materials we had in the shop. The basic frame for the monitor was made with 2x4's and wood screws. As the screen was very heavy (as CRT screens tend to be) I built the housing to accommodate the weight to provide as much support as possible. Step 2 I installed small section of plywood inside the housing which held the TV's electronics, Raspberry Pi and speakers. All of these components were hot glued to the surface, including a power strip and LED light (which were later installed). MDF board used for the sides and routed to fit. Everything was spray painted black w/ metallic flakes, than covered in an epoxy for gloss and durability. A side panel was constructed from 1/4" clear acrylic. This would prevent accidental exposure to the internal wiring while still maintaining a look at the inside. The panel was installed with hinges and locks. It was cut with our laser cutter to fit. Step 3 After completing the housing I went to work on the joystick housings. I did not have original plans to use, so I found some images online. The wood used for each housing was 1/4" plywood. The pieces were cut on an Epperson laser cutter. Small 1"x1" blocks were secured in each corner for increased durability. Everything was spray painted separately and than mounted to the table. Bar top was used for the top and front to decrease scratches and for gloss. Step 4 The top was made of 3/4" OSB. The shape was based on images I found online and edited in Photoshop to size. It was cut on our Shop Bot. The design was edited on Adobe Photoshop with the following dimensions: 32" W by 40" L. The inside hole was slightly smaller than the television screen which covered up the edges. I was hoping to use a router and line both edges with t-molding, but due to time and cost I sanded and painted instead. The top layer was 1/2" clear acrylic. I wanted to have a glazer cut 1/2" glass, but that would have been much more than I wanted to spend. The acrylic has held up fine and is more scratch resistant than I expected. Step 5 My next step involved soldering wire extensions from the TV circuit board and running these connections to buttons on the side. Volume, Channels, Power and Options were connected. A final kill switch was also installed on the side which controls power. The interior electronics were cleaned up and organized accordingly. The final step was creating images for the top. I used our large printer to create retro game images & console logos. 3 months and about $500 later the project was complete.
With this file you will be able to print Cocktail Arcade with your 3D printer. Click on the button and save the file on your computer to work, edit or customize your design. You can also find more 3D designs for printers on Cocktail Arcade.