Coffee Pour Over Stand with Drip Tray
thingiverse
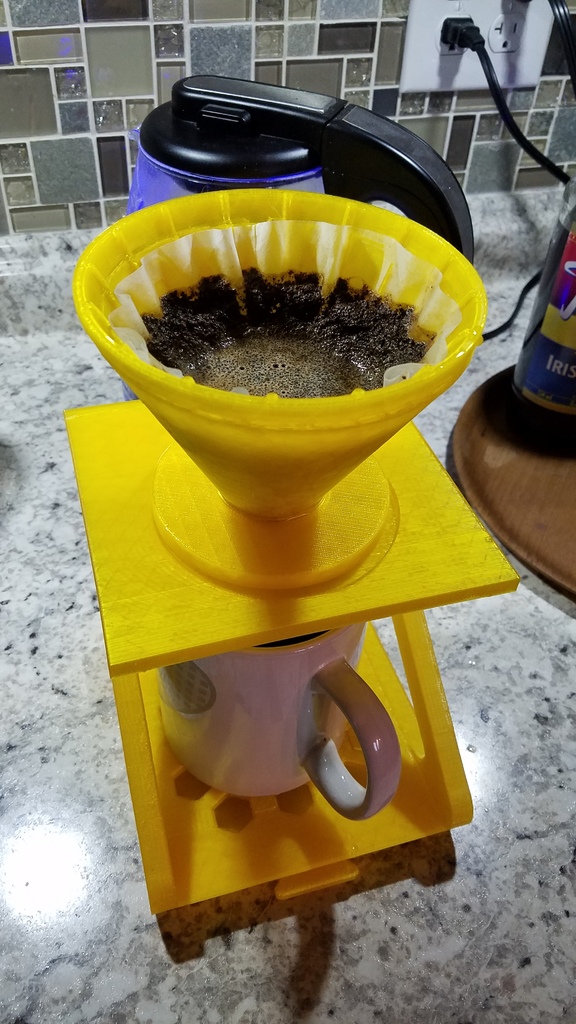
11/26/2018 Update to Recommended Print Settings: for PLA + (PLA PRO) Filament .20 Layer Height at 60mm/s (100mm/s Linear Advance) Bed Temp 65 C 25% Infill 5 Upper and lower layers 4 or 5 perimeters for strength. Annealing PLA to increase temperature resistance and strength: 1) In your slicer: Scale the X and Y to 104% Scale the Z to 98% 2) Print the object. 3) Arrange the new print as it came off the print bed on a cookie sheet preferably with a silicone mat under it. 4) Preheat your oven to 160 Degrees F (71 C). Use an oven thermometer to accurately measure the interior temperature. Don't trust the temp on the oven. You may need to adjust the temp on the oven up or down to account for the oven's thermostat inconsistencies. A Convection oven is preferred. But if you don't have a convection oven, place the print on the middle rack or as far away from the heating elements as possible to avoid hot spots on the print. 5) Place the print in the oven 6) Allow to bake for 1.5 hours. 7) Turn off oven and allow print to cool inside the oven till the oven and print are room temperature (an hour or so) 11/24/2018 UPDATE: 19 hours later, and there is an obvious layer shift around 8mm that practically ruined this print. Dang, I should have checked it more often. I cut off the lower half shifted segment and the tray now moves freely, so my tolerances were pretty good otherwise. Regardless, this is a pretty successful design, and no supports needed. I will reprint this in PLA+ (PLA Pro) next time, I think, because my settings for PETG don't seem to be dialed in as I thought. Also, I will print in .2 mm layer height for a little better detail. Even with the print issues and layer shift, this thing actually works really well. :-) I also added a Version 2, which is taller to allow some little larger vessels, and is sturdier. Some slight adjustments to the cone and base, also to direct the coffee a little better into the cup at the higher level. Enjoy! Initial Post:--------------------------------------------------- I am in the process of printing this as I am typing, so I will post Make photos when it is done (19 hours at .35mm Layer height 50mm/s speed using PETG). You can adjust resolution to meet your own needs, of course. I recommend printing the "Coffee Pour Over Device.stl" because it has everything optimized for printing in one file, and will fit on most standard 3D printer beds. I also included the individual pieces. I made the cone and base so it could also be used on top of a coffee mug by itself if you wanted to just print those. I consider this a work in progress, because I haven't put the pieces together to verify all the tolerances. But, hey, it all went together in CAD..... What could go wrong, right? I got my inspiration from rize0528 "Coffee pour over stand", but built this from scratch. I decided to post this as a remake because I wanted to give rize0528 the credit for putting me on the right track.
With this file you will be able to print Coffee Pour Over Stand with Drip Tray with your 3D printer. Click on the button and save the file on your computer to work, edit or customize your design. You can also find more 3D designs for printers on Coffee Pour Over Stand with Drip Tray.