Colin's CoreXY (V-Slot)
thingiverse
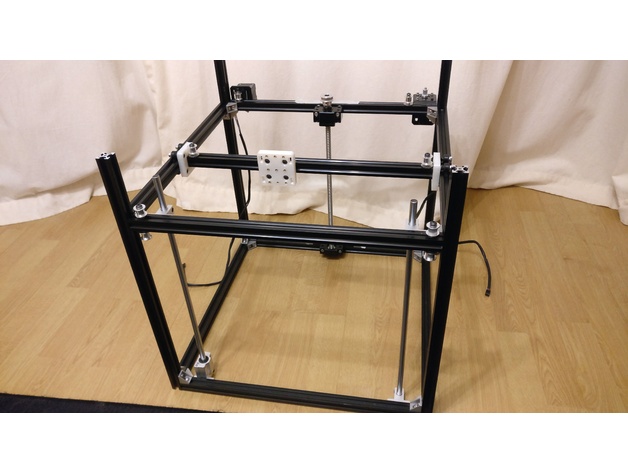
I'm Building a Custom CoreXY printer using V-Slot. The V-Slot is reasonably priced, but the Accessories for it are quite expensive and Will Add Up! So I am going to design a lot of parts for ABS Printing. This is an In-Progress Thing! So far, it's just a couple of Parts to Join the V-Slot together. The Cube part has 3x 5mm holes for joining 3 pieces of V-Slot at the top (when you Tap the V-Slot), thus enabling you to make a Square or Rectangular Frame. The 3 larger holes are so you can get the Bolt in the cube. V2 of cube added: Rounded corners, internal countersink for CapHead Bolts The Corner Piece is pretty Self-Explanatory; M5 10mm Dome Head Screws work best. I've just come across this http://www.thingiverse.com/thing:105900, which is the open builds version. I did not copy these designs, however my design and their designs are very similar. 03-07-2016: Added a Nema17 Mount to attach the motor to the vslot; I still have to make a second mount that is higher than the first as I plan to use a "over and under" drive belts rather than the traditional crossed belts. This mount uses 3x M5 Cap head bolts to secure to the vslot and 4x M3 cap heads to attach the nema17 05-07-2016: Added 2nd Nema17 Mount, this one is taller to raise the Gear Pulley above the first mount allowing an over under belt system; I may change this model. 06-07-2016: Added V3 of the cube; the previous two versions will need to be drilled to allow for a Cap Head bolt. V2 will work ok for button head bolts. V3 is optimised for button head bolts, cap head bolts are a poor choice they would require making the supporting plastic a lot thinner. 09-07-2016: Changed the Nema17 Mounts from cap head bolts to button head bolts; I'm using M5 10mm Button Head Bolts for everything on this build now. 24-07-2016: Added RodFixing, it allows you to fit 10mm Smoth rod to the V-Slot / T-slot Extrusions. 21-11-2016: Added Custom Y-Plates; the Y plate is loosely based on the Openbuilds Mini V gantry plate. However, the hole spacings are designed to do away with the Eccentric spacers using mini wheels which you can get from your usual Chinese distributors. One orientation will give you a tighter fit than the other orientation (that's what the two squares are for on the top) 20-11-2016: Improved the X and Y gantry Plates; they work much better now. No adjustment or messing about is needed for use with the mini gantry wheels, just 4x m5 25mm bolts, 4x m5 standard hex nuts, 4x m5 washers, 4x mini V wheels, and 8x m5 lock nuts. It's important to use lock nuts! as the inner diameter of the locking part of the nut is the perfect size to not lock up the mini wheels! Put one either end of the wheel, the locking part towards the wheel! (so the last lock nut is backwards) Drill out the 4 holes with a 5mm drill bit to make sure the bolts fit through without being held by the plastic. The nuts on the rear are used to hold the bold straight and in place, if you screw the bolt through the plastic (which is very easy), it's very probable that it will be at a slight angle! (you don't want that) https://youtu.be/fFbzME6J3Ao Print Settings Printer: P3Steel Rafts: Doesn't Matter Supports: No Resolution: 0.16 Infill: 25% +
With this file you will be able to print Colin's CoreXY (V-Slot) with your 3D printer. Click on the button and save the file on your computer to work, edit or customize your design. You can also find more 3D designs for printers on Colin's CoreXY (V-Slot).