Colored Pencil Carousel
thingiverse
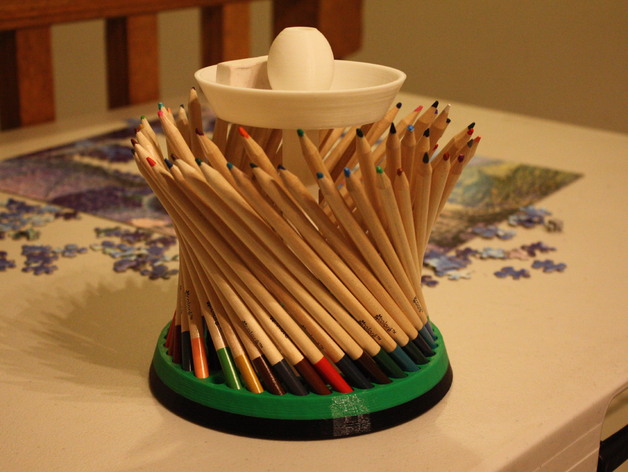
This is a spinning colored pencil carousel with room for up to 72 pencils, a basket for a sharpener and eraser, and a handle for easy carrying. The base has sixteen 9.5mm (3/8") bearing balls so it can spin freely. It's derived from corbantek's beautiful Multiple Ring Fancy Pencil Holder, which is derived from net_id's Customizable fancy pencil holder. I think it looks good as a centerpiece on a dining table. See it on YouTube. Note: the version in the YouTube video has a platform that's slightly too narrow. The picture with the black and green platform (using a mid-print color change) is up to date. UPDATE: The carousel seems to actually encourage my kids to put away the pencils when they're done! They color things often and I have rarely seen pencils lying around since printing this; it seems they like to put the pencils away in such a fun place. Bonus! UPDATE 2: When my kids threw this thing onto a tile floor (grrr!), the bottom cap broke. Fortunately, the bottom cap is the smallest part, so it sacrificed itself to save the rest. After a five minute print, the carousel was in perfect shape again. Another surprise bonus! Print Settings Printer Brand: RepRap Printer: Original Prusa i3 Rafts: No Supports: No Resolution: 0.2mm Infill: 25% Notes: I used a 0.8mm nozzle to print quickly (about twice as fast as the time required for a 0.4mm nozzle). I printed in PLA, but any material ought to work. If anyone is interested in printing on a small print bed, I thought of a way to cut it up into smaller pieces, so leave a comment saying what size print bed you have. Post-Printing Materials Needed 1 of each printed part 6 M3 x 12mm screws 6 M3 washers 6 M3 nuts 2 M5 screws at least ~20mm long (longer is OK) 2 M5 nuts 16 9.5mm (3/8") bearing balls - the same size used by the Marblevator and Marble Machine 3 - I got them at Amazon If the M3 screws you have are too long, you'll have to either cut them to fit or use extra washers on top of the floater so that the ends of the screws won't scrape your table. Build Steps The 6 M3 holes in the platform (the large ring that holds pencils) have thin layers that need to be removed. Use a 1/8" or 3mm drill. (The thin layers serve as a kind of support material.) Place the 6 M3 nuts in their traps at the bottom of the platform. Use masking tape (or similar) to temporarily hold the nuts in place. Put the platform on a table and place the base in the middle of platform. Place the bearing balls in the circular channel in the base. Place the floater over the base so that the floater and base secure the balls loosely in the channel. Screw the floater and platform together (with the base and balls trapped between them). Remember to use M3 washers on top to avoid damaging the plastic. Once the floater and platform are connected, the platform should spin freely when placed on a table and the balls should be sealed inside. Slip an M5 nut into one end of the shaft (the shaft is identical on both ends). Put the same end of the shaft into the base. Place the bottom cap over the M5 hole and secure the cap and shaft with an M5 screw. Slip the other M5 nut into the other end of the shaft, place the basket on the shaft, add the egg-shaped top cap, and secure it with the other M5 screw. Add pencils and post a picture!
With this file you will be able to print Colored Pencil Carousel with your 3D printer. Click on the button and save the file on your computer to work, edit or customize your design. You can also find more 3D designs for printers on Colored Pencil Carousel.