Colorful Wind Wheel
prusaprinters
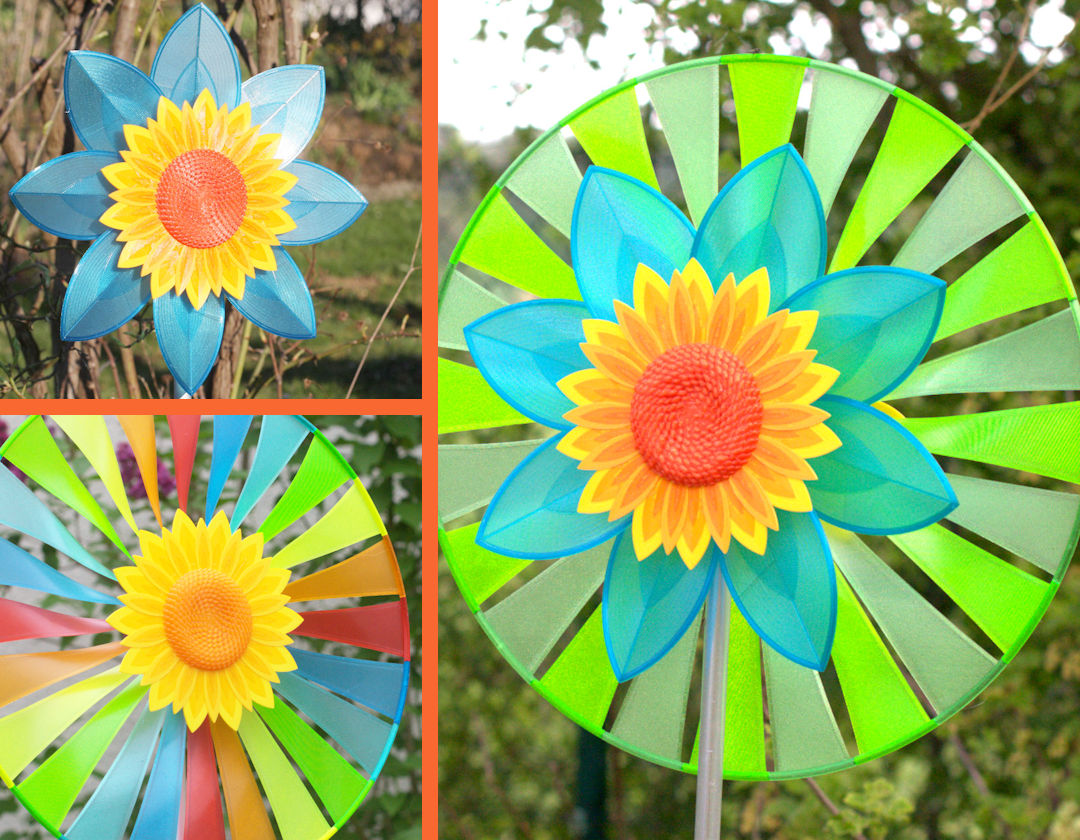
<h4><i><strong>Update History:</strong></i></h4><p><i>May 8, 2021:</i></p><ul><li><i>Increased the robustness of the design by changing the thickness of the sails from 1 to 2 layers. See section “How robust is the wind wheel against wind and weather?” in the appendix for more details.</i></li><li><i>Simplified the assembly of the sails: The mounting holes now taper to make it easier for the sails to find their place during assembly. Also, the two parts of the mount are now keyed, so there is no way to connect the parts incorrectly:</i></li></ul><figure class="table"><table><tbody><tr><td><p><strong>Old Design:</strong></p><figure class="image image-style-align-right image_resized" style="width:87.02%;"><img src="https://media.prusaprinters.org/media/prints/63019/rich_content/ae0062e2-f3e7-4c0e-a63d-dfdae07fda26/sail_mount.png#%7B%22uuid%22%3A%22a3e3fa1a-cf06-425a-bd56-67cc94125bdf%22%2C%22w%22%3A464%2C%22h%22%3A167%7D"></figure></td><td><p><strong>New Design:</strong></p><figure class="image image-style-align-left image_resized" style="width:50.13%;"><img src="https://media.prusaprinters.org/media/prints/63019/rich_content/d985dea0-cebf-4938-a7fa-0290ee4d5f23/sail_mount.png#%7B%22uuid%22%3A%22ac0c4f0b-f07b-419a-b8b2-c608427241c6%22%2C%22w%22%3A664%2C%22h%22%3A300%7D"></figure></td></tr></tbody></table></figure><p><i>May 2, 2021:</i></p><ul><li><i>Two of the wind wheels have now been in operation outside in the wind and weather for several weeks. They stand up to rain, wind and sleet showers and are wonderful to look at. So the design has stood the test of time and I'm now stocking up on filament to go into Christmas and birthday gift production with.</i></li><li><i>I have started experimenting with the design to perhaps replace the screw connections with clip connections. It really wouldn't be too hard to do completely without screws. But of course it takes time and effort to change the design and provide it again with the same reliability. So please tell me in the comments: Should I redesign the wind wheel into a 100% fully 3D printed design, or would you rather I focus on new designs?</i><br><i>The attempts with the first connection were already quite successful, which would already save 8 of the 19 screws (the final design would be different though):</i></li></ul><figure class="table"><table><tbody><tr><td><figure class="image image-style-align-right image_resized" style="width:51.65%;"><img src="https://media.prusaprinters.org/media/prints/63019/rich_content/df91fd68-f3b5-4e01-b9c3-956614eab009/step_00.jpg#%7B%22uuid%22%3A%228219f602-931e-4f9a-b0de-63311bdec32d%22%2C%22w%22%3A977%2C%22h%22%3A711%7D"></figure></td><td><figure class="image image-style-align-left image_resized" style="width:53.76%;"><img src="https://media.prusaprinters.org/media/prints/63019/rich_content/76b30cbd-4e82-4998-9b6f-4a2afdc028a5/clip_experiment1.jpg#%7B%22uuid%22%3A%228f311377-7bfd-4452-8a13-758b7c5c8dfe%22%2C%22w%22%3A1014%2C%22h%22%3A675%7D"></figure></td></tr></tbody></table></figure><p><i>April 23, 2021:</i></p><ul><li><i>Added a section “Single layer design style as a brand new way of design?” to the appendix.</i></li><li><i>The instructions for assembling the sail wheel have been expanded</i></li><li><i>Added a second option for the bloom to the design with a much more natural look (section "Printing the Parts") </i></li></ul><p><i>April 11, 2021:</i></p><ul><li><i>Added links to my other related designs at the end of the description</i></li></ul><h3> </h3><h3>Introduction</h3><p>My garden was in desperate need of a nice wind wheel. Then there was this moment two weeks ago, when I had to cancel a large print right after the first layer. Looking at the failed print I had the idea to use single or dual layer prints as sails or blades for a DIY 3D-printed wind wheel. So after a few days of planning, designing and a little bit of trial and error, this is the design I came up with:</p><figure class="media"><oembed url="https://youtu.be/9PasySw_mpI"></oembed></figure><p>There are two different variants from which you can choose from:</p><figure class="table"><table><tbody><tr><td><figure class="image image_resized" style="width:100%;"><img src="https://media.prusaprinters.org/media/prints/63019/rich_content/fa47d6b6-78cf-4a89-beda-51870fd078bc/variant1.jpg#%7B%22uuid%22%3A%22a2855501-5475-476f-91db-c68b35722343%22%2C%22w%22%3A980%2C%22h%22%3A1007%7D"></figure><p><strong>Variant 1:</strong> two wheels ("leaves" and “sails”). This is the complete design, I recommend to go for.</p></td><td><figure class="image image_resized" style="width:68%;"><img src="https://media.prusaprinters.org/media/prints/63019/rich_content/1613fc47-1773-455a-98e3-4132b46d3a29/variant2.jpg#%7B%22uuid%22%3A%22ea0d6e33-4b84-4436-a7d8-b3488ab7f3d3%22%2C%22w%22%3A928%2C%22h%22%3A929%7D"></figure><p><strong>Variant 2:</strong> only one wheel ("leaves"). This one only uses half of the printed parts for a more minimalistic result. Also suitable for impacient makers or if you are in a hurry for printing a present.</p></td></tr></tbody></table></figure><h3>Printing the Parts</h3><p>I have printed all parts in PETG using these colors:</p><ul><li>black</li><li>yellow</li><li>translucent blue</li><li>translucent green (two different shades)</li><li>translucent red or orange</li></ul><p>For download I have provided the bare STL files, the 3MF files (that also contain my print settings) and the gcode files for the MK3s.</p><h4>What you will have to print for any of the two variants:</h4><ul><li>The <strong>bloom</strong> (2x for variant 1, only 1x for variant 2). This is the most complex part. It uses color changes to achieve a nice shading of the petals: yellow → translucent red/orange → yellow → translucent red/orange. With a layer height of 0.1mm and only one or two layers of red/orange the colors mix nicely:</li></ul><figure class="image"><img src="https://media.prusaprinters.org/media/prints/63019/rich_content/d61ea1d3-12be-43b5-8dce-7e579f1b6f07/bloom_sliced.jpg#%7B%22uuid%22%3A%22c71234d0-42e5-4a81-8407-9b443c4b9324%22%2C%22w%22%3A973%2C%22h%22%3A737%7D"></figure><figure class="table"><table><tbody><tr><td><figure class="image image-style-align-center image_resized" style="width:100%;"><img src="https://media.prusaprinters.org/media/prints/63019/rich_content/0b48997a-fbdd-4bb9-9fe5-9489a6c852d7/layers2.jpg#%7B%22uuid%22%3A%227d6bfad5-17ef-4e97-a9b9-78728a1cef6e%22%2C%22w%22%3A583%2C%22h%22%3A847%7D"></figure></td><td><figure class="image image-style-align-center image_resized" style="width:72.5%;"><img src="https://media.prusaprinters.org/media/prints/63019/rich_content/7bf34d5b-0e0d-4b0a-959e-c924cbc0f612/layers.jpg#%7B%22uuid%22%3A%22881f3ef3-9a18-4132-a480-2620bc5129c1%22%2C%22w%22%3A1531%2C%22h%22%3A1136%7D"></figure></td></tr></tbody></table></figure><p>There are two options for the bloom:</p><figure class="table"><table><tbody><tr><td><p><strong>Bloom V1:</strong></p><p>This was my first approach, where the petals and seeds are all perfectly mathematically symmetrical:</p><figure class="image image_resized" style="width:100%;"><img src="https://media.prusaprinters.org/media/prints/63019/rich_content/84222136-641d-41c1-9440-2ec49b2f2051/v1.jpg#%7B%22uuid%22%3A%222e1587b8-30af-405f-a8be-68333958b75d%22%2C%22w%22%3A1001%2C%22h%22%3A1028%7D"></figure></td><td><p><strong>Bloom V2:</strong></p><p>I wanted to achieve a slightly more natural look for the flower. Therefore, I used pseudorandom numbers to slightly vary the design of each leaf and seed. The overall design of the wind wheel now looks much more coherent to me than before:</p><figure class="image image_resized" style="width:58.38%;"><img src="https://media.prusaprinters.org/media/prints/63019/rich_content/0ffb62d4-6113-4af1-b730-6e8a71ee8d61/v2.jpg#%7B%22uuid%22%3A%22260737a4-103c-44ec-a258-9c2d1ba18360%22%2C%22w%22%3A1001%2C%22h%22%3A1012%7D"></figure></td></tr></tbody></table></figure><ul><li>The <strong>leaf</strong> is printed in translucent blue. You will need to print 8 leafs in total. For a more natural look I adjusted the perimeters setting to 100. So the “infill” is parallel to the external perimeters:</li></ul><figure class="table"><table><tbody><tr><td><figure class="image image-style-align-right image_resized" style="width:76.23%;"><img src="https://media.prusaprinters.org/media/prints/63019/rich_content/336da475-58b8-42f2-b0e4-156f10bab8e5/leaf.png#%7B%22uuid%22%3A%22d410b2a1-6fe1-48b1-a4f6-afd41cb3a3c6%22%2C%22w%22%3A594%2C%22h%22%3A249%7D"></figure></td><td><figure class="image image-style-align-left image_resized" style="width:99.4%;"><img src="https://media.prusaprinters.org/media/prints/63019/rich_content/13274993-3677-412e-8b34-6da85fbd7d0b/detail2.jpg#%7B%22uuid%22%3A%226b8fd398-6374-45fb-b5ba-beb511fd9e0c%22%2C%22w%22%3A821%2C%22h%22%3A625%7D"></figure></td></tr></tbody></table></figure><ul><li>The <strong>leaf mount</strong> is printed in translucent blue.</li></ul><figure class="image image_resized" style="width:28.02%;"><img src="https://media.prusaprinters.org/media/prints/63019/rich_content/b4a7f631-e09c-4190-bd04-db0361aa79f3/leaf_mount.png#%7B%22uuid%22%3A%22c9dedb20-dc97-4dca-88f2-947197338643%22%2C%22w%22%3A467%2C%22h%22%3A325%7D"></figure><ul><li>The <strong>bloom axis</strong> in black.</li></ul><figure class="image image_resized" style="width:28.42%;"><img src="https://media.prusaprinters.org/media/prints/63019/rich_content/44d2cb9e-a27a-482b-8fef-104fea19e082/bloom_axis.png#%7B%22uuid%22%3A%22b4d28ded-9bca-4442-be75-6348c3a0879f%22%2C%22w%22%3A398%2C%22h%22%3A431%7D"></figure><ul><li>The <strong>main mount</strong> in black. The main mount is printed in variable layer height in order for the bridging trick to work for the overhead screw holes.</li></ul><figure class="table"><table><tbody><tr><td><figure class="image image-style-align-right image_resized" style="width:43.3%;"><img src="https://media.prusaprinters.org/media/prints/63019/rich_content/c4de9bf4-5ca2-4721-b8cf-fa101c249a05/main_mount.png#%7B%22uuid%22%3A%225d211d3d-f3b6-4445-adf1-443eb02056d5%22%2C%22w%22%3A602%2C%22h%22%3A452%7D"></figure></td><td><figure class="image image-style-align-left image_resized" style="width:50.94%;"><img src="https://media.prusaprinters.org/media/prints/63019/rich_content/df0987fe-87cf-4068-9204-b20c78bf4bc9/overhead_screws.png#%7B%22uuid%22%3A%222685db47-403e-4ad0-8838-d77ed6174cab%22%2C%22w%22%3A518%2C%22h%22%3A361%7D"></figure></td></tr></tbody></table></figure><h4>For the minimalisctic variant 2 you also have to print:</h4><ul><li>The <strong>sail axis dummy</strong> in black</li></ul><figure class="image image_resized" style="width:19.62%;"><img src="https://media.prusaprinters.org/media/prints/63019/rich_content/1f8c7e72-b647-4f0e-9aa6-d59de5eb38e8/sail_axis_dummy.png#%7B%22uuid%22%3A%2255651f96-5d93-48c8-abbd-e5207c61bcc4%22%2C%22w%22%3A372%2C%22h%22%3A361%7D"></figure><p> </p><h4>For the fully featured variant 1 you also have to print:</h4><ul><li>24 pieces of the <strong>sail</strong> in translucent green. <br> </li></ul><figure class="image image_resized" style="width:57.4%;"><img src="https://media.prusaprinters.org/media/prints/63019/rich_content/6ce9e8e5-2ac1-4cb6-8e95-cf4dfa032aa9/sail.png#%7B%22uuid%22%3A%222c8de7e0-c381-4a1e-ba6f-5893af937e23%22%2C%22w%22%3A651%2C%22h%22%3A178%7D"></figure><p>The thin sail is 0.4mm thick, printed as two layers of 0.25mm and 0.15mm layer height. So make sure your first layer calibration is correct ( <a href="https://help.prusa3d.com/en/article/first-layer-calibration_112364">https://help.prusa3d.com/en/article/first-layer-calibration_112364</a>). If it still does not work, then I recommend performing a more detailed bed level correction: <a href="https://help.prusa3d.com/en/article/bed-level-correction_2267.">https://help.prusa3d.com/en/article/bed-level-correction_2267.</a></p><figure class="image image_resized" style="width:73.12%;"><img src="https://media.prusaprinters.org/media/prints/63019/rich_content/adb3ce63-638b-4610-835b-5b88dde35f28/thin.jpg#%7B%22uuid%22%3A%223bc089ef-db58-410d-884c-bca151767a28%22%2C%22w%22%3A1376%2C%22h%22%3A834%7D"></figure><p>I highly recommend choosing two different shades of color for printing 12 of each shade. So the color change makes for a nicer look:</p><figure class="image image_resized" style="width:50%;"><img src="https://media.prusaprinters.org/media/prints/63019/rich_content/efb72aaf-6ebb-4d4f-95d1-04e1ce7c0512/step_10.jpg#%7B%22uuid%22%3A%225be4de5b-1d8b-4b56-b596-5ef9efa0232f%22%2C%22w%22%3A1230%2C%22h%22%3A929%7D"></figure><ul><li>A <strong>sail mount</strong> in translucent blue. This part is also printed in variable layer height in order for the bridging trick to work for the overhead screw holes.</li></ul><figure class="image image_resized" style="width:37.49%;"><img src="https://media.prusaprinters.org/media/prints/63019/rich_content/d985dea0-cebf-4938-a7fa-0290ee4d5f23/sail_mount.png#%7B%22uuid%22%3A%22ac0c4f0b-f07b-419a-b8b2-c608427241c6%22%2C%22w%22%3A664%2C%22h%22%3A300%7D"></figure><ul><li>A <strong>sail axis</strong> in black</li></ul><figure class="image image-style-align-center image_resized" style="width:19.03%;"><img src="https://media.prusaprinters.org/media/prints/63019/rich_content/fd0aef51-1bd8-4676-9bd5-efcb5b901d90/sail_axis.png#%7B%22uuid%22%3A%22d74e1d55-f530-47b0-b613-bf00f1717e92%22%2C%22w%22%3A320%2C%22h%22%3A380%7D"></figure><h3>Additional Material required</h3><p>Besides the 3D printed parts there are only two things required:</p><ul><li>19pcs M3x8mm flathead screws (ISO 7380)</li><li>12mm rod for mounting the wind wheel onto</li></ul><figure class="image image_resized" style="width:50%;"><img src="https://media.prusaprinters.org/media/prints/63019/rich_content/9e1d722b-580c-4042-8487-d4d6ff180e42/material.jpg#%7B%22uuid%22%3A%22cbb1142b-c200-4849-8985-3514ec29aa19%22%2C%22w%22%3A623%2C%22h%22%3A415%7D"></figure><h3>Assembly</h3><p><strong>Step 1:</strong> Attach the <strong>bloom axis</strong> (this is the shorter one of the two axes) to a <strong>bloom</strong> using 4 screws:</p><figure class="image image_resized" style="width:50%;"><img src="https://media.prusaprinters.org/media/prints/63019/rich_content/df91fd68-f3b5-4e01-b9c3-956614eab009/step_00.jpg#%7B%22uuid%22%3A%228219f602-931e-4f9a-b0de-63311bdec32d%22%2C%22w%22%3A977%2C%22h%22%3A711%7D"></figure><p><strong>Step 2:</strong> Attach the 8 <strong>leaf</strong> parts to the <strong>leaf mount </strong>using one srew for each:</p><figure class="image image_resized" style="width:75%;"><img src="https://media.prusaprinters.org/media/prints/63019/rich_content/db639d67-0399-49cc-a816-367d1e8474bb/step_01.jpg#%7B%22uuid%22%3A%22b90fcffc-7e73-46e4-abcc-024839c8d087%22%2C%22w%22%3A1015%2C%22h%22%3A726%7D"></figure><p><strong>Step 3:</strong> Insert the <strong>bloom axis</strong> into the <strong>leaf mount</strong> from the front. Make sure the leaf wheel can spin easily around the axis. If not, you might have to remove some debris:</p><figure class="image image_resized" style="width:50%;"><img src="https://media.prusaprinters.org/media/prints/63019/rich_content/8d526f05-2959-4d1b-94b3-46a29b42e40e/step_02.jpg#%7B%22uuid%22%3A%22a521b5b2-b69b-40c5-88df-0bd0912b832e%22%2C%22w%22%3A724%2C%22h%22%3A744%7D"></figure><p><strong>Step 4:</strong></p><ul><li>For the fully featured <strong>variant 1 </strong>please continue at<strong> step 9</strong></li><li>Fot the minimalstic<strong> variant 2</strong> continue at <strong>step 5</strong></li></ul><p><strong>Step 5:</strong> Attach the <strong>sail axis dummy</strong> to the <strong>bloom axis</strong> using one screw:</p><figure class="image image_resized" style="width:50%;"><img src="https://media.prusaprinters.org/media/prints/63019/rich_content/4afb78a9-9044-4144-8348-c4b75676b3ff/step_03.jpg#%7B%22uuid%22%3A%223afccc8c-714f-4ef4-91e9-d2d87b745979%22%2C%22w%22%3A1097%2C%22h%22%3A744%7D"></figure><p><strong>Step 6: </strong>Attach the <strong>main mount</strong> to the axis by using two screws. The mount should hold the axis very well, so that it cannot move or rotate:</p><figure class="image image_resized" style="width:75%;"><img src="https://media.prusaprinters.org/media/prints/63019/rich_content/ca2851d3-c590-4294-bd8f-cfaa4d17e191/step_04.jpg#%7B%22uuid%22%3A%228920d0e6-e942-4d06-99cd-e53a7bd576ea%22%2C%22w%22%3A1140%2C%22h%22%3A744%7D"></figure><p><strong>Step 7:</strong> Attach a 12mm rod to the main mount:</p><figure class="image image_resized" style="width:50%;"><img src="https://media.prusaprinters.org/media/prints/63019/rich_content/d23e810f-2fe3-4b4f-9751-c0dd8e3acad2/step_05.jpg#%7B%22uuid%22%3A%2241f8c30b-84f3-473e-a4a0-707bb724f291%22%2C%22w%22%3A1140%2C%22h%22%3A788%7D"></figure><p><strong>Step 8:</strong> Place the wind wheel in your garden at a suitable place:</p><figure class="image image_resized" style="width:72.92%;"><img src="https://media.prusaprinters.org/media/prints/63019/rich_content/fcab6565-0bf1-4684-90cd-4bc3ce6e761d/variant2.jpg#%7B%22uuid%22%3A%2277a63ff7-2989-47ca-8ca3-bc3e6f90a53a%22%2C%22w%22%3A928%2C%22h%22%3A929%7D"></figure><p>Now you're done with variant 2. Note that you can upgrade your to the fully featured variant 1 at any time, by printing the additional parts.</p><p> </p><p><strong>Step 9 (only for variant 1):</strong> Attach all the <strong>sail</strong>s to one half of the <strong>sail mount</strong>. Make sure they are all oriented in the same direction. If you decided to use multiple color shades alternate the colors in the way you like:</p><figure class="image image_resized" style="width:89.27%;"><img src="https://media.prusaprinters.org/media/prints/63019/rich_content/0abf9985-664a-460c-a67a-898c71f908e0/construct_sail.jpg#%7B%22uuid%22%3A%22fc0d4dcc-058f-42a6-bac7-9d8a42f78164%22%2C%22w%22%3A1212%2C%22h%22%3A894%7D"></figure><p><strong>Step 10:</strong> Attach the top half of the <strong>sail mount:</strong> The keying of the parts ensures that they are properly assembled in any case. Threading the ends of the sails is a bit fiddly, but the tapered holes will help them slide in. Wiggle the ends of the sails and gently press the top of the mount against them until everything slides into place:</p><figure class="image image_resized" style="width:55.13%;"><img src="https://media.prusaprinters.org/media/prints/63019/rich_content/fe6cb743-4a4e-4daf-b0a1-f8e511e7d6d9/connect_sail.jpg#%7B%22uuid%22%3A%2242de9344-cd84-4bcd-81e6-76dbe70c8327%22%2C%22w%22%3A891%2C%22h%22%3A678%7D"></figure><p><strong>Step 11:</strong> Now connect both halfes of the sail mount using 3 screws:</p><figure class="image image_resized" style="width:58.12%;"><img src="https://media.prusaprinters.org/media/prints/63019/rich_content/67372637-f1a5-4c9c-a6a7-58b6b4848b5a/step_y.jpg#%7B%22uuid%22%3A%22d33bf916-6a90-4c90-8efb-9e89840fbe2e%22%2C%22w%22%3A1036%2C%22h%22%3A711%7D"></figure><p><strong>Step 12:</strong> This is the most satisfying part of the work: Thread the ends of the sails with a piece of filament. You will need about 109cm of filament. PETG will do, but I ended up using PC blend filament, since it is more robust:</p><figure class="image image_resized" style="width:83.52%;"><img src="https://media.prusaprinters.org/media/prints/63019/rich_content/aee83539-7b28-4ed5-96a4-c3e19dd5a247/step_08.jpg#%7B%22uuid%22%3A%22710f0426-f694-4778-88fe-22f2acda1eb9%22%2C%22w%22%3A1015%2C%22h%22%3A667%7D"></figure><p><strong>Step 13:</strong> The two ends of the filament must be placed in the middle of the last sail:</p><figure class="image image_resized" style="width:63.72%;"><img src="https://media.prusaprinters.org/media/prints/63019/rich_content/7fce6a4d-0911-41e5-89da-63257eada70d/step_09.jpg#%7B%22uuid%22%3A%2213cdd7e0-66ca-411d-985f-9002c977459e%22%2C%22w%22%3A1015%2C%22h%22%3A766%7D"></figure><p><strong>Step 14:</strong> Congratulations - you just finished the sail wheel!</p><figure class="image image_resized" style="width:74.32%;"><img src="https://media.prusaprinters.org/media/prints/63019/rich_content/07b4f547-be24-44c2-bf67-0da7b0240072/step_10.jpg#%7B%22uuid%22%3A%226d1ee9d1-6cbf-4caf-8963-af7e6b3e7940%22%2C%22w%22%3A1230%2C%22h%22%3A929%7D"></figure><p><strong>Step 15:</strong> Insert the <strong>sail axis</strong> into the <strong>sail mount</strong> from the back. Make sure the wheel can spin easily around the axis. If not, you might have to remove some debris:</p><figure class="image image_resized" style="width:67.62%;"><img src="https://media.prusaprinters.org/media/prints/63019/rich_content/5714412b-198f-4911-8173-9a4336f1c9fa/step_11.jpg#%7B%22uuid%22%3A%227e3870b4-6030-4439-9a18-a1c96e81f529%22%2C%22w%22%3A1032%2C%22h%22%3A678%7D"></figure><p><strong>Step 16:</strong> Now connect the <strong>sail axis</strong> and <strong>bloom axis</strong> with a screw by overlapping them:</p><figure class="image image_resized" style="width:75.43%;"><img src="https://media.prusaprinters.org/media/prints/63019/rich_content/3a9097d3-75e0-4596-8417-ee5e032c503f/step_12.jpg#%7B%22uuid%22%3A%22ee2e91ae-e577-4f2b-a41b-621c3bdbd465%22%2C%22w%22%3A1132%2C%22h%22%3A839%7D"></figure><p><strong>Step 17:</strong> Attach the <strong>main mount</strong> to the axis by using two screws. The mount should hold the axis very well, so that it cannot move or rotate:</p><figure class="image image_resized" style="width:75.71%;"><img src="https://media.prusaprinters.org/media/prints/63019/rich_content/0be2c090-74b9-4d93-8f7f-5e93ef53ce40/step_13.jpg#%7B%22uuid%22%3A%221fb0ed4e-3741-46c6-81cf-38c1b3a05803%22%2C%22w%22%3A1132%2C%22h%22%3A839%7D"></figure><p><strong>Step 18:</strong> Attach a 12mm rod to the main mount:</p><figure class="image image_resized" style="width:50%;"><img src="https://media.prusaprinters.org/media/prints/63019/rich_content/d5d42643-3b2d-4e58-98da-8d67275da30d/step_14.jpg#%7B%22uuid%22%3A%225a395cbd-aac7-4735-b912-d436b2f25658%22%2C%22w%22%3A735%2C%22h%22%3A1073%7D"></figure><p><strong>Step 19: </strong>Place the wind wheel in your garden at a suitable place:</p><figure class="image image_resized" style="width:73.76%;"><img src="https://media.prusaprinters.org/media/prints/63019/rich_content/8c85d587-26ce-4a97-8503-e82aaf75e44b/variant1.jpg#%7B%22uuid%22%3A%2213b693b3-2f82-44dc-86c8-1fb9cd86f035%22%2C%22w%22%3A980%2C%22h%22%3A1007%7D"></figure><p><strong>That's it :-)</strong></p><p> </p><h3>Appendix</h3><p>The sections above contain all the important facts and instructions for successfully printing and assembling the wind wheel. For those interested, I have compiled some additional information below.</p><h4>Source Code</h4><p>The wind wheel has been designed using OpenSCAD.</p><figure class="table"><table><tbody><tr><td><figure class="image image_resized" style="width:76.41%;"><img src="https://media.prusaprinters.org/media/prints/63019/rich_content/9e0e8f7b-ee75-486b-a97a-80180177463f/openscad2.jpg#%7B%22uuid%22%3A%22b28e44a0-7d9b-47fa-8821-1793b472577c%22%2C%22w%22%3A1071%2C%22h%22%3A718%7D"></figure></td><td><figure class="image image_resized" style="width:100%;"><img src="https://media.prusaprinters.org/media/prints/63019/rich_content/180679ed-506c-464d-a206-75db1971b2b4/openscad1.jpg#%7B%22uuid%22%3A%2230d194ee-f046-45a4-8af3-39ad2138984b%22%2C%22w%22%3A701%2C%22h%22%3A732%7D"></figure></td></tr></tbody></table></figure><p>So you can adjust the design to your needs. But be warned when working on the bloom part: it took about 40 minutes to render on my machine, also you will have to fix the resulting STL “through the NetFabb”.</p><h4>Size matters?</h4><p>I designed the wind wheel to a reasonable size of 350mm diameter for the large sail wheel. However the largest part for printing (a single sail) is only about 154mm x 46mm:</p><figure class="image image_resized" style="width:50%;"><img src="https://media.prusaprinters.org/media/prints/63019/rich_content/069124b3-be07-470c-bcfc-ddf63407f446/print_size.jpg#%7B%22uuid%22%3A%22d09ec868-d75e-45af-b0d0-0dadc4e25ab7%22%2C%22w%22%3A958%2C%22h%22%3A780%7D"></figure><p>So this design can easily be printed on a Prusa Mini. Also by adjusting the OpenSCAD source code, the design could be scaled up to a diameter of a whopping 580mm, when printing on a MK3s!</p><h4>Translucent Red or Orange?</h4><p>In addition to yellow I had two filament color to chose from for printing the bloom: Translucent orange (left) and translucent red (right). I found that I rather liked something in between (middle):</p><figure class="image image_resized" style="width:80.46%;"><img src="https://media.prusaprinters.org/media/prints/63019/rich_content/03a7d720-aaca-4fd9-ac6d-f3f5314723ac/oranges.jpg#%7B%22uuid%22%3A%226f62141b-846e-4ee9-b91c-bb8d40f136ab%22%2C%22w%22%3A1283%2C%22h%22%3A668%7D"></figure><p>So for mixing red and orange filament I did print my own filament using the technique found on <a href="https://www.thingiverse.com/thing:3565827">https://www.thingiverse.com/thing:3565827</a>:</p><figure class="image image_resized" style="width:59.82%;"><img src="https://media.prusaprinters.org/media/prints/63019/rich_content/0a3340bc-c67c-4721-b53a-80bb0d751f40/filamentprint.jpg#%7B%22uuid%22%3A%22944401e7-11b5-498c-a07a-b37b8da3fe95%22%2C%22w%22%3A994%2C%22h%22%3A671%7D"></figure><p>Admittedly, I wouldn't recommend that to everyone. But if you want to get the maximum out of it, then you have to resort to more drastic means. </p><h4>Single layer design style as a brand new way of design?</h4><p>With the single-layer design for the sails, I tried something new that I hadn't seen anywhere before. What surprised me is that the design not only works well for sails, but also opens up completely new design possibilities. Just look at this and let your creativity run wild:</p><figure class="image image_resized" style="width:50.67%;"><img src="https://media.prusaprinters.org/media/prints/63019/rich_content/a8d77ff7-eb32-41b9-b91b-890f9f1f8b31/beauty.jpg#%7B%22uuid%22%3A%22ff489209-3387-4fd9-82f4-c18ee6e42ee5%22%2C%22w%22%3A524%2C%22h%22%3A900%7D"></figure><p>I will definitely continue to experiment with this technique and am confident that I can create very beautiful and unusual decorations and trinkets.</p><h4>How robust is the wind wheel against wind and weather?</h4><p>When we recently had a strong storm, I took the opportunity to test the first version of the design for robustness. I moved many other things in the garden to safety, but deliberately exposed the wind wheel to the elements. It was clear to me that the thin sails were the weakest point of the construction. They withstood the strong wind for a surprisingly long time, but at some point individual sails tore. Therefore, I increased the thickness of the sails in the current design from one to two layers:</p><figure class="image image_resized" style="width:50%;"><img src="https://media.prusaprinters.org/media/prints/63019/rich_content/9cd0b503-6c97-4195-8737-dbb801eb1b19/thicker_sail.jpg#%7B%22uuid%22%3A%22e506929a-9539-4785-a9ee-6357b673e893%22%2C%22w%22%3A2376%2C%22h%22%3A2988%7D"></figure><p>The sails are still sufficiently flexible, but the additional layer makes them much more robust, of course. As another advantage, the color intensity has increased, so I could additionally improve the appearance with it. Here is a video of the current design in a small hailstorm:</p><figure class="media"><oembed url="https://youtu.be/Vve3Fzw6x_c"></oembed></figure><h4> </h4><h4>Happy Printing!</h4><p>If you like this design, then <strong>please leave a like</strong> and also <strong>post a photo in the comments</strong>. Also check out my <a href="https://www.prusaprinters.org/social/52356-mageb/prints"><strong>other designs</strong></a>. The wind wheel fits really well with the following designs:</p><figure class="table"><table><tbody><tr><td><p><a href="https://www.prusaprinters.org/prints/62792-modular-tagging-system-for-plants-boxes-drawers"><strong>Modular Plant Tagging System:</strong></a></p><figure class="image image_resized" style="width:90.25%;"><img src="https://media.prusaprinters.org/media/prints/63019/rich_content/48763fbb-f2bd-44e3-9764-a84be00175da/overview.jpg#%7B%22uuid%22%3A%221829591b-91bf-4bba-a955-5ea7cf0ce650%22%2C%22w%22%3A1080%2C%22h%22%3A814%7D"></figure></td><td><p><a href="https://www.prusaprinters.org/prints/60395-rain-gauge-using-advanced-techniques-and-pvb"><strong>Rain Gauge:</strong></a><strong> </strong></p><figure class="image image_resized" style="width:50%;"><img src="https://media.prusaprinters.org/media/prints/63019/rich_content/0c295b94-a75b-41c8-a13b-6fde0aaccfb3/raingauge3.jpg#%7B%22uuid%22%3A%22244c6a77-7801-449e-8d03-64a4d07d1a6b%22%2C%22w%22%3A1278%2C%22h%22%3A1472%7D"></figure></td></tr></tbody></table></figure><p> </p>
With this file you will be able to print Colorful Wind Wheel with your 3D printer. Click on the button and save the file on your computer to work, edit or customize your design. You can also find more 3D designs for printers on Colorful Wind Wheel.