Combination lock soft drink can cover/piggy bank
thingiverse
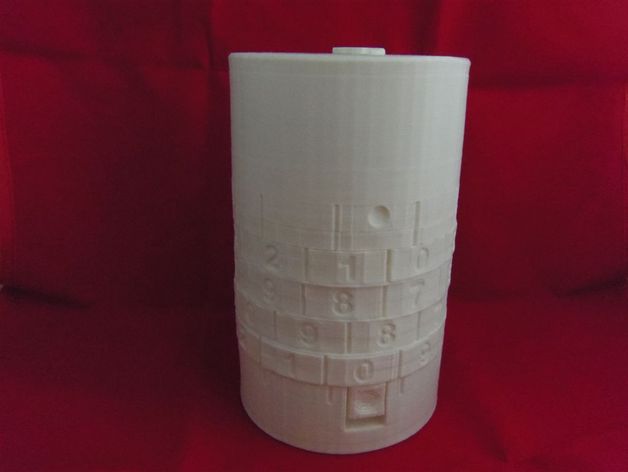
An insulated cover for a 375ml (standard Australian, 67 x 130mm) soft drink can, with screw-on top and four digit combination lock to keep your drink safe from your work/school mates. With an alternative top which has a coin slot, it can instead be used as a piggy bank/ coin safe. Another alternative top has a hole for a straw, with a screw-in plug. For the truly paranoid/security conscious, there is optional provision for a chain/padlock so it can be secured to another object. Designed in Tinkercad with the threads created by a self-written Shape Generator. Instructions Suggested print settings are 0.25mm layers, 2 shells, and 10% infill. It prints fine with 5% infill, but 10% infill looks like it will be better for insulation. No raft or support is required. Total print time on a Replicator 2X is about 10 hours, and uses about 200g of PLA. Printed parts required: Can_Safe_Base: One required One of the following choices for the top (one required): Can_Safe_Top: Soft drink can safe without straw hole. Can_Safe_Straw_Top: Soft drink can safe with straw hole. Can_Safe_Coin_Top: Piggy bank/coin safe. Can_Safe_Latch: One required Either: (one required) Can_Safe_TopRing Can_Safe_SecureTopRing (which has a loop for fitting a chain/padlock for securing the safe to another object) Your choice of any four of the dial rings, which set the combination: Can_Safe_Dial1: Combination digit is 1 Can_Safe_Dial2: Combination digit is 2 Can_Safe_Dial3: Combination digit is 3 Can_Safe_Dial4: Combination digit is 4 Can_Safe_Dial5: Combination digit is 5 Can_Safe_Dial6: Combination digit is 6 Can_Safe_Dial7: Combination digit is 7 Can_Safe_Dial8: Combination digit is 8 Can_Safe_Dial9: Combination digit is 9 Can_Safe_Dial0: Combination digit is 0 Can_Safe_Washer: Three required If you are using the Straw_Top and wish to be able to plug the straw hole also print Can_Safe_Straw_Plug. To assemble the safe body/combination lock (refer to assembly diagram in Gallery): (The following steps are shown in Step 1 in the assembly diagrams) Hold the latch by the grip - the raised dimpled part at one end - horizontally with the protrusions facing up. Hang the dial for the first digit of your combination vertically on the latch. Have the notch in the dial (i.e. the combination digit) anywhere but uppermost, so the latch is not sitting in the notch in the dial. This means you will have to lift the dial over the protrusions on the latch. Put the dial against the grip. The bottom of the digits should be against the latch grip, so they will be up the right way when the safe is assembled and stood upright. Hang a washer hard against the dial. Hang the dial for the second digit on the latch, against the washer. Hang another washer hard against the second dial. Similarly hang the dial for the third digit, and then the third washer. Note that the last dial can be left out for now, and will be fitted later. (The following steps are shown in Step 2 in the assembly diagrams) Hold the safe base horizontally, with the latch groove uppermost, and slide the latch - with dials and washers - into the groove, grip end first. The washers are a fairly tight fit (and also fairly fragile), and need to be kept perpendicular to the base surface in order to slide on. Slide the latch, dials and washers all the way in, so the first dial sits against the bottom of the base. Note that the latch grip won't be able to be moved all the way to the end of the groove until the dials are rotated to the correct combination. All the washers and dials should be touching each another with no gaps. (The following step is Step 3 in the assembly diagrams) Slide the last dial onto the latch. You will have to rotate it so its combination digit aligns with the latch before it goes on. Place it against the last washer. The top of this dial should be a couple of mm below the start of the thread, and that space should be even all around the safe. (The following step is Step 4 in the assembly diagrams) Position the top ring (either TopRing or SecureTopRing) with its grooved side facing towards the bottom of the safe, and align the notch in it with the latch. Slide it onto the base. It is a firm fit, but should push on without too much effort. Use: Rotate the dials to your chosen combination. Use the vertical lines on the base, top ring and dials to align them correctly. When the correct combination is set, the latch can be slid downwards (towards the base of the safe) to the very end of the groove, and the top can be screwed on all the way. Screw the top on, stopping when it is almost tight and the dot on its edge is aligned with the latch. To secure the top, slide the latch upwards and rotate one or more of the dials. Reverse the steps to unlock: align dials, slide latch downwards, unscrew lid. Tip If you are using the top with the straw hole, the Straw_Plug can be screwed in from either the outside or inside of the safe top - the head is thin so it will clear the top of the can if on the inside.
With this file you will be able to print Combination lock soft drink can cover/piggy bank with your 3D printer. Click on the button and save the file on your computer to work, edit or customize your design. You can also find more 3D designs for printers on Combination lock soft drink can cover/piggy bank.