Combined First Layer + Adhesion Test
prusaprinters
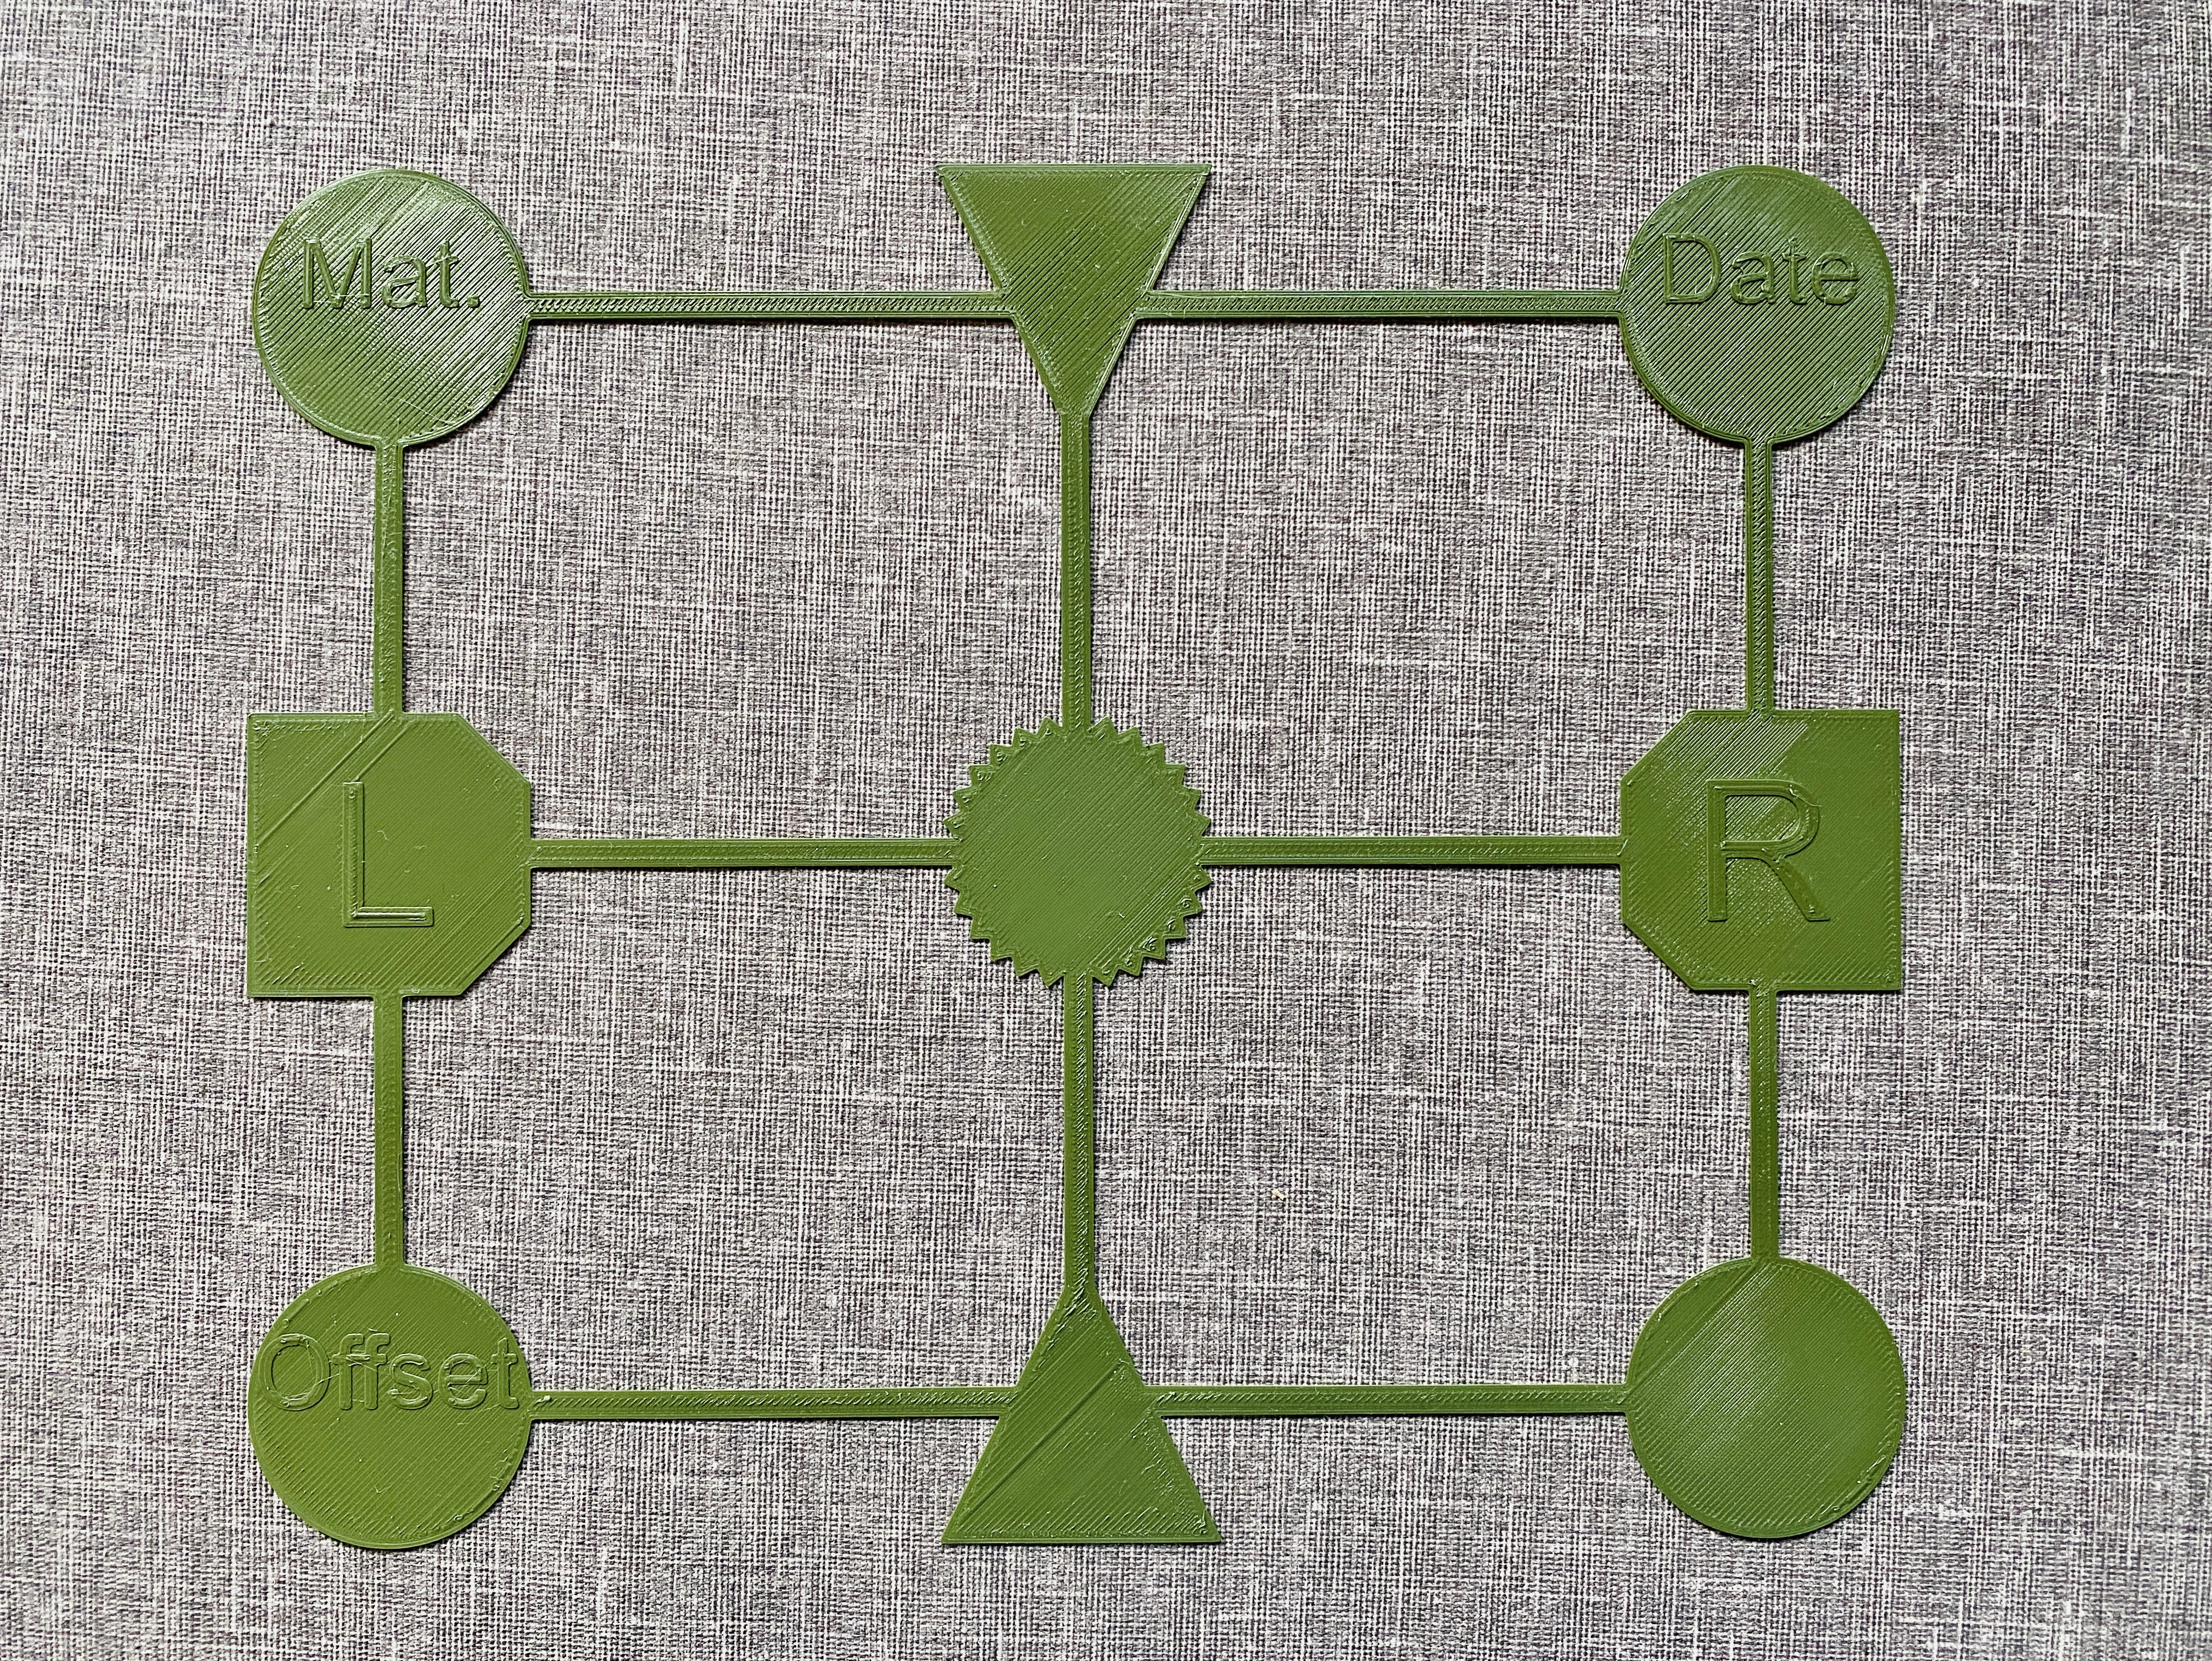
<h3>The Ultimate First Layer and Adhesion Calibration</h3><p><strong>I designed this model to test several calibration and adhesion aspects like for example:</strong><br><br><strong>Nozzle Offset</strong><br><strong>Adhesion</strong><br><strong>Roundness</strong><br><strong>Small-feature performance</strong><br><br>Also it <strong>gives you an indication</strong> for <strong>retraction- and extrusion-multiplier</strong> settings.</p><p>Designed for <strong>Original Prusa Mk3 </strong>but scaling to any other build plate (e.g. <strong>Original Prusa Mini</strong>) is of course possible.</p><p><strong>I hope this model helps you as much as it helped me on the way to fast and successful, trouble free printing.</strong><br><br>Please see below for more Details.<br><br><strong>Happy Printing!</strong></p><p> </p><h3><strong>Features:</strong></h3><p><strong>1.) Print-bed orientation markers for easy allocation:</strong></p><figure class="image image-style-align-center image_resized" style="width:79.21%;"><img src="https://media.prusaprinters.org/media/prints/108863/rich_content/e6d5475a-c0b5-4e06-be8e-3a32f1722772/foto-281221-12-07-37.jpg#%7B%22uuid%22%3A%223cd9ceb5-45ad-45f4-9e78-74482e72ebfe%22%2C%22w%22%3A4032%2C%22h%22%3A3024%7D"></figure><figure class="image image-style-align-center image_resized" style="width:79.08%;"><img src="https://media.prusaprinters.org/media/prints/108863/rich_content/820d187f-a64d-4fd0-bb59-799a97b47e81/foto-281221-12-07-42.jpg#%7B%22uuid%22%3A%229dff670b-3e4f-4621-ac28-dfb24c4fc5b8%22%2C%22w%22%3A4032%2C%22h%22%3A3024%7D"></figure><p> </p><p><strong>2.) Most common shapes you will find in regular models to help with evaluation of important parameters.</strong></p><p><strong>Circle: </strong>Somethimes when printing circular patterns, they keep coming out as an oval shape. This test print will help you to reveal that issue and speed up trouble-shooting.</p><figure class="image image-style-align-center image_resized" style="width:53.74%;"><img src="https://media.prusaprinters.org/media/prints/108863/rich_content/9932aab0-5651-4110-a42b-9cb999f21156/30-12-_2021_15-19-29.jpg#%7B%22uuid%22%3A%22fac076d9-7b5b-4200-a1fe-f2502161bd8f%22%2C%22w%22%3A370%2C%22h%22%3A360%7D"></figure><p> </p><p><strong>Triangle:</strong> Cornes with an angle below 90° are sometimes hard to print at the tip of the corner.<br>While a rectangular shape won't show this issue (cause all cornes are 90°), the triangle with corners at 60° will.</p><figure class="image image-style-align-center image_resized" style="width:60.56%;"><img src="https://media.prusaprinters.org/media/prints/108863/rich_content/432de3e3-ab1e-4a86-9992-76c2d440b014/30-12-_2021_15-24-18.jpg#%7B%22uuid%22%3A%22a9fd779c-72f8-4155-8db2-84c9bf5d7aab%22%2C%22w%22%3A458%2C%22h%22%3A374%7D"></figure><p> </p><p><strong>A finely jagged pattern: </strong>This part of the test print will most likely trigger some retractions as the print head needs to move arount to fill the small gaps in the corners. <br>Obersving the results will help you to judge the flow (extrusion multiplier) and retraction settings.<br>(Plus: In case you struggle with local or evenly distributed bed adhesion-issues, the small details in the middle of the print bed will show them too.)</p><p> </p><figure class="image image-style-align-center image_resized" style="width:61.28%;"><img src="https://media.prusaprinters.org/media/prints/108863/rich_content/40a48492-588f-4dc0-927b-3e3a2e7f115c/foto-281221-12-07-49.jpg#%7B%22uuid%22%3A%22fecbbbbe-4c59-4a3c-acef-260a405b96bb%22%2C%22w%22%3A4032%2C%22h%22%3A3024%7D"></figure><p><br><strong>3.) Dedicated labeling areas:</strong><br>Finally you can label your test-print regarding:<br> </p><p><strong>Date of your test print:</strong></p><figure class="image image_resized" style="width:60.46%;"><img src="https://media.prusaprinters.org/media/prints/108863/rich_content/240aa2ae-0487-4823-878b-0bf3f0d117f5/date.jpg#%7B%22uuid%22%3A%22d83933ee-db10-4d2a-b2fc-ab969b73335d%22%2C%22w%22%3A4032%2C%22h%22%3A3024%7D"></figure><p><strong>Material you used:</strong></p><figure class="image image_resized" style="width:59.92%;"><img src="https://media.prusaprinters.org/media/prints/108863/rich_content/d9f26979-9b9c-4c5c-8dad-7dccfdba6918/material.jpg#%7B%22uuid%22%3A%22d95c1063-fb24-4d06-a5b7-86d4bda90b78%22%2C%22w%22%3A4032%2C%22h%22%3A3024%7D"></figure><p><strong>Nozzle offset applied:</strong></p><figure class="image image_resized" style="width:59.26%;"><img src="https://media.prusaprinters.org/media/prints/108863/rich_content/73acc1ac-3e73-42d9-b18d-a700cb45f5bb/offset.jpg#%7B%22uuid%22%3A%225ef97698-b52a-4c02-b6b7-46fa61b2ac20%22%2C%22w%22%3A4032%2C%22h%22%3A3024%7D"></figure><p>… for easy comparision and documentation of your progess + success.</p><p>This model was inspired by several first-layer calibration tools available (especially the Prusa Bed Level Test) but none of them combined all the featutes I wanted and needed to make leveling, calibration and documentation easy and quick.</p><p>Please feel free to like and share.</p><p>Happy Printing!</p>
With this file you will be able to print Combined First Layer + Adhesion Test with your 3D printer. Click on the button and save the file on your computer to work, edit or customize your design. You can also find more 3D designs for printers on Combined First Layer + Adhesion Test.