Combined Magnetic Carriage and Slider
thingiverse
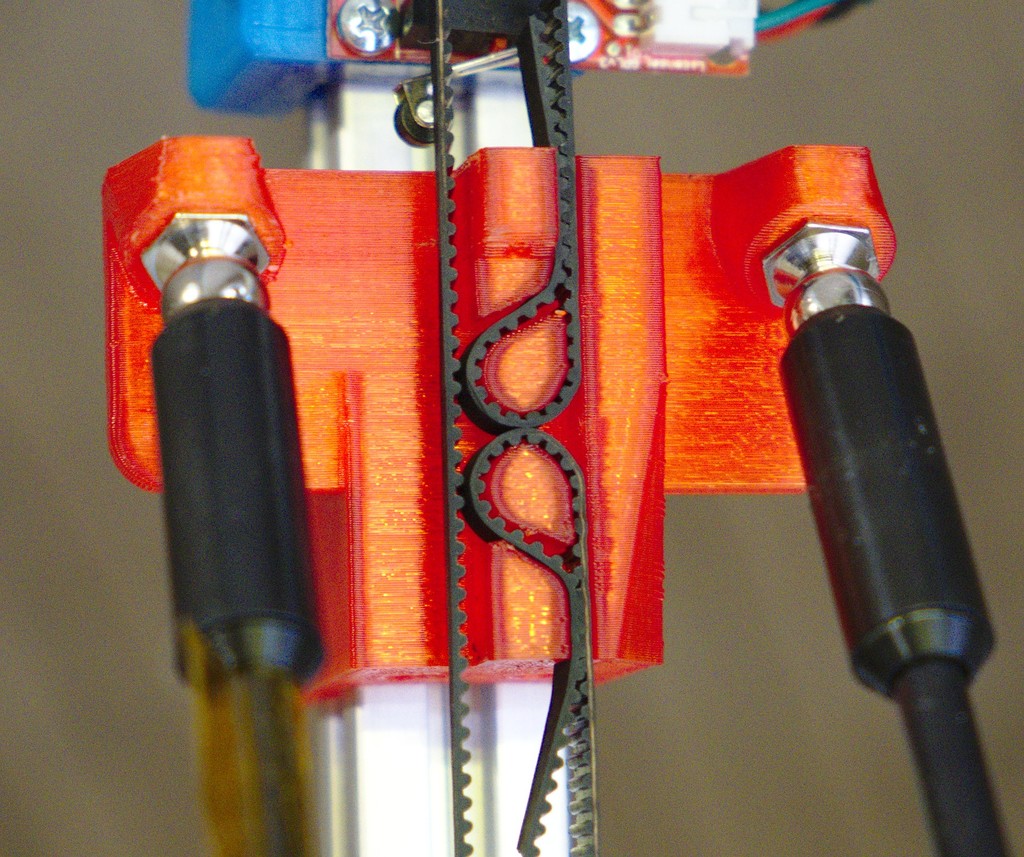
Description =========== This is a remix of my Yet Another Kossel Magnetic Carriage (https://www.thingiverse.com/thing:2833905), which is a remix of the Kossel Magnetic Ball Stud Carriage (https://www.thingiverse.com/thing:932959) by Tim Watson (aka wittmason), which is in turn a remix of the Kossel Mini Spring String Effector and Carriage (https://www.youmagine.com/designs/kossel-mini-spring-string-effector-and-carriage) by Forerunnert. This version makes the following changes from its immediate predecessor, the first two of which are the most important: * **Combined 2020 slider** -- This version melds the carriage with a 2020 slider, similar to DanBuro's creation (https://www.thingiverse.com/thing:984766). This simplifies assembly, since there's no need to screw the carriage and slider together. The 2020 slider is intended to fit partially or fully around a 2020 extrusion, sliding smoothly (with a bit of lubrication) without the use of wheels. * **Improved stability** -- This is essentially a consequence of the preceding point, and is more important. Compared to a combination of two parts, I hoped this one would twist less because of a wedge of plastic that strengthens the piece as a whole against the possibility of twisting as the printer operates. In practice, this effect was small at best. * **Minor improvements** -- I tweaked numerous parameters in the model, mostly to get it to print more easily in its new upside-down orientation. Forerunnert's original design was intended to support a spring-based redundant/emergency magnetic arm spring, via the hole in the top center of the carriage. I'm not using this feature, but I've left it in place because I may want to experiment with a flying extruder in the future, and that could be a useful mounting location for it. It does no harm if it's not used. Printing This Thing =================== In total, I provide eight .stl files. Two (`Slider-Test-bare.stl` and `Slider-Test-full.stl`) are 9mm-high slices of the slider alone, intended for printing to test the slider's fit (see below) before printing the whole slider. The remaining six `.stl` files vary on two dimensions: * **Inter-ball spacing** -- I provide 48mm, 51mm, and 55mm versions. I use the 55mm version myself with my Duet Delta Smart Effector. The other sizes seem to be at least somewhat popular; but see "Modifying This Thing," below, if you need another spacing. * **"Bare" vs. "full"** -- The "full" versions wrap all the way around the 2020 extrusions, which is more stable but precludes mounting anything on the outside of the vertical extrusions. The "bare" versions are untested by me in a working printer. They cut off the back side of the slider, which is similar to PLA Slider for 1515 Extrusion (https://www.thingiverse.com/thing:984621). This variant enables mounting items to the outside of the vertical 2020 extrusions, but I expect this version would be less stable. Print tolerances are critical; if the hole for the 2020 extrusion is a little bit narrow or if its shape is distorted, the slider won't fit over the extrusion; or if you can get it to fit, it won't slide smoothly. (Note that considerable friction is normal when the slider is first fit; but the slider should begin moving smoothly after lubrication and breaking-in movement, as described later, in "Using This Thing.") If you can't get the slider to fit, or if it produces too much play, you may need to adjust the extraCutout variable (as described later, under "Modifying This Thing") and build a fresh .stl file. Alternatively, adjusting slicer settings may help. With DanBuro's slider, for instance, I found I needed to reduce the infill/perimeter overlap and the extrusion multiplier to get the part to fit. In addition to the tight tolerances required, this Thing is challenging to print because of the overhangs. It prints upside-down to deal with the worst of these (it should load into your slicer in this upside-down orientation); however, it benefits from supports in the belt loops. Other overhang areas (in the aeration holes and in the areas where mounting nuts go) aren't normally a problem; however, most slicers tend to go a little crazy with their supports. This unnecessary support material can be difficult to remove. I've tried printing this Thing with no supports, and the result is surprisingly good, as shown in one of the photos -- there was some sagging around the belt loops, but this can be trimmed away and the slider/carriage should work. Thus, if you're using a slicer that doesn't provide manual support features, you may want to simply print without supports. Alternatively, try playing with the overhang threshold. By setting this to 1 in Slic3r, it produces supports only around the belt attachment points. It still produces too much support there, but at least you won't be digging it out of the hole for the 2020 extrusion. If your slicer does provide a manual support option, try adding minimal supports around the belt loops. I've found ideaMaker's manual supports to be easier to remove than those produced by CraftWare. Other slicers I have don't provide manual support options. (I don't own a Simplify 3D license.) I recommend printing in PLA, which is quite rigid. PETG has more "give," which is likely to lead to flexing. I've not tried other plastics for this or similar parts. Because this carriage/slider will encounter significant stresses and must be rigid for best results, I recommend printing with a high infill setting and multiple perimeters. I used 3 perimeters and 70% infill. Using This Thing ================ To use this design, you will also need, per carriage: * **2x magnetic balls with stud mounts** -- These are available from Ultibots, Filastruder, and others. If you bought a complete set of magball rods, you should already have these balls. * **2x M3 nuts** -- These help hold the ball studs in place. Before attempting to fit the slider to its 2020 extrusion, be sure to carefully examine the 2020 cutout. If you see any blobs, burs, or stringing, remove the defects. Note that the bottom surface when printing (the top in use) may have a slight lip that will need to be removed. Carefully finishing these surfaces with a knife, file, or other tool is required. You must also remove support material, of course. (Small bits of support material in the aeration holes shouldn't make much of a difference.) You'll almost certainly have to lubricate your vertical extrusions to use this slider. When I first built my printer, I used a few drops of vegetable oil for this purpose; but that eventually turned gummy. I'm now trying a lubricant based on lithium grease and PTFE, and sold for use in precision optical equipment such as camera lenses and microscopes. I strongly recommend printing a `Slider-Test-full.stl` part to assess proper fit before printing the whole carriage/slider. Note that the 9mm test part is likely to move more smoothly than the full part, so if the test part barely moves, a full print won't move at all. After lubricating a 2020 extrusion and slipping the slider over it, you'll have to run the slider up and down the extrusion by hand a few dozen times before it begins to move really smoothly. If it sticks and requires considerable force to move, even after lubricating the 2020 extrusion and breaking it in, you may need to revisit your slicer settings, or modify the `extraCutout` variable, as described shortly. Modifying This Thing ==================== You can edit the `Magnetic-Carriage-and-2020-Slider.scad` file to alter various details of the design, then build your own custom `.stl` file using OpenSCAD (http://www.openscad.org). The Thingiverse Customizer can do this, too. Variables you may want to alter include: * `makeTest` on line 10 determines whether the small slider test wafer is built (`true`) or the complete slider/carriage (`false`). * `bareBack` on line 16 determines whether to build the "full" version or the "bare" version, as described above; set this to `true` to produce the bare version or `false` to produce the full version. * `rodSeparation` on line 20 adjusts the separation between the magball mounts, and therefore between the push rods. *Be sure this value matches the value used on your effector!* * `extrusionSize` on line 24 sets the size of the extrusion. I've tested only `20` (for 2020 extrusions). In theory, setting this to `15` should produce a slider that works with 1515 extrusions; however, you may need to adjust finWidth and/or finDepth on lines 28-29, too. This design does not support non-square extrusions, such as 2040. * `extraCutout` on line 35 specifies a slop factor by which the size of the extrusion cutout is increased. The default is `0.3`, which works well for me; however, you may need to adjust this value and/or tweak your slicer settings, as described earlier. Note that the slider will move with difficulty initially; you must lubricate the extrusion and move the slider up and down by hand quite a few times before it will move smoothly. * `extrusionCornerCutout` on line 48 controls whether a little extra cutout is made at the corners of the 2020 extrusion cutout. (`extrusionCornerCutoutRadius` on line 52 controls the size of this cutout, if it's present.) DanBuro's slider includes such cutouts, presumably to provide for some slop in the printing of the corners; however, when I sliced with ideaMaker, the result was a degraded ability to fit the slider, since there was a bulge near the extra cutout. This did not happen when slicing with Slic3r; but as ideaMaker provided the best supports for this design, I set the optimal design with ideaMaker's quirks in mind. As my 2020 extrusions are slightly rounded at the corners, a little deviation from a perfectly square corner is OK in practice. Thus, the default is `false`. If you have the opposite problem, you can change it to `true`. There are several more variables you can adjust; however, the preceding ones are the ones you're most likely to have to change.
With this file you will be able to print Combined Magnetic Carriage and Slider with your 3D printer. Click on the button and save the file on your computer to work, edit or customize your design. You can also find more 3D designs for printers on Combined Magnetic Carriage and Slider.