Compact 5-Spool Filament Drybox
thingiverse
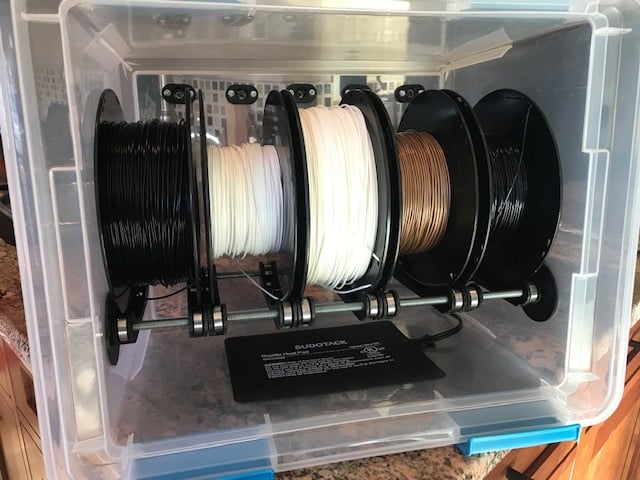
This storage system for filament is built around a Sterilite 30 liter water-resistant box. The drybox will store and feed five typical 1 KG spools, keeping them dry and dust-free. This project is part of my compact 3D printing workstation (https://www.thingiverse.com/thing:3399360). I designed threaded rod supports that maximize internal space, as well as a plug that serves as both dust barrier and quick access filament end holder. Some good part designs by others are used for this project and linked below (thanks to @rainreign1 and @Flex35). ### Printed parts from Thing Files page 4 X Threaded Rod Supports (outside endcap) 4 X Threaded Rod Supports (inside) 5 X Drybox Plugs with Filament Retainer 5 X Drybox Plug Washers ### Printed parts by other designers 5 X Filament Tube Feeder Front: https://www.thingiverse.com/download:4063547 5 X Filament Tube Feeder Back (my remix): https://www.thingiverse.com/download:6430559 10 X Spool Box Slider (two per spool, my remix): https://www.thingiverse.com/download:6432839 ### Purchased parts 1 X Sterilite 32 Quart/30 Liter Gasket Box (p/n 19334304) 5/16" - 18 threaded rod stock, e.g., https://amzn.to/2GfePvq 20 X 608zz bearings, e.g., https://amzn.to/2GeTvWK 5 X PTFE Tube Push In Quick Fitting Connectors, e.g., https://amzn.to/2MMh6PK 4 mm OD PTFE tubing as required, e.g., https://amzn.to/2MMm6nF 10 X M3x16mm screws and nuts for attaching tube feeders Optional: 6-8 watt heat mat, e.g., https://amzn.to/2Tme6MF **UPDATE:** I am now using u-groove bearings instead of the sliders. I'm finding it easier to load the box if the bearings move independently, and this design allows a few more mm of spool width. The pre-assembled nylon bearings that I'm using work very well but they are a bit pricey: https://amzn.to/2XDvyOb. Or you could roll your own with 20 plain 608 bearings and this printed part: https://www.thingiverse.com/thing:2425723 ### Assembly and Usage 1. The drybox may be assembled with the cover facing top or front. 2. Using one of the sliders as a template, mark a location near the bottom of the container. 3. Mark at the same vertical and horizontal offset on the opposite side. 4. Drill four 1 inch (26 mm) holes at the marked locations. 5. Cut two sections of 5/16" threaded rod about 20 mm longer than the container so the ends will be flush with the endcaps. 6. Press two bearings into each spool slider and insert the threaded rods through the bearings. Screw an inside rod support to the end of each threaded rod. 7. Adjust the inside rod supports so that the threaded rods are centered and the supports are pressed into the 1 inch drilled holes and just snug. Screw an endcap onto the end of each threaded rod and hand tighten. 8. Mount the five filament tube feeders and install a quick fit connector onto each. 9. Install a PTFE tube or drybox plug and washer on each quick fit connector. The washer makes disconnecting the tube much easier. The drybox plugs have retainer clips that can hold the end of filaments that aren't currently in use. 10. Install the optional heating pad on the container bottom. ### Notes All parts printed in ABS. Print the Drybox Plugs at 0.10 resolution and all other parts at 0.20, with build plate supports. The spool box sliders don't carry any weight and are thicker than necessary. It would be possible to gain a few more mm of space inside the box by redesigning this part with a reduced width.
With this file you will be able to print Compact 5-Spool Filament Drybox with your 3D printer. Click on the button and save the file on your computer to work, edit or customize your design. You can also find more 3D designs for printers on Compact 5-Spool Filament Drybox.