Compact Enclosure for Nubia Red Magic Adapter
thingiverse
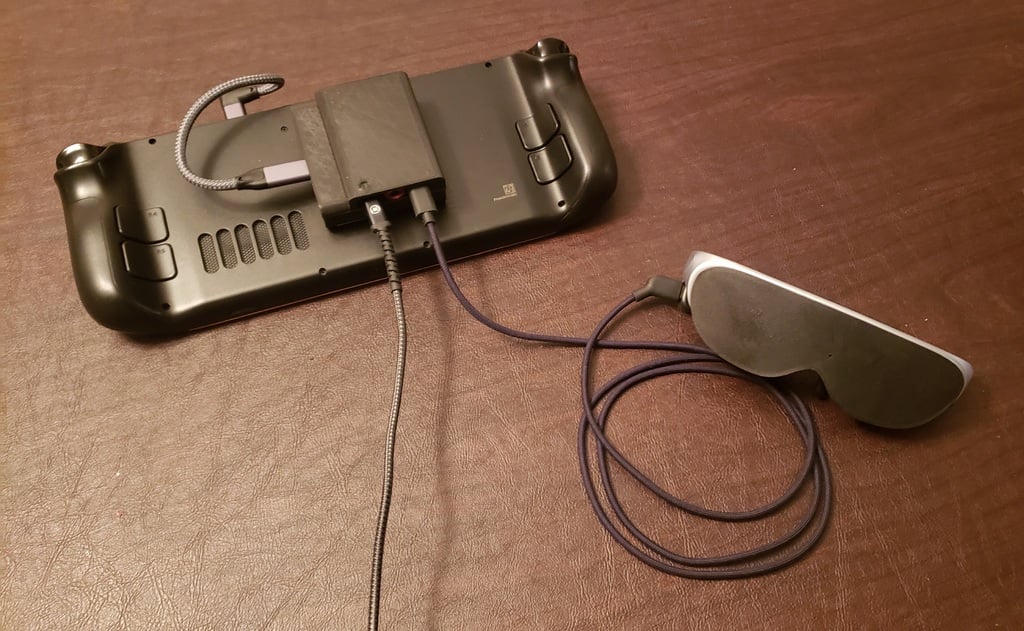
This gadget is an enclosure that allows the Nubia Red Magic Adapter to be "folded" up into as small a volume as possible. While this will work fine for any source device, it is primarily intended for use with the Steam Deck. If you are looking for something for use with a Cell Phone or Tablet, you can save yourself some hassle and get a much smaller package by just picking up a [Rokid Hub](https://store.rokid.com/products/rokid-hub). I have the Rokid Hub and it works fine with my Samsung Galaxy Note 9 and my Samsung Galaxy Tab S6 with either the Rokid Air glasses or the Nreal Air glasses. Unfortunately, for some reason, the Rokid Hub does not work with the Steam Deck, which means the only other option currently available commercially is the Nubia Red Magic Adapter The Nubia Red Magic Adapter is a somewhat awkward design that isn't ideal for use with the Steam Deck. It has a fairly thick and stiff 2' cable with a 2.5" wide USB connector. When you plug this connector directly into the Steam Deck, it will cover the power button as well as one of the exhaust vents on the Steam Deck. This 3D printable enclosure was designed to mitigate those issues by allowing the cable to be wound up compactly and attached directly to the back of the Steam Deck. Once attached, all you need is a small USB-C pigtail cable to connect the adapter to the deck, and you are left with two USB-C ports for video-out and power-in. I imagine any short USB-C extension cable that is rated to carry video and power will work for the "pigtail" but am personally using [this cable](https://www.amazon.com/gp/product/B07YP4SGZT/ref=ppx_yo_dt_b_search_asin_title?ie=UTF8&psc=1) from Amazon. When you print this, you will notice a small circle on the top left side. This is there simply to give a clear indication of which side the USB-C power input should be plugged into. The other USB-C is for the glasses. I considered designing this so that it could latch or screw together somehow so that it could be take apart, but in the end, I just decided to design it to be superglued together. This keeps the enclosure even smaller, and I don't intend to use the Nubia Adapter any other way. I used [Gorilla Superglue Gel](https://www.amazon.com/Gorilla-Super-Glue-Gram-Clear/dp/B00OAAUAX8/ref=asc_df_B00OAAUAX8?tag=bingshoppinga-20&linkCode=df0&hvadid=80539278510124&hvnetw=o&hvqmt=e&hvbmt=be&hvdev=c&hvlocint=&hvlocphy=&hvtargid=pla-4584138857546542&psc=1). I found what worked well was to get the adapter all wound up and installed into the bottom section of the enclosure and test to make sure everything is working in this state. I then put a good dallop of the gel glue onto a disposable paper plate and used a toothpick to spread it along all the inner edges of the top portion of the adapter. You want enough that all the surfaces that will mate with the bottom are covered and glistening a bit with glue, but not so much that it's going to ooze out when you put the two sides together. I let the glue sit for 15 to 20 seconds to "melt" the plastic a bit, and the pressed the two sides together and held it for several minutes. At least with PLA, that formed as nice tight bond, and I'm not worried about it coming apart unless I specifically want to pull it apart. I recommend just printing both parts face down so that all the support marks are on the inside. There are internal ledges that requires supports, and it can take a bit of effort to remove those supports, but it wasn't too difficult in my prints. I used the "line" support pattern in my slicer for the supports. Initially I mounted this to the back of my Steam Deck using some very thin [Velcro mounting tape](https://www.amazon.com/VELCRO-Brand-Removable-Mounting-Damage-Free/dp/B01KLXCHEC/ref=sr_1_3?crid=27TXTP62LO3RH&keywords=velcro+brand+removable+mounting+tape+damage+free&qid=1676595131&sprefix=velcro+brand+removable+mounting+tape+damage+free%2Caps%2C114&sr=8-3). That worked fine, but I have since transitioned to a [DeckMate mount](https://www.printables.com/model/214467-steam-deckmate). There is also an STL file for a cap, that can be used to protect the male USB-C connector when not in use. I got a little nervous just throwing it in a bag with this exposed, so this optional cap should help. It is a very tight friction fit, but and can be a bit tricky to remove the first time you work it into place, but it loosens up a bit after pulling it on and off a few times. **UPDATE 2/23/2023**: I have added STL files (and photos) for a right-angle version of the enclosure. This version of the enclosure works with a right-angle USB C cable such as [this](https://www.amazon.com/dp/B0836HS4LQ?psc=1&ref=ppx_yo2ov_dt_b_product_details). The USB-C input is on the side rather than the top, which decreases the amount of cable that sticks out above the Steam Deck by a few inches. Assembly is the same as with the standard enclosure, just need an extra 90 degree twist when placing the adapter in the enclosure. **UPDATE 4/11/2023**: I made an update to the bottom peice of the angled version of the enclosure I'm using to better accommodate a DeckMate universal mount. The DeckMate universal latch can now set down into the body of enclosure so that when it's attached there's less clearance between the enclosure and the body of the Steam Deck. There is still sufficient room inside the enclosure to coil the RedMagic cable. I also made a modified version of the bottom portion of DeckMate latch mechanism that fits into the indent on the modified enclosure. The modified enclosure and modified base portion of the latch can be downloaded from downloads section of this listing. However, if you don't already have the DeckMate, you will need to print the remaining portions from the full set of DeckMate parts that can be found [here](https://www.printables.com/model/214467-steam-deckmate/files). I used the "Case" version of the mount and attached it to the back of my SteamDeck with strong, but removable tape similar to [this](https://www.amazon.com/Double-Sided-Tape-Heavy-Duty/dp/B07Z1WPB77?source=ps-sl-shoppingads-lpcontext&ref_=fplfs&smid=APHHKZK1TU7TG&th=1). You will also need the bottom half of the latch mechanism. This is available on the same link above with all the other DeckMate printables, but if you want to avoid sanding and filing, I recommend you use the higher-tolerance version found [here](https://www.printables.com/model/289610-steam-deckmate-top-higher-tollerance-mechanism). Just assemble the latch mechanism with some small springs (I just stole two springs from ball-point pens that were laying around the house) and then tape or superglue the assembled latch mechanism down into the inset hole on the modified bottom enclosure. Happy Printing!
With this file you will be able to print Compact Enclosure for Nubia Red Magic Adapter with your 3D printer. Click on the button and save the file on your computer to work, edit or customize your design. You can also find more 3D designs for printers on Compact Enclosure for Nubia Red Magic Adapter.