Compact Trifan Ender 3-Pro-V2 Hotend LED Fan Housing
thingiverse
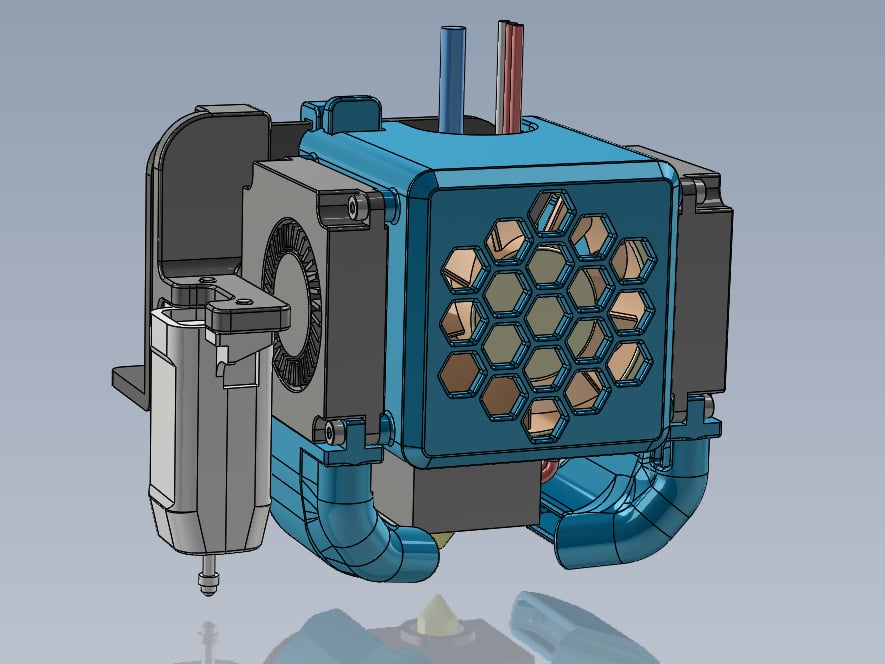
This is an updated revision of my previous Compact Trifan Design. I now have a version for the Ender3 V2 as well as a revised version for the Ender3/Pro. Both versions now incorporate a Snap-Fit design that allows instant installation and removal of the Main Housing without the use of tools. I have also changed the front Hotend grill pattern to a more open Hex pattern for improved air flow and an updated styling that several people had asked for. Note: The first three files are for the Ender 3 V2 only. The second three files are for the Ender 3 and Ender 3 Pro only. The rest of the files are for both versions. Again, the main purpose for the Compact Trifan design is to provide true separation of the Part Cooling and Hotend Fans. This allows for printing filaments like ABS and Polycarbonate that require No Part Cooling, due to warping and layer adhesion issues. The secondary purpose for the Compact Trifan design is to be able to have an unrestricted view of the Hotend Nozzle while printing. In order to enhance this even more, I have incorporated a single 5mm LED 24V light into each Fan Duct. This results in a fantastic lighted view of the Hotend Nozzle while printing. No more need to grab a flashlight to check how that first layer is going down. Another minor change made to the Compact Trifan Main Housings is a wire retention position that is higher up on the housing, for better unrestricted air flow for the main Hotend Fan. All wires are now mounted above the direct airflow path of the Hotend Fan. As before, with the Original Compact Trifan, I have provided a mounted Locking Tab for the Stock Creality Hotend as well as a version for the all metal Micro Swiss Hotend (and its clones). Also, as before, it is suggested to use some Aluminum Fiberglass Reinforced Heat Barrier Tape on the underside of the Locking Tab and Main Housing for printing higher heat filaments like ABS and Polycarbonate. The same extra screw list applies from the Original Compact Trifan, so if you are upgrading to this version, all the same screws will swap directly over to the new version. The only new parts will be the 24V LED wired lights. By the way, the new LED Fan Ducts will also fit the Original Compact Trifan Housing, in case you don't want to upgrade the rest of the parts. The following is a parts list for the new Compact Trifan LED Fan Housing. Parts List: 1. One extra 24VDC Winsinn 40mm 4010 dual bearing brushless turbine blower fan. 2. Four (4) M2 x 6mm Hex Socket Head Cap Screws for the upper mounting screws for both 4010 side mounted blower fans. These will self tap into the printed mounting holes. I used black oxide screws to match the black parts. 3. Four (4) M2 x 10mm Hex Socket Head Cap Screws for the lower mounting positions of the side mounted blower fans, which also retains the Fan Ducts. These also self tap into the printed mounting holes. Again, black oxide screws. 4. Four (4) M3 x 12mm Hex Socket Button Head Cap Screws for the inside mounted stock 40x10 hotend fan. These are slightly longer than the stock button head screws and self tap into the printed mounting holes. For a 40x20 Noctua hotend fan, use M3 x 22mm screws. 5. HMFC 2in x 16ft Aluminum Fiberglass Reinforced Adhesive Backed Heat Barrier Tape. This is used on the bottom of the Locking Tab and Main Housing for higher heat applications. 6. Two (2) Uxcell 24vdc 5mm wired single LED white light emitting diodes. Be sure to get ones with the 24vdc resistor built into the wiring. Connect in parallel to the main Hotend Cooling Fan so they will be always on while printing. I was able to find a pair of Winsinn blower fans and an assortment of M2 socket head cap screws, as well as an assortment on M3 Button Head socket screws on Amazon at a reasonable price. Also, the Heat Barrier Tape and LED lights were available at Amazon as well. The Hotend will need to be temporarily unmounted to install the Locking Tab. Simply remove the two hotend mounting screws and slide the Locking Tab over the hotend body and install the single stock screw for the Locking Tab on the Ender 3/Pro version, and no screws required for the Ender3 V2 version. Remount the Hotend and reinstall both Hotend mounting screws. The extra side mounted blower fan is spliced into the power lines (parallel) of the original side mounted blower fan. There is a cutout on each side of the new housing that will retain the wires for the side mounted fans and LED Fan Ducts. I recommend using some epoxy on the fan body where the wires enter the side of these fans as a strain relief. These are very delicate solder joints and can break if handled too much. I used JB Weld Black Plastic Bonder and applied a small amount to hold the wires in place. Feed the wires on the 5mm LED lights into the light port of the LED Fan Ducts. A small dental pick is useful to coax the wires out of the top of the LED Fan Ducts. Use the JB Weld Black Plastic Bonder (Epoxy) on the back of the LED lights and push into place in the Fan Ducts. The best position for the lights is to be about 2-3mm of the bulb protruding outward from flush with the duct opening. This allows for a slightly broader light pattern, since the bulb is not pointed directly at the nozzle. Be careful not to get any Epoxy on the end of the LED lights. It only takes a small amount of epoxy to secure the LED in place. When mounting the main Housing, be sure to slide it over both lower side tabs and the single snap fit tab at the top of the fixed Locking Tab. This will provide a secure three point mount for the main Housing. The Main Housing is sized to fit the stock 40x10 Hotend Cooling Fan as well as a 40x20 Noctua oversized cooling fan. Be aware that the Noctua fan is quieter than the stock fan, but may not provide as much airflow, if you chose to go that route. This can lead to "Heat Creep" issues, if using an All Metal Hotend with PTEG or PLA filaments in lower airflow conditions. I have also provided a set of .050" shorter LED Fan Ducts for certain clone Micro Swiss Hotends that may have a shorter nozzle height than normal. These will only be necessary if you notice your Fan Ducts are too close to the Print Bed surface. I made an Auto Bed Level Adaptor that will fit the BLtouch and CR-Touch level sensors and will fit both the Ender3/Pro and Ender3 V2 stock Backing Plates. This piece is independently mounted from the Compact Trifan Housing assembly. The Compact Trifan Housing no longer will have the auto level sensor mount built in and both can be used with or without the other. It mounts with a single M3 x 6mm Hex Button Head Cap Screw. I have to give a big thanks to fellow Thingverse member, Dave (aka befuddledpirate), for his help in inspiriting me to update these designs as well as his help in providing critical measurements for the Ender3 V2 that were used in the updated parts. Here is a quick video I made of the new Compact Trifan LED laying down a first layer with ABS filament, https://www.youtube.com/watch?v=4pyVr1Rdeks Update 1 - I have modified the LED Fan Ducts for improved air flow. There is now almost twice the area at the opening of the Fan Ducts and the flow is directed more toward the nozzle than before. I have deleted the original LED Fan Ducts and replaced them with the new Revised versions. If you are one of the first 44 downloads of the original versions, please update to the new LED Fan Duct versions. Update 2 - I modified the Locking Tab parts for the Ender 3/Pro version only. Increased the stiffness of the snap fit lever arm for a more rigid engagement of the housing. I have deleted the original Ender 3/Pro Locking Tabs and replaced them with the new revised versions. Update 3 - I uploaded Revised Fan Ducts without the LED addition to the previous version Compact Trifan page, If you prefer your Fan Ducts plain, without LED, you can download them here, https://www.thingiverse.com/thing:4788255 . Any of my Fan Ducts fit any version Compact Trifan system.
With this file you will be able to print Compact Trifan Ender 3-Pro-V2 Hotend LED Fan Housing with your 3D printer. Click on the button and save the file on your computer to work, edit or customize your design. You can also find more 3D designs for printers on Compact Trifan Ender 3-Pro-V2 Hotend LED Fan Housing.