
Compact Z-Axis Magnetic Wobble Dampener
thingiverse
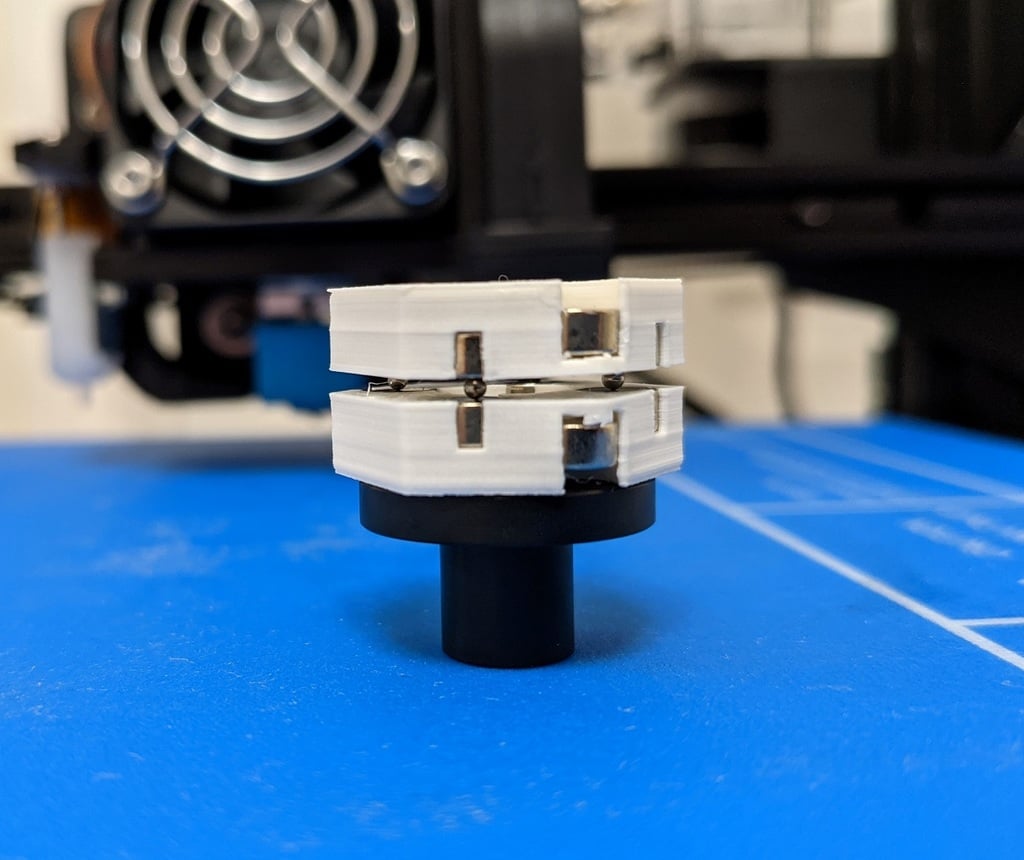
There's been a few of these popping up on Thingiverse and the idea is based on MirageC's work https://www.youtube.com/watch?v=mqSQhwqSzvg. I've gone and made my own for the Anycubic Mega Zero since the ones available so far are far too big. Here's a video of these: https://youtu.be/MiLdzWd_OEo They are meant for 16mm lead screw nuts. Let me know if you need 18mm mounting holes. I have been using this in combination with this [printable coupler](https://www.thingiverse.com/thing:2922542). This is part of a series of mod designs for the Mega Zero V1, here are others mods I've designed: - [MGN9 X-Axis](https://www.thingiverse.com/thing:4830265) - [MGN12 Y-Axis](https://www.thingiverse.com/thing:4903945) - [Dual Lead Screw Linear Rods Z-Axis](https://www.thingiverse.com/thing:4817790) - [Sherpa Mini Direct Drive Mount](https://www.thingiverse.com/thing:4843855) **EDIT V3:** Much thinner version for 6x3mm magnets. Overall thickness is 3.50mm. There are lips around the bottom of the magnet slots. The idea is to have these sides of the two halves facing each other with ball bearings in between. The lip will prevent the magnet from pulling one another apart during removal. I highly recommend printing these with PETG rather than with PLA. Also, the magnets can be difficult to insert. Use a flat thick metal tool placed over the magnet while pressing down with your thumb. It's designed to be a snug fit so that superglue is not needed and the magnets can be reused. I've been using 1.5mm bearing balls and they have been working fine. 3mm balls are probably pushing it a bit. The larger the gap, the weaker the magnetic force and you will end up with the bottom half twist and cause estep loss. Make sure to lube as well, since that's a sign of binding caused by friction. The bottom shouldn't twist more than ~5 degrees at most. Pay attention that if there's twisting on one side then it should also occur on the other side. If one side twists while the other does not, then lube the twisting side. You also don't need to use anti-backlash lead screw nuts. Just replace the brass nuts with POM nuts. **End EDIT V3** **EDIT V2:** Added a round version with 6 magnets per side. 4 will receive bearing balls and the two protruding without. The two magnets are meant to help the pieces realign / aid lateral movement instead of spin with the lead screw. **END EDIT V2** You will need: (12) 6x3mm neodymium magnets. (4) 1.5 - 3mm ball bearing. I pulled mine from an LM8UU linear ball bearing guide. (2) 8mm M3 nut for the lead screw. (2) 8-10mm M3 nut for the top piece depending on the thickness of your Z bracket plate. I haven't had a chance to test these since I am out of the right size m3 screws. They are intended to be screwed in directly and no need for m3 nuts. But in the meantime, if anyone else has available parts and wants to give them a try, please feel free and feedback would be greatly appreciated.
With this file you will be able to print Compact Z-Axis Magnetic Wobble Dampener with your 3D printer. Click on the button and save the file on your computer to work, edit or customize your design. You can also find more 3D designs for printers on Compact Z-Axis Magnetic Wobble Dampener.