Complete Ender 3 BL Touch Guide (Updated 06/13/19) - No cutting wires or buying adapters
thingiverse
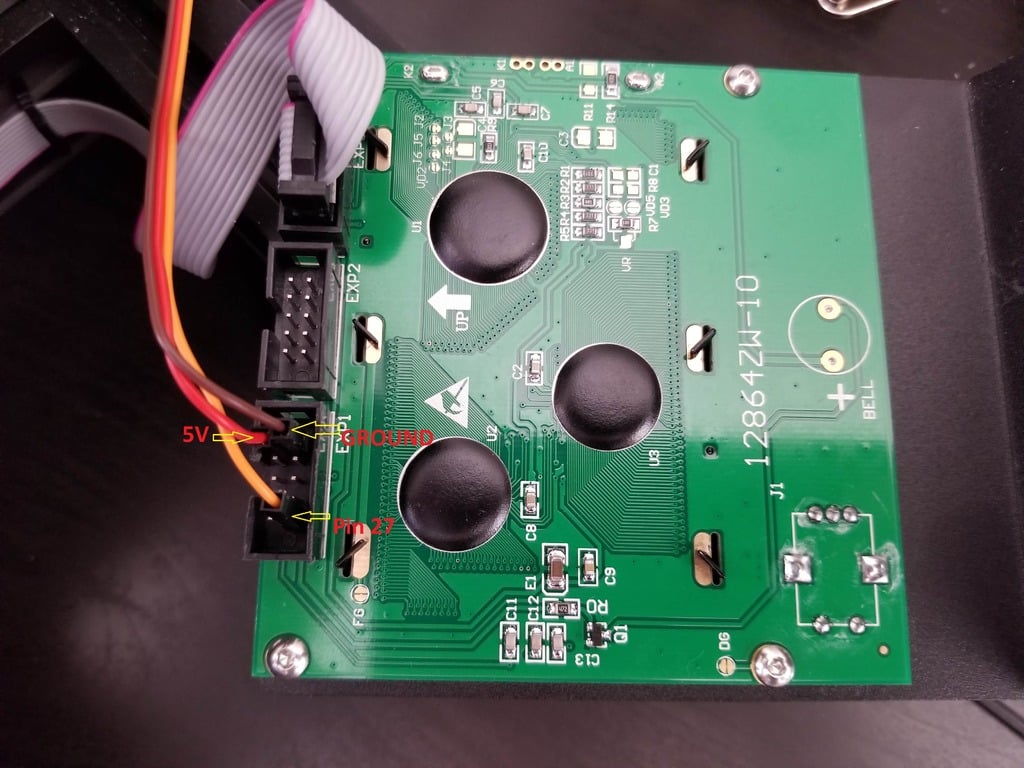
Luckily BL Touch is now fully supported by TH3D so this makes things incredibly easy. **Misc Requirements**: * Generic or branded BL Touch (Clones can be bought for as low as $4 on Aliexpress or genuine for about $48 on Amazon. The one I bought was $11 on sale, [currently it's $15](https://www.aliexpress.com/item/Old-customer-discount-activities-bl-touch-auto-bed-leveling-New-upgrade-sensor-3D-TOUCH-SENSOR-2018/32913903746.html) and comes with extension cables which is nice. If your sensor comes with a metal tip, you probably have a v3. See v3 notes below. * BL Touch Mount (For stock: https://www.thingiverse.com/thing:3148733 from the page you can see my remix that doesn't require an M3 nut) * BL Touch height calibration cube (attached here in this guide) * Working bootloader (https://www.youtube.com/watch?v=fIl5X2ffdyo) * TH3D Unified firmware (https://www.th3dstudio.com/knowledgebase/th3d-unified-firmware-package/) * Pliers * Pronterface Software (http://www.pronterface.com/) **Mounting** - For printing and mounting the BL Touch, that should be pretty straight forward. Please follow the instructions on the mount page or your appropriate cooler's page. I have added a calibration cube to make sure the BL Touch is mounted at the optimal height. Instructions on the Thingiverse page. **Wiring the Z Stop** - Wiring the Z stop is quite straight forward. Simply unplug your current z end switch and plug in the appropriate wires from your BL Touch. For my version they were white and black. https://imgur.com/6EzUS4J This is not as scary as it sounds. When you click home after flashing, the nozzle goes to the center of the bed and the BL Touch acts as your Z stop when the probe touches the bed. **Wiring the Sensor** - Unlike other methods, we will be using the pins on the back of the LCD. I have taken a few pics to try to make it more clear. **The downside to this method is the speaker will buzz constantly once the firmware is flashed so you will need to disable it physically**. I always hated the speaker so I removed it. If the pics are still not clear, pin 27 is on the farthest side of the plug on the left and 5v/ground are on the farthest right pins. https://imgur.com/qBv1IDl https://imgur.com/CkXBZLp https://imgur.com/ctmIvAt https://imgur.com/dUlynaB **Wiring Alternative - No soldering** - If you don't want to remove the speaker you can buy a ribbon adapter (https://www.aliexpress.com/item/32995440438.html) or you can just splice the cable into the ribbon. Either way, the rest of the guide and firmware changes are unaffected **Wiring Alternative - soldering** - If you are competent at soldering, you can either solder directly to the pad or add a pin here (https://imgur.com/gallery/BvufghV) and define it as Pin 29 rather than Pin 27. Whoever wrote this guide (user name jaywidanem on imgur) please PM me if you see this so I can give you credit if you're here on thingiverse. **Wiring Alternative - using the ICSP header pins** - VonThing wrote up a great alternative wiring scheme using the ICSP headers. This lets you keep your buzzer and still use the BLTouch. (https://www.reddit.com/r/ender3/comments/c02q88/the_definitive_guide_to_wiring_bltouch_v3_on_icsp/) **Flashing the firmware** - If you are VERY lazy, you can use this paste bin (https://pastebin.com/DyMqSGuM) and simply replace paste this over your configuration.h in the TH3D firmware. ONLY DO THIS FOR THE MATCHING VERSION. If you do this, you still need to set your X Y probe offsets if you use a different mount than above. If you wish to do the whole process manually or if your firmware version is different than U1.R2.10a, please keep reading. Uncomment: #define ENDER3 #define CUSTOM_PROBE #define BLTOUCH #define SERVO0_PIN 27 Change (for the mount above -44/-14 are correct, if you use a different mount YOU MUST UPDATE THIS): #define X_PROBE_OFFSET_FROM_EXTRUDER -44 // X offset: -left +right [of the nozzle] #define Y_PROBE_OFFSET_FROM_EXTRUDER -14 // Y offset: -front +behind [the nozzle] If everything is correct you should be good to boot up your printer. Don't forget to load EEProm from the printer menu under "control". Go to auto home and when the printer goes back to the center and the probe drops and it starts to go down, either be ready to flip the power button to prevent nozzle crash or manually touch the probe GENTLY to simulate it touching the bed. If things are going as planned the probe should touch the bed a couple times then come to rest. If something went wrong (most likely your z stop wiring), the nozzle wish crash into the bed and try to grind itself through the printer or when you touched the probe the printer will ignore you and it will keep going down). If things are going well, here is an amazingly good video on setting Z offset (https://www.youtube.com/watch?v=y_1Kg45APko). **Update 4/30/19 for clarity** After setting your Z offset, you will want to run G29 to do an autobed level probe. Then you will send M500 to save to EEPROM and M501 to read the settings from EEPROM back to the printer. Some software/settings uses G29 before every print in the "start gcode" so in that case, this step isn't necessary; however, some start gcode uses "M420 S1" to recall this data in which case it would be necessary. **Advanced Tuning (Completely Optional)** Found this great video from Teaching Tech on Youtube where he shows how to greatly speed up the probing speed of the G29 command. (https://www.youtube.com/watch?v=BV11-VOQjMc) Highly worth trying out if you're comfortable with doing a lot of firmware edits and re-flashing your firmware. ENJOY YOUR NEW AUTO BED LEVELING! **Closing thoughts:** If you are having trouble flashing, your bootloader might be corrupted. I successfully flashed a bootloader and TH3D but couldn't flash this new version of the firmware. I kept getting a "not in sync" error. The solution was to reflash the bootloader. Right now I'm running the signal/5v cable over the top of my power supply, I will design a cable guide/holder and update this thread when it's done or I might just solder on some longer cables to keep my install clean. I'm not sure what is less work tbh. **update** I just soldered some extensions so there won't be an over power supply guide coming any time soon. Don't forget to add "M420 S1" to your start gcode if you're not using G29 every time. "M420 S1" should go on the line right after G28. (http://marlinfw.org/docs/gcode/M420.html) **Update 4/22/19** It has been reported to me that some clone manufacturers are now shipping BL Touch V3 clones. If your Z stop isn't working and you reverse the wires and it still isn't working, you might have a v3 clone and you'll need stock Marlin v2.0 **Update 5/10/19** I'm getting quite a few questions about the new V3 and I found this great guide on how to get it fixed if you use marlin: https://www.youtube.com/watch?v=sOFxalLOZOI **Update 5/12/19** It's come to my attention that the newest TH3D has a v3 fix embedded. Instead of "#define BLTOUCH" you will uncomment: #define BLTOUCH_V3 Otherwise, the guide should work the same. **Update 5/29/19** Added and clarified alternative wiring schemes. Also added the advanced section. **Update 6/13/19** I have found the best way to really get a perfect Z offset is to use the method in the video above then print a few bed level tests and adjust the Z using the live Z offset or babystep Z function from the LCD menu. So first I will generally print loops to make sure I'm getting good adherence across the whole bed. This can identify if your G29 worked correctly. The adhesion should be the same regardless of where it is printing, so either too high everywhere or too low everywhere. Once you're done with that, print some squares and make sure they aren't stringy (too high) or missing spots or rough texture (too low). Here's a few customizeable links for testing your bed level. Bed Level Loops: https://www.thingiverse.com/thing:538624 Bed Level Squares: https://www.thingiverse.com/thing:2977300
With this file you will be able to print Complete Ender 3 BL Touch Guide (Updated 06/13/19) - No cutting wires or buying adapters with your 3D printer. Click on the button and save the file on your computer to work, edit or customize your design. You can also find more 3D designs for printers on Complete Ender 3 BL Touch Guide (Updated 06/13/19) - No cutting wires or buying adapters.