Complete Minecraft Ore Lamp
thingiverse
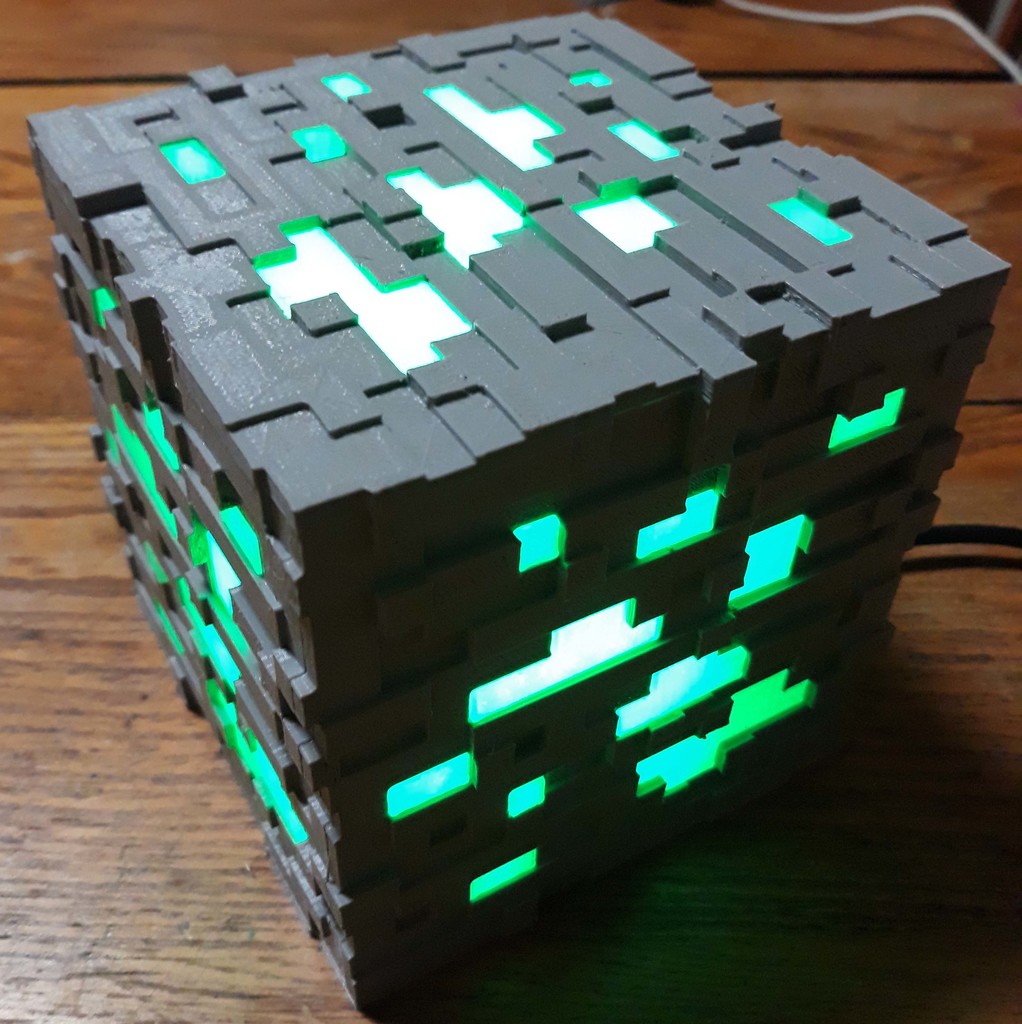
This is the consolidated build for constructing a Minecraft Ore Lamp. This is a remix based on the design by jorgenp at https://www.thingiverse.com/thing:3625720. Write the number of the stl file on the inside of each side as it comes off your printer. Now grab the inserts that astan00 did here: https://www.thingiverse.com/thing:4732460/files. You'll need to print 4 of these in white or translucent color. Print the 5th one from my set here, it has a hole for mounting a 6mm push button in (with hot glue). These inserts snap right into the sides of the cube. Use the push button'd insert on side #2 which has a cutout for the power cable. Snap the inserts into the sides and assemble the cube as shown in the example, but don't mount the bottom on yet. NOTE: The base plate is designed for headerless arduino nano's. Wire up the arduino nano as shown in the circuit diagram. The resistor value for the switch is 10K and its 330/470 on the pixel input. Hot glue the processor down in the trough and hot glue the pixels on the stump. Ive used a neopixel ring for one and a strip for another. Glue the switch in its hole on side #2. If you would rather go the WLED route, you can use the circuit and programming instructions found in my Simple WLED Night Light project: https://www.thingiverse.com/thing:4816082 PRO TIP: You can not turn off the power led via software on the nano. Use a marker or bit of sticker to block it out. Otherwise, your cube will have a faint red glow in the off position. Now glue the bottom on. Use the attached .ino files to either switch between colors or have it sweep thru them. The .ino files are based on the work done by Jonas-werner. My changes were to treat the switch as an interrupt. Build Notes: Ive included some photos of how I put them together. Using the base as a jig to get everything square is helpful. If you have a helper, you could use a large rubber band to hold all 4 sides together and then glue the seams. Make sure you have the sides orientated right and then the patterns will line up( I messed up, can you spot it?). Read the comments! Several questions are answered there and some good suggestions have been made. BOM Here is the parts list for this build. Full disclosure, these are affiliate links. You will need some 10K & 330 ohm resistors. Processor -> https://www.amazon.com/gp/product/B07DMGM5FT?ie=UTF8&psc=1&linkCode=sl1&tag=ani101mantoo-20&linkId=31a9024559041d03ba354f0d4a2b7fad&language=en_US&ref_=as_li_ss_tl Ignore all the talk about using the ATMEGA328P (old bootloader) setting in the arduino IDE, My batch used the regular ATMEGA328P setting. neopixel ring ->https://www.amazon.com/gp/product/B0105VMUUQ?ie=UTF8&psc=1&linkCode=sl1&tag=ani101mantoo-20&linkId=246080206febbd7628e55a0dc2e67204&language=en_US&ref_=as_li_ss_tl You will need to change PIXEL_COUNT to 12 to use all of the pixels on the ring. Push button switch -> https://www.amazon.com/gp/product/B07VQF8P2Y?ie=UTF8&psc=1&linkCode=sl1&tag=ani101mantoo-20&linkId=32ff73d72a257ca5f1e4ded97ab34447&language=en_US&ref_=as_li_ss_tl If you're using a neo pixel strip, I found these connectors very useful: Nicelux CCT LED Strip Connector: https://www.amazon.com/gp/product/B071VN9D6N?ie=UTF8&psc=1&linkCode=sl1&tag=ani101mantoo-20&linkId=41e8675b15f1e3679b6779b50c7ec662&ref_=as_li_ss_tl
With this file you will be able to print Complete Minecraft Ore Lamp with your 3D printer. Click on the button and save the file on your computer to work, edit or customize your design. You can also find more 3D designs for printers on Complete Minecraft Ore Lamp.