Compound Bow Center Shot Laser Alignment Tool
thingiverse
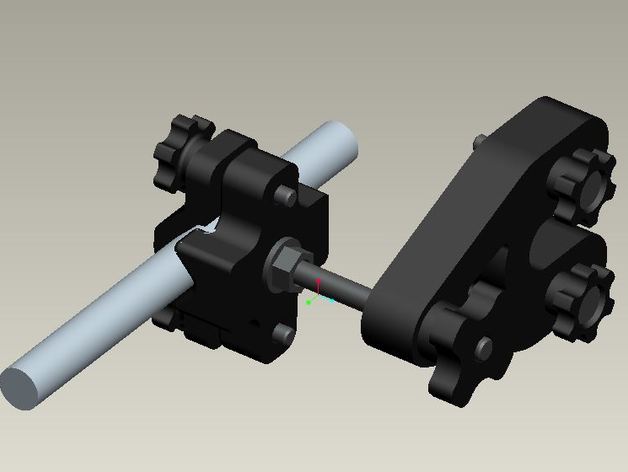
This assembly is used to help set the center shot on a compound bow. To complete this assembly the following is needed: Hardware: 4 - 10-24 countersunk head x 1.5" in length 2 - M6 Washers 1 - M6 Nylock Nut 2 - M6 Standard Nuts 2 - 10-24 Nuts 1- M6 Hex Head bolt 60mm to 70mm in length Printed Parts: 1 - Riser_Mount.stl ( 1 nut is inserted during this print) 1 - Laser_Clamp_Outer.stl 1 - M6 Knob ( 1 nut is inserted during this print) 1 - Laser_Clamp_Base.stl (2 nuts are inserted during this print) 2 - 10_24_Keeper_Washer.stl 4 - 10_24_Knob.stl You will also need to supply a laser pointer. I recommend a decent laser pointer and not a cat toy type laser that costs a few bucks as from testing the alignment\lens on those are not good. A few of these components require the nuts be inserted during the prints by pausing @zpos and then inserting the nuts and continuing the print. I would use a gcode viewer to find the last layer height the boundary of the nut pockets are printed at and then set the printer to pause at that height so you can insert the nuts in. Once all the parts are printed: (1) Obtain the hardware mentioned and print all the necessary parts (2) Screw the 10-24 countersunk screws into the 10-24 knobs (3) Assemble the Laser Clamp Base part to the M6 bolt using M6 washers on either side and the M6 Nylock nut. Tighten the lock nut just enough so the clamp can still rotate but is not loose on the shaft. (4) Insert 2 of the 10-24 knob\screw assemblies into the riser mount part and then use the keeper washers on the opposite side to keep the screws from falling out all the time. The bolts should be inserted so the washers are in the pockets in the plastic part so the mount can sit flush on the bow riser. (5) Thread the M6 bolt with laser clamp base into the riser mount and then thread the M6 Knob on the opposite side. (6) Install the outer laser clamp to the laser clamp base using the remaining 2 10-24 knobolt assemblies. (7) insert laser pointer and tighten clamp so laser does not move. To use: (1) Install on bow riser at the sight mounting holes (2) Adjust laser position by threading the m6 bolt into or out of the riser mount so the laser aligns with the center of the string. (3) Tighten down m6 knob to keep it in position and then recheck the alignment and adjust as necessary. (4) Laser can then be used to check alignment of arrow shaft to bow string. Accuracy will depend upon laser used and accuracy of the printed parts so keep that in mind during use.
With this file you will be able to print Compound Bow Center Shot Laser Alignment Tool with your 3D printer. Click on the button and save the file on your computer to work, edit or customize your design. You can also find more 3D designs for printers on Compound Bow Center Shot Laser Alignment Tool.