Connex Prosight Antenna Frame Replacement
thingiverse
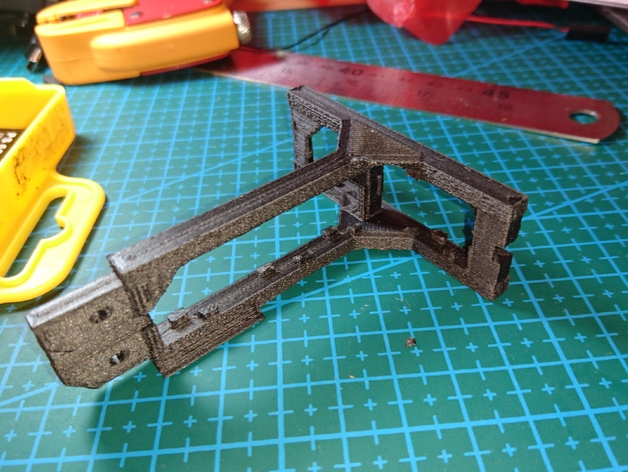
UPDATE REV5: This was fitted especially for my X frame, but I think it could benefit other X frames with the antenna bottom mounted. This design includes a few improvements, which are made mostly for X frames: Cable guide from the left top guides the cable away from potential prop damage, and acts as a bumper in case the antenna brushes against the prop. Right side bumper increases antenna survivablity in case it is pushed in the right side prop which can hit the antenna from the top. 2cm extended base moves the top bar of the "T" shape further away if it slides between the two props. This appears to me to be very common for X frames. Without it, it seems like certain death for the antenna when it's pulled backwards. 13 deg forward tilted base helps to keep the antenna higher and safer from prop damage as it needs to be pulled harder to actually reach prop level. It also makes the antenna pads stick further away from the frame, and be less shadowed by the back arms, which should improve signal reception. In addition to these, I did minor fixes to the model and stitched it better in place where it was slightly broken, which caused bumps and creases in the final printed part. UPDATE REV4: Uploaded a revised version when I had to go back to this form factor from the v-shape, as low mounted v-shape on a compact X-quad build gets the antenna pads too close to the props. The revised version is sturdier, doesn't require to clip off any bits, slightly curvier and appealing, bridges better during unsupported prints and requires less hot glue to secure the pads to. I broke the original on its first flying session, and then got the antenna cable chopped up by the props, so I picked up a caliper, measured everything, and created an alternative design, inspired by the original, but not exactly the same. This design has a slightly lower, narrower profile than the original, and so far has withstood crashes much harder than what it took to break the original. It has a cable channel that goes through the side of the top frame part, so the cable is safer from prop damage. Print Settings Printer Brand: Robo 3D Printer: R1 ABS + PLA Model Rafts: No Supports: No Resolution: 0.2mm Infill: 100% Notes: This was designed to be printed without supports, if your printer + filament of choice are good for bridging. I used FormFutura's CarbonFil which is super stiff. Speed: 40 mm/s Nozzle: 0.4mm Walls: 5 (Bridging works much better with a lot of walls) Slicer: Cura I used the "change at Z height" plugin to reduce the printing speed to 50% for the first 3 layers of top bridging (should be layers 97-100 at 0.2mm). Rev4 was printed with FormFutura's TitanX, which should be very impact resistant, but less stiff than the carbonfil. I think its properties are a better fit for this application. Printed with a 0.6mm nozzle at 40-50mm/s, 50% infill Post-Printing Installation Update: for rev4, just clip off any loose bits that might prevent from the pad to slide easily into place, then, make sure the antenna pad can slide through the top side of each of the two "slits" that are made to hold the antenna side opposite to the wire connection, and use a sharp knife to make them big enough to slide through otherwise. This version, unlike the previous and the original, requires you to slide in each antenna pad through the center section of each fixture. Apply a moderate amount of pressure on the pads to slide them from the center through the slit, and then back down to the base. You should still use a dab of hot glue to secure the top pad's cable to the "channel" at the side of the top fixture. After printing, clean well any loose bits and strings from the area where the antenna patches need to slide into, and then: (Use the provided images for reference) (with a wire cutter) Clip off the part supporting the bit that slides into the rubber mount. Clip off the the two supporting pillars that go across each antenna patch fitting, but leave about 2mm at the base of them at both sides (for better securing the patches when they slide in). (with a sharp knife) Trim and finish and bits that secure the patches in place, so they allow just enough room to slide the patches easily. (Optional) After sliding the patches in, use a bit hot glue to secure the top antenna cable to the channel, so it doesn't get mauled by the props, and more to secure the top antenna patch in place.
With this file you will be able to print Connex Prosight Antenna Frame Replacement with your 3D printer. Click on the button and save the file on your computer to work, edit or customize your design. You can also find more 3D designs for printers on Connex Prosight Antenna Frame Replacement.