Continuous rotary to intermittent rotary via a Reuleaux triangle
thingiverse
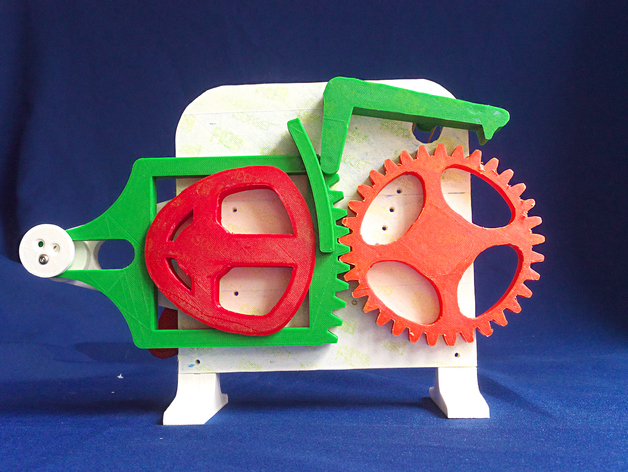
This redesign for three-dimensional printing transforms the mechanism showcased on GrabCad here: https://grabcad.com/library/reuleaux-triangle-intermittent-mechanism-1. Based on an adapted Reuleaux triangle, this innovative mechanism translates continuous rotary motion into intermittent rotary motion. The Reuleaux triangle provides movement to and from the gear-to-be-turned, as well as the rotation of that gear. It's a clever design. Designed in Moment of Inspiration (Moi), simulated in SimLab Composer Mechanical, and printed with Diamond Age PLA on an Ultimaker original. Note that the STL files included contain an optional part called the Reuleaux rotor spacer. You might not need this component if you can print all parts flat enough. I found it difficult to fully tighten all screws retaining the handle lever. In the images and video, I've used stainless steel washers to space out the handle lever, but these were fiddly to fit. Subsequently, I designed the aforementioned spacer. Additionally, note that the posted STL files differ slightly from the model printed by me. I changed the hub keeper setup from three screws to one screw and added three more holes in the base to accommodate a wider range of rubber bands. The necessary hardware includes: * A longish rubber band * Three millimeter by ten millimeter long button head cap screws, with at least eleven and up to sixteen required A video demonstrating the model's operation is available here: https://youtu.be/_lvGsT3ATXw. A simulation can be viewed here: https://youtu.be/HkxusRPVYAA. A 3D PDF file that allows you to rotate the model in any direction and run it is included with the files. Print Settings: * Printer Brand: Ultimaker * Printer: Ultimaker Original * Rafts: No * Supports: No * Resolution: Generally 0.2mm; see Misc. Notes for additional details * Infill: Thirty percent Notes: Material: I used Diamond Age PLA. If you need the Reuleaux rotor spacer, which is only 0.5mm thick as designed, 0.1mm resolution is suitable. Otherwise, 0.2mm resolution is acceptable. In general, for models of mechanisms like this one, I use a 1.2mm wall section everywhere. For larger parts, I strongly recommend using a good-sized brim to minimize warping. Post-Printing: Firstly, the normal cleaning up process occurs. I utilize a tapered reamer to clear excess material from all holes. For holes in which parts rotate, I bring the holes to size with an appropriately sized hand reamer. Note that the hole in the handle lever that accepts the handle stem should not be reamed out. The handle stem should be a tap fit into the handle lever. All parts should rotate freely. Finally, the rubber band. You should aim to have the rubber band hardly stretched at all when the pawl is engaged in the gear. Use as long a rubber band as possible and screw a three millimeter by ten millimeter (or slightly longer) screw into the appropriate hole.
With this file you will be able to print Continuous rotary to intermittent rotary via a Reuleaux triangle with your 3D printer. Click on the button and save the file on your computer to work, edit or customize your design. You can also find more 3D designs for printers on Continuous rotary to intermittent rotary via a Reuleaux triangle.