Convex/Concave/Straight Overhang Test
prusaprinters
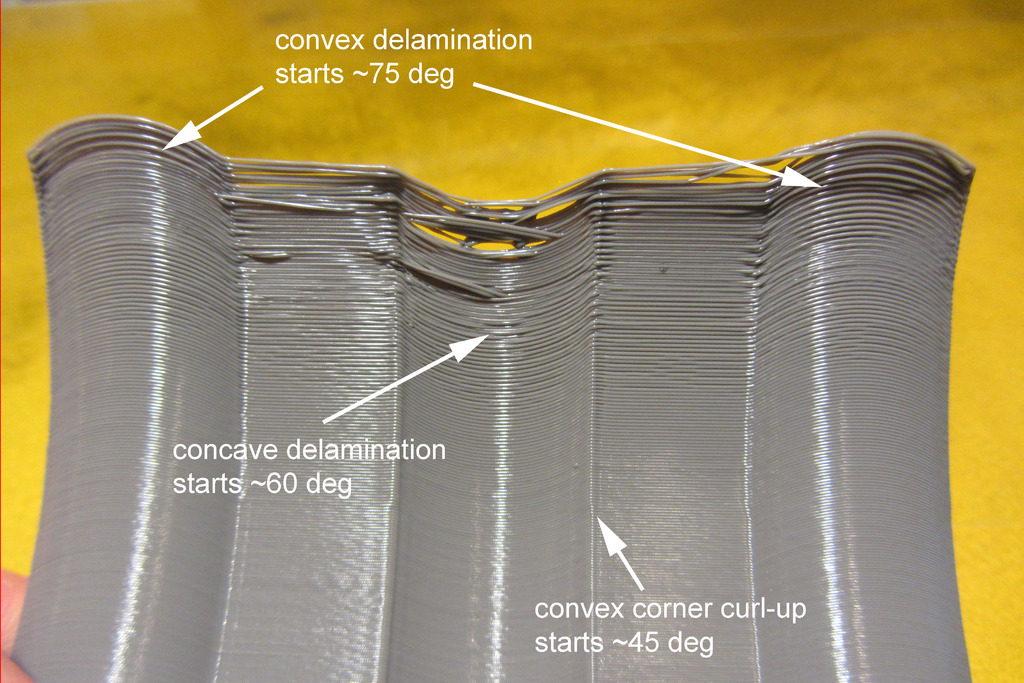
<p>Not all overhangs are created equal. The print quality of an overhang depends not only on the overhang angle, but also on whether the overhang surface is convex, concave, straight, or a sharp corner. This test part features all of these variations. The overhang angle starts at 15 deg. and goes up to 80 deg., with graduated markings at 30, 45, 60 and 75 degrees.</p> <p><strong>Types of Print Degradation</strong></p> <p>There are two different types of print surface degradation that occur with overhangs:</p> <p><em>Convex curves</em> (from smooth curves to sharp corners) tend to curl up. This is because the filament is actually stretched as is is laid down, and if it is not connected to much below it, the stretch will cause it to curl up. The sharper the radius, the more the curl. The greater the overhand angle, the more the curl.</p> <p><em>Concave curves</em> tend to delaminate horizontally. Again, because the filament is stretched as it goes down, if it doesn't have enough below it to stick to, it will be pulled taught, creating a "shortcut".</p> <p>Straight overhangs are not affected by the stretch (much like bridging), but eventually, the filament will delaminate horizontally because the layers have nothing below them to sqush and widen the line enough to attach to the adjacent line.</p> <p>To improve the overhang performance you can play with the layer thickness and line width. Thicker layers where the line width is close to the thickness requires less stretching of the filament.</p> <p>From a practical standpoint, though, you're usually better off playing with the extrusion temperature and airflow. I tend to follow the Makerbot Replicator 2 methodology of printing PLA very hot (230 deg) and with a lot of airflow (I use a ducted blower instead of a fan). The high temperature reduces the internal extruder pressure, and thus, hysteresis), and it also ensures good adhesion with the layer below. The high airflow cools the filament quickly, allowing less time for the stretching to deform the surface. I'll look forward to people's comments about what they have found successful.</p> Category: 3D Printing Tests
With this file you will be able to print Convex/Concave/Straight Overhang Test with your 3D printer. Click on the button and save the file on your computer to work, edit or customize your design. You can also find more 3D designs for printers on Convex/Concave/Straight Overhang Test.