Cord / Cable Coiler
myminifactory
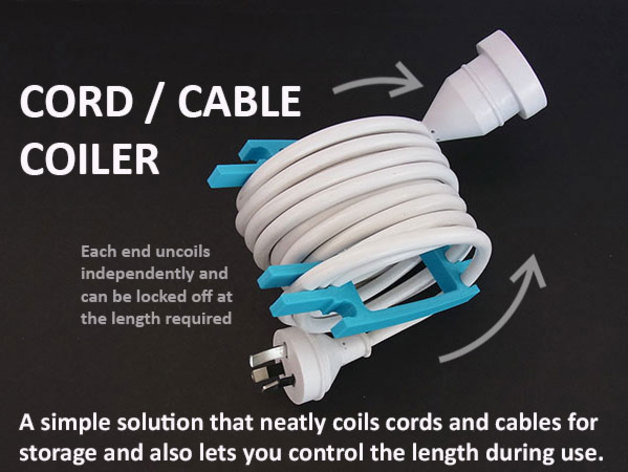
The Cord / Cable Coiler is a small and simple solution to keep your power cords and Ethernet cables etc. tidy and make them easier to use and /mange during use. With the Cord / Cable Coiler your cords and cables will be stored in a neat and orderly way. In use, it lets you uncoil just the length required at the time then secure the rest of the cord / cable temporarily so it won't uncoil further.... then coil the length used up again after use. The design even has rails that are useful as handles to make it easy to carry your coiled cords / cables. This makes keeping your cords and cables in order easy and also safer in use as excess cable is not left squirming around the floor where it could cause someone to trip and fall. The size of the Cord / Cable Coiler has been kept to the minimum to perform their function well but without consuming too much filament to print (approx. 30gm. depending on version and print settings applied) and so they don't take too long to print. Please note that a centre brace has been added to minimise distortion when the cord is wound on fairly tightly so the print will be slightly different from the images shown. Size guide: Large - 7.25mm to 7.5mm diameter power cords etc. Medium: 6.25mm to 6.5mm diameter power cords and computer cabling etc. Small: 5.0mm to 5.25mm diameter Ethernet / computer cables etc. Cord / Cable Lengths: The length that can be coiled differs depending on the cord / cable diameter and how neatly / tightly it is coiled. However, they will all take at least 5M of cable. This means, as an example, if you have a 6M long cord / cable and only need about 3M for a specific purpose, just leave the remaining 3M coiled. The Cord / Cable Coiler functions by separating the cable into two sections. Firstly isolate up to 1M of cable (short end) by clipping it into the centre retainers. The short end is the length of cable that, in the case of a power cord for example, is available to plug it into a wall socket. With the short end secured in the retainers you can coli it in the narrow coiling channel. Once the length is almost fully coiled in lock the end of the cable into the nearest end retainer on the narrow coiling channel side (Refer images). Now you coil on the long end of the cord / cable by winding it neatly into the wide coiling channel. Coil from one side to the other, back and forth, When the free length is almost all coiled into the wide coiling channel lock the end of the cable into the nearest end retainer on the wide coiling channel side (Refer images). Note: It is not recommended to coli cords / cables too tightly. Manufacturers of power cords in particular do not recommend using tightly coiled cables for extended periods due to the risk of heat build up etc. The Cord / Cable Coiler is a practical solution for an every day problem. They are easy to print, don't use much filament and don't take too long to print... start getting your cords and cables under control today... Please refer to the instructions and images for additional information.... and post images for others to see how your Cord / Cable Coilers are being put to use. Note: If you like this check out he rest of my practical and fun designs!
With this file you will be able to print Cord / Cable Coiler with your 3D printer. Click on the button and save the file on your computer to work, edit or customize your design. You can also find more 3D designs for printers on Cord / Cable Coiler.