CoreXY Laser engraver
prusaprinters
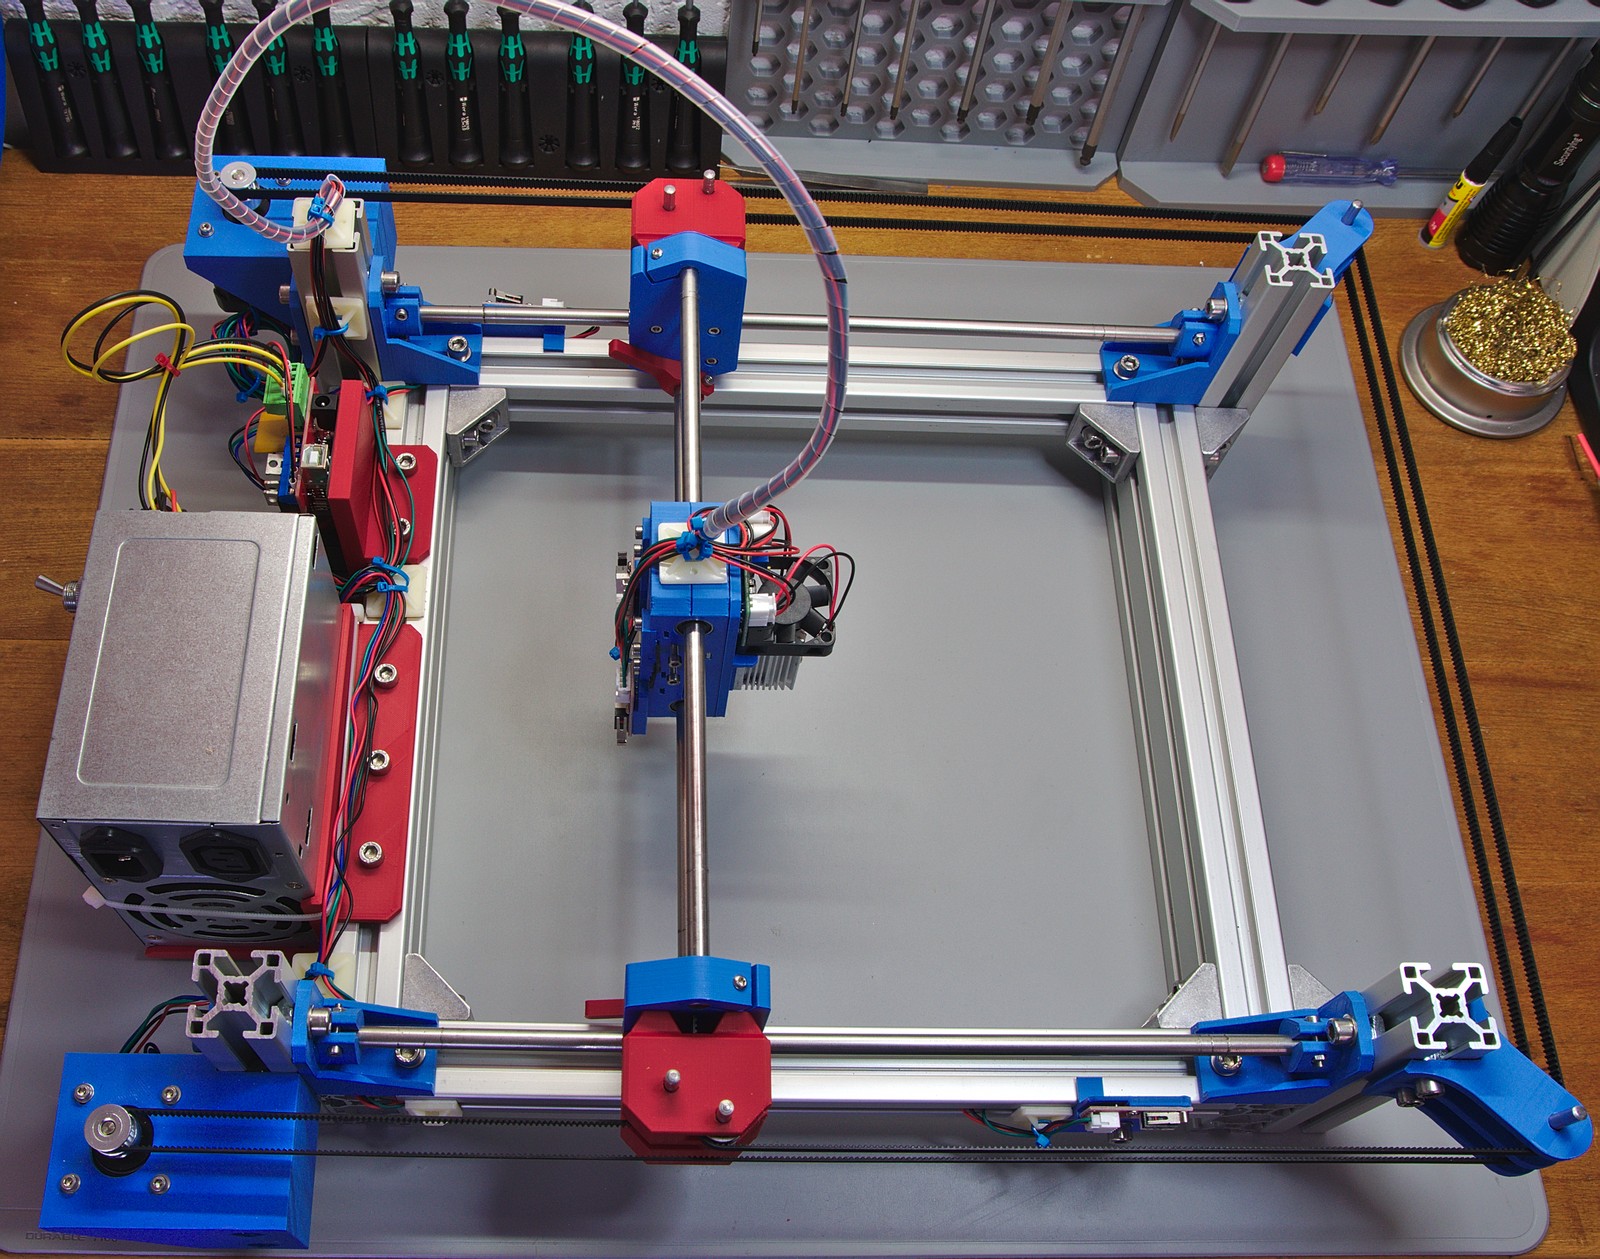
<p>Some time ago I built a small DVD-Laser engraver but it wasn't really usable. Now this new one became reality by chance. When I upgraded my 3D printer Prusa i3 MK2 to the newer MK2S version I had a few spare parts, namely linear rods and bearings. Additionally, a 1 W blue laser from eBay was lying around unused... this is the result. ;-)</p> <h4>Disclaimer</h4><p>This is the obligatory warning. Lasers with such high powers are dangerous and can burn or blind you, even from reflections. Don't attempt to build this if you are not familiar with high power lasers.</p> <p>Good quality laser protection goggles are a must! Don't use cheap ones. And always wear them! Beware that the laser might turn on unexpectedly when the Arduino is booting (it shouldn't, but don't rely on it).</p> <h3>Update</h3><p>Check out my update/remix that adds a Z axis and further improvements to this engraver!</p> <h3>Print instructions</h3><h3>Design specs</h3><p>With the spare Prusa linear rods (370 mm and 330 mm) this engraver has a usable work area of 210x220 mm. You might even be able to get a few millimetres more.</p> <p>The CoreXY system is loosely inspired by other systems, especially the excellent 3D printers <a href="https://www.thingiverse.com/thing:1752766">Hypercube</a> by Tech2C and <a href="https://www.thingiverse.com/thing:2254103">Hypercube Evolution</a> by SCOTT_3D. Some other details are also modeled after these printers, such as the belt spanner system on the X carriage.</p> <p>While these two systems guide their belt on the inside of the printer I decided to move the belts on the outside to get the most usable area. Instead of proper belt pulleys or idlers I used 625 ZZ ball bearings to divert the belt. For now this is working fine.</p> <p>The limit switches on the X carriage were originally supposed to be triggered by the Y carriage itself. However, when the switches finally arrived they differed from the my 3D model so the additional switch activators were added... it's not elegant, but works. ;-)</p> <h3>Firmware</h3><p>The engraver is controlled by an Arduino Mega + Ramps 1.4 board running GRBL 1.1f. These were spare parts I had in my drawer and I wasn't aware of the Arduino CNC shield when I began this build. Plus, the Ramps board seemed like an excellent choice. However, in retrospect, I would not use this board for GRBL again. There are several drawbacks compared the regular CNC shield.</p> <ul> <li>no Hardware limits (the limit switches are placed on pins that are not available for external interrupts)</li> <li>the spindle PWM defaults to a 12 V output. The laser driver however expects a 5 V TTL signal for power control (solved with a small GRBL patch)</li> </ul> <p>Be aware that the GRBL version for the Arduino Mega has an issue when homing a CoreXY machine. It's axis locking mechanism prevents both motors to be moved at the same time when homing, i.e. the machine will move diagonally. There's a quick-fix available.</p> <p>The modifications I made to GRBL are available in this fork on GitHub:<br/> <a href="https://github.com/RealNagus/grbl-Mega">GRBL CoreXY Laser engraver</a></p> <h3>Software</h3><p>To actually use the engraver you'll need to generate the proper GCode somehow. So far I've found the following tools quite useful.</p> <ul> <li><a href="https://jtechphotonics.com/?page_id=2012">JTech Inkscape Laser Plugin</a> (contour-engraving only)</li> <li><a href="https://github.com/LaserWeb/LaserWeb4">LaserWeb4</a> (any type of engraving)</li> <li><a href="https://github.com/winder/Universal-G-Code-Sender">Universal GCode Sender</a></li> </ul> <h3>Parts list</h3><p>In addition to the printed parts you'll need the following parts, too. If anything is missing please let me know.</p> <p><h4>Electronics</h4></p> <ul> <li>1x Arduino Mega / Uno</li> <li>1x Ramps / Arduino CNC Shield</li> <li>2x Pololu Stepper driver (A4498, DRV8825, SilentStepStick)</li> <li>4x Endstops (Makerbot)</li> <li>1x Laser with TTL driver</li> <li>1x Power supply (e.g. old ATX)</li> <li>1x Fan 12V (for the laser)</li> <li>2x Nema 17 stepper motor</li> </ul><p><h4>Mechanics</h4></p> <ul> <li>2x 8mm Rod, 370 mm (Y axis)</li> <li>2x 8mm Rod, 330 mm (X axis)</li> <li>8x LM8UU linear bearing</li> <li>16x Ball bearing 625 ZZ </li> <li>6x 5mm steel rod, 40 mm</li> <li>2x GT2 Pulley, 20 teeth</li> <li>ca. 4m GT2 belt</li> <li>2x Aluminum profile, 30x30 B (8 mm slot), 325 mm</li> <li>4x Aluminum profile, 30x30 B (8 mm slot), 150 mm</li> <li>2x Aluminum profile, 30x60 B (8 mm slot), 360 mm</li> <li>12x Corner mounting brackets 30x30</li> <li>M6 T-slot nuts</li> <li>M6x12 screws</li> <li>M3x16 countersunk head</li> <li>M3x16 head cap screw</li> <li>M3x20 head cap screw</li> <li>M3x25 head cap screw</li> <li>TP screws, 2.5 mm (endstops, Arduino mounting, 2.5W laser driver)</li> <li>M3 square nuts</li> <li>M3 hex nuts</li> </ul><p>Note: The 5 mm linear rods I bought from eBay to mount the bearings had to be sanded down a bit to fit. Your mileage might vary.</p> <h3>Summary</h3><p>After about a month of testing and tinkering I am quite satisfied with how this thing turned out. There are however a few changes / modifications I will probably implement some time in the future.</p> <ul> <li>Larger working distance<br/> The laser is placed quite close to the workpiece. This is not bad as such but unfortunately I have to move the lens so far out that it sits quite loose, probably does not capture the whole beam anymore and one cannot engrave larger objects. </li> <li>Better end-stop placement<br/> I really should have incorporated them at an earlier stage in the design process... ;-)</li> <li>Motorized Z-axis<br/> I did not implement it in this design because it would have reduced the work area. Manually adjusting the lens works fine, however, a motorized z axis will make it a lot easier.</li> <li>Cable chains<br/> While these were initially planned I chose to drop it in order to get the engraver done quicker. </li> </ul> <h3>ChangeLog</h3><ul> <li><p>2019-09-21<br/> Changed license to GPLv3.</p> </li> <li><p>2018-03-29<br/> Uploaded a new laser tool mount for the common 2.5 W blue laser module.</p> </li> <li><p>2018-02-24<br/> Initial upload</p> </li> </ul>
With this file you will be able to print CoreXY Laser engraver with your 3D printer. Click on the button and save the file on your computer to work, edit or customize your design. You can also find more 3D designs for printers on CoreXY Laser engraver.