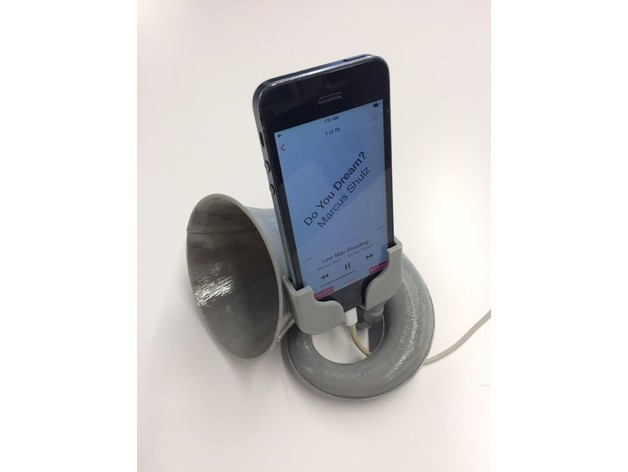
Cornucopia Exponential Horn iPhone Dock
thingiverse
I added a second version split out into four parts for Up! Mini owners like myself... if you have a large enough build tray, don't bother because it's just more solvent bonds, but if a Mini's all you have, give the second set of parts a try. Pro tip: print the end sections of the horn vertically, they come out much better. Pictures of four-piece build have been posted at the end. I was inspired by brycelowes GRAMiPhone to explore the potential of passive amplification for an iPhone. I loved the idea and how fun the resulting model was, but I found that his implementation took up a lot of space and was somewhat ungainly. I might put it on a shelf but I'd never put it on the nightstand where I charge my phone. Speaking of which, that implementation didn't allow for a power cord, so when your battery is dead, the music stops. This version uses the expansion horn as the dock itself by bending it in a coil, much like a French horn or a sousaphone. Because the run is laid out in a spiral, I was able to give it a long enough acoustic path to tolerate a low expansion that preserves bass down to 500 Hz (exponential horns act as a high-pass filter based on the expansion coefficient you use). I also put it on three feet so it sits stably on non-flat surfaces and you can run a charge cable under it to get to the phone in the cradle. Having printed, assembled, and tested it, I have to say I'm impressed. At low volumes, the amplification sounds like a perceived tripling of volume. Pushing the iPhone speaker to maximum, it's much harder to tell how much it amplifies, but the difference is noticeable. I also tested it against the GRAMiPhone I printed and a wineglass, and it appears to have better bass than both. I built the dock to accept an iPhone 5 and I left some space in there so it didn't grab. If you want more grip on the phone, to change the angle of repose (watch out for the triangle of stability of the feet!) or want to build a dock for your particular phone or phone case, I've included a STEP of the split out parts so you can push surfaces or hack in your favorite 3D modeling software. This also should allow you to adjust the splits or use different splits to print it in smaller pieces. I also have included a STEP of just the horn profile unsplit in case you want to do it as a series of rings instead of two halves or something more awesome than I could come up with (use different colors if you come up with a nice set of splits!). This was printed on an Up! Box, and assembled with acetone for solvent bonding. I also poured acetone through the funnel to get a nice glossy surface and acoustic skin on the inside surface. I had a few challenges with undercuts on the seam, but I've since added a chamfer to the seam inside edges to get rid of the undercuts so the parts fall together. I also noticed that on the base the coil touches the tangent of the wall. On mine I cut the stitch with a razor knife, put the top and bottom together, and when I solvent-bonded it it just stuck back where it was before. Your results may vary. I also tacked the dock onto the tangent of the horn with acetone to make it a little sturdier. The parts will assemble in whatever horn-to-phone orientation suits your fancy, just solvent-bond it in place when it's where you like it. I'm not sure how the 7 would sound in this because of Apple's new stereo speakers, but if this were a first-world problem I had, I'd try ducting the two speakers together in the dock and feeding it into the tube, and if that didn't work I'd try splitting the horn with a vertical section down the middle and ducting one to each side of it. But that's a task for another day... (one where I can afford an iPhone 7!) How I Designed This I googled the design parameters for an exponential horn profile (https://mysite.du.edu/~jcalvert/tech/speak.htm) and built a blended surface from cross-sections laid out in a spiral. Putting these sections tangent to a bottom plane resulted in a body that sat nicely on a surface. I then bent the inlet sections up into a curve to interface with a bottom of an iPhone dock, and adjusted the exit sections to start to angle upward and straighten out to give it a nice flare. Profile of an Exponential Horn (letter tags are cross-sections in the CAD) Cross-sections laid out in the scaffold After splits and with dock attached.
With this file you will be able to print Cornucopia Exponential Horn iPhone Dock with your 3D printer. Click on the button and save the file on your computer to work, edit or customize your design. You can also find more 3D designs for printers on Cornucopia Exponential Horn iPhone Dock.
