Corsair iCUE 4000X & 4000D AIRFLOW style Front Panel
thingiverse
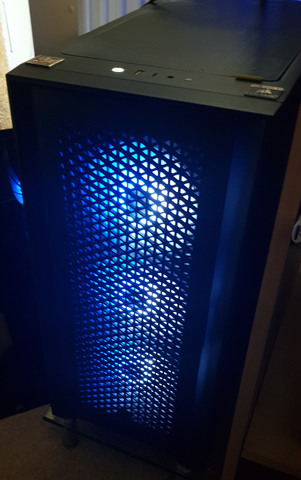
[If you find my designs useful, please consider sending a tip](https://www.paypal.com/paypalme/slegnor/1) **UPDATE: Thanks to design adjustments by [DryFly](https://www.thingiverse.com/dryfly/designs) when trying to print his own on an Ender 3 with built-in tabs, I have updated the design to just 2 variants, both with internal slot connectors. - Please consider sending DryFly a tip as well!** **UPDATE 2: If you want to add your own mesh pattern or design, here is a solid version on TinkerCad: https://www.tinkercad.com/things/3liiNYPmccR-solid-icue-4000-airflow-front-panel** I have a Corsair iCUE 4000X PC case which comes with a solid glass front panel. I wanted more airflow for my front fans, so I have tried to order the AIRFLOW front panel available for 4000D series cases direct from Corsair but: 1) they seem to be permanently out of stock and 2) they don't ship outside the US even if they were in stock. Long story short, I have designed my own interpretation of it. This will fit the Corsair iCUE 4000X & 4000D cases as they are the same chassis. If you have a 5000X/5000D it will not fit but could possibly be scaled up to fit, depends on the peg spacing. **There are 2 versions included and will fit on an Ender 3 bed, including a brim, if your Slicing software is set to use the full printable size of the Ender 3's bed (235x235mm), not just 220x220 which typically is set as the default.** V1: A top and bottom piece that require attaching together with the Connector pieces. This version uses printed ball pegs that push into the case. These are OK, but be careful when fitting the panel onto the case, as they are undoubtably the weak point of the design, especially if printed in PLA. V2: Exactly the same as V1 but with the plastic pegs removed and holes added to allow the use of M3 x 4mm x 5mm brass threaded inserts and 5mm ball head screws. NOTES: 1: The ball head screws have a head size of 5mm and are M3 threaded, the most common source of these seems to be RC car part suppliers, specifically Tamiya part # 19804205 will be the correct size for an M3 brass threaded insert. 2: The M3 brass threaded inserts are designed to be inserted using a soldering iron, just place the tip on the insert and gently push down until it sinks into the hole, once it cools it will be rock solid. 3: You can add the Corsair logo if desired (as shown in the last photo), I used this one and scaled it down appropriately: https://www.thingiverse.com/thing:4778711 - STL included at the correct size for the panel. 4: Again, make sure your Slicing software is set to use the full printable size of the Ender 3's bed (235x235mm), not just 220x220 which typically is set as the default. Print Settings: Quality: 0.2 Infill: 60% (I went this high for rigidity and strength) Brim: Yes (Personal Preference) Supports: No Material: PLA
With this file you will be able to print Corsair iCUE 4000X & 4000D AIRFLOW style Front Panel with your 3D printer. Click on the button and save the file on your computer to work, edit or customize your design. You can also find more 3D designs for printers on Corsair iCUE 4000X & 4000D AIRFLOW style Front Panel.