costmo Bracket - Mount anything to your 3D printer
thingiverse
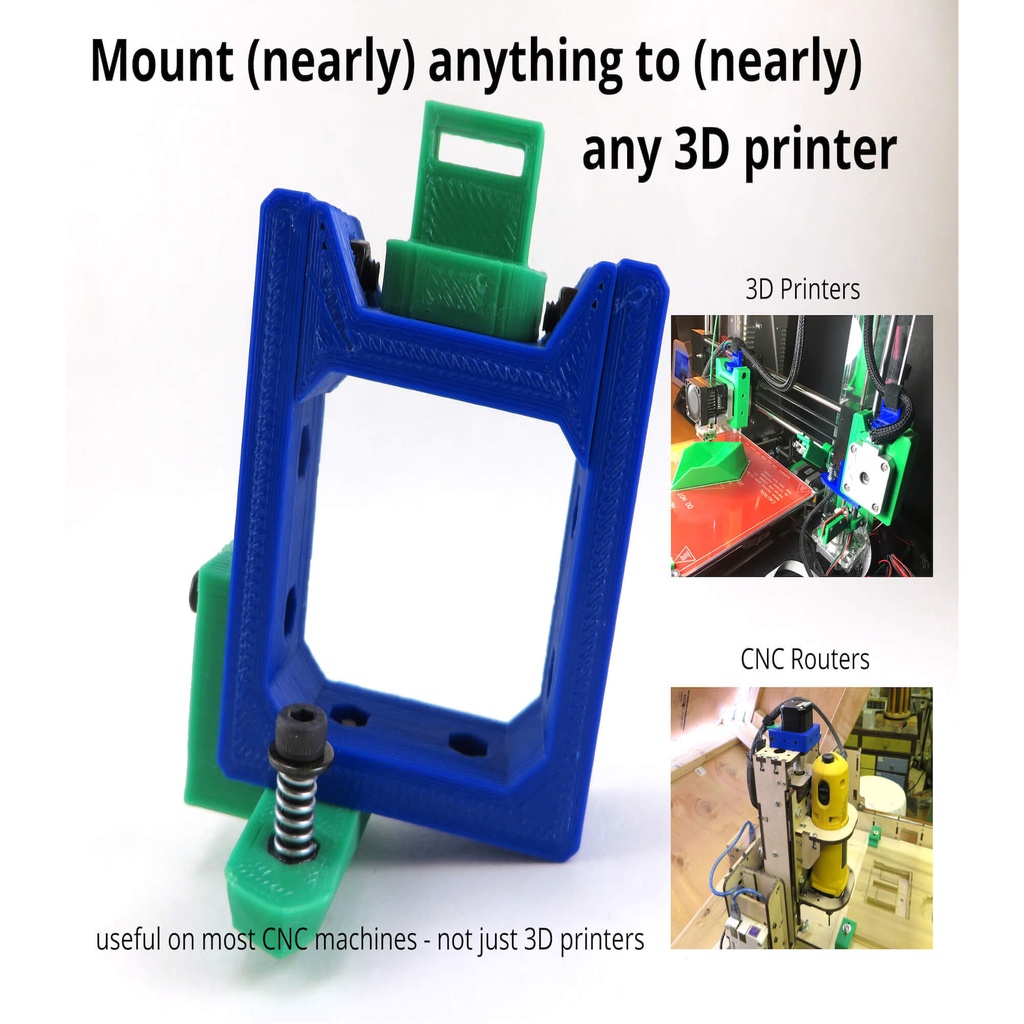
Do you need to mount things to your 3D printer? This is the most versatile way to get that done. It's easy to install. It's easy to modify. It's easy to extend (and there are at least a couple ways of doing so). It also works on any 3D printer that uses Nema 17 motors. That's nearly every FDM-style 3D printer, so if you've got a 3D printer, chances are, this will be useful to you. **What this is:** In short, it's a modular mounting bracket for Nema 17 motors that serves as a platform for mounting anything else to your printer. It is designed in such a way that it will mount to any 3D printer (assuming you use Nema 17 motors), and can have an arbitrary number and type of things attached to it. It includes bolt connector through-holes if you want to design something specific with bolt connectors, or you can import models into a tool like Tinkercad.com and mash somebody else's part onto the bracket. Since it attaches to a Nema 17 motor, it can be used anywhere you have one of those. That means you can use a costmo Bracket to mount accessories to just about any consumer-grade CNC machine, like a CNC router, lathe or laser engraver. **Why this is:** I am resolving a long-running frustration. This is my therapy. I got very frustrated looking for parts to mount to my printer. Just about every time it seemed like i had found the right thing, I would discover that I couldn't use it because it was designed specifically to connect to a particular hotend (that I don't have), or the mount points were on the right instead of the left - or any number of stupid reasons. This modular bracket connects to a part that exists on nearly every 3D printer (a Nema 17 motor), and has M3 through-holes and nut traps in strategic locations so that any type of part can be securely mounted to the motor. You can mount parts that others have already created for mounting to a costmo Bracket, you can use those I have created. you can make your own, or you can easily modify other people's models to work on your printer. If you want to read the whole story and get specific instructions for creating add-on modules, check out my Instructable: [Instructables.com link](https://www.instructables.com/id/Mount-nearly-Anything-to-nearly-Any-3D-Printer-or-/) This part is the main piece - the mounting bracket. After you download, print and mount the bracket, you'll probably want some things to mount. Here are a few modules I have created: - [Easy Z index adjuster (two different styles)](https://www.thingiverse.com/thing:3926509) - [Wire trap](https://www.thingiverse.com/thing:3926442) - [Mount for 5015 part cooling fan](https://www.thingiverse.com/thing:3926544) I'll link to modules made by others as I'm made aware of them as long as they are released with an Open Source license that does not have commercial usage restrictions. These models and the SCAD code used to create them is available under a GPL license, and are available at github: https://github.com/appideasDOTcom/3dPrinterModels *Note: The "articulated" model is included so that you can import it into a tool like Tinkercad.com and make your own attachments around it. The model that you want to print is the "costmo Bracket.stl" file.*
With this file you will be able to print costmo Bracket - Mount anything to your 3D printer with your 3D printer. Click on the button and save the file on your computer to work, edit or customize your design. You can also find more 3D designs for printers on costmo Bracket - Mount anything to your 3D printer.