CR-10 Enclosure
thingiverse
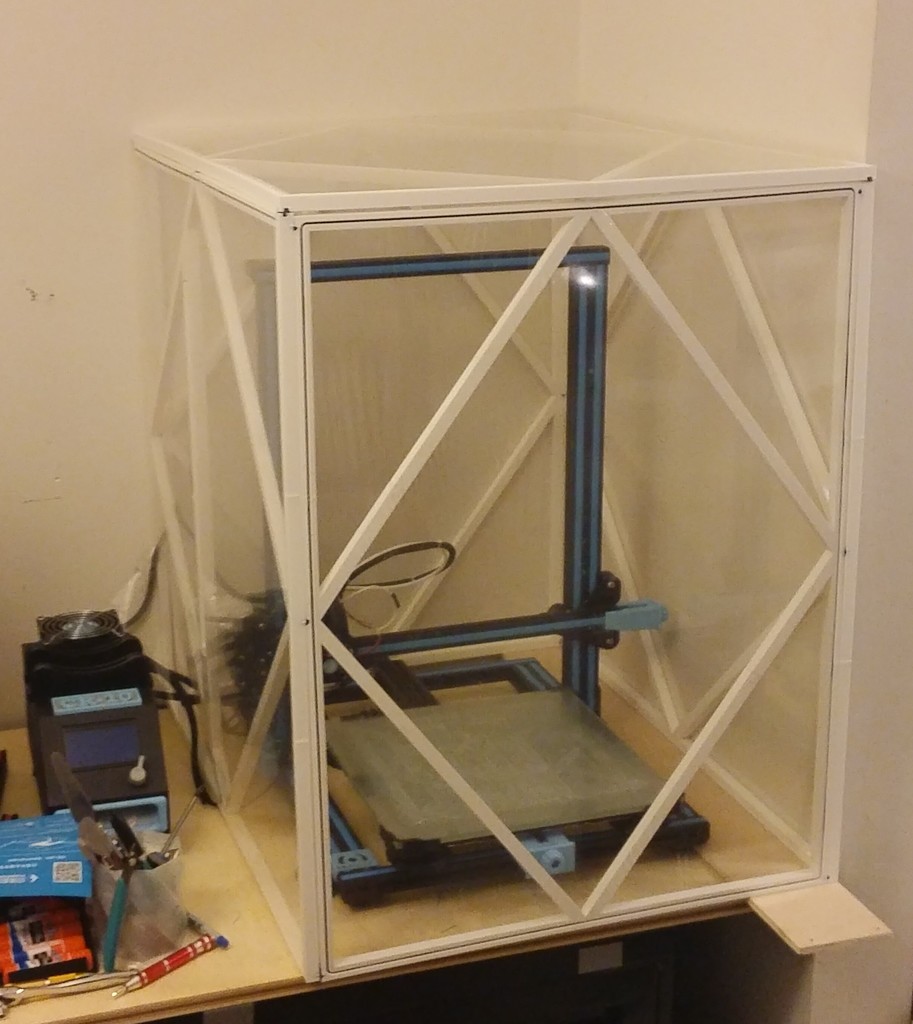
It's a fully printed enclosure for the CR-10! I had tried ABS and nylon on the printer before with some pretty bad warping. The printer can do it, it just needs the heat to stay around the part and not float away and make the apartment warmer. My first enclosure attempt was left over window wrap and a piece of plywood zip-tied to the top of the printer. It actually works really well but way too much of a hassle to setup. Once again I came here first to see what other people had done for printer enclosures. Then went online and saw some more, none fit the criteria. I wanted something small, light and able to be collapsed down to be stowed away easily. The idea I got was for a 5 part enclosure that holds itself together with some magnets and is sealed by that winter shrink wrap for windows. There is a groove in the outer surface on each part that 1.75 mm filament will fit into to hold the shrink wrap in place. Not a single drop of glue was used in the assembly but it took 27 prints though. 100% worth it. NOTE: You need a slicer that can separate non connected surfaces to print the files that are currently uploaded. The individual parts are not in currently in separate pieces and need to be broken before printing. Update: Day Zero: I finished printing all the parts and have it assembled when I noticed I didn't account for the cables to the printer from the control box. I cut out the corner of the left side piece for now and might change it later. One Month: I expected some heat loss from having the corner cut but it really doesn't make a difference. I got an extension kit for all the cables to be ran behind the table and under the enclosure. Works great and collapses down when not needed, which is about 66% of the time. I use it more for PLA and PET than ABS. 6 month update: So far so good. I have not had to go back to fix the cable issue or the corner that's cut but those will be easy to fix when that becomes necessary. The enclosure works way better than I expected and collapses easily when not in use as I've stated many times. I have given myself a well deserved pat on the back for the designs effectiveness. 9 months in I added a new left side piece that has a cut away allow for the control cables to pass under. The enclosure melted slightly in the sun of my car and I had to reprint some parts so I went a head and corrected for the mistake I made in its original design.
With this file you will be able to print CR-10 Enclosure with your 3D printer. Click on the button and save the file on your computer to work, edit or customize your design. You can also find more 3D designs for printers on CR-10 Enclosure.