CR-10 flexible filament extruder bracket with adjustable spring tension
thingiverse
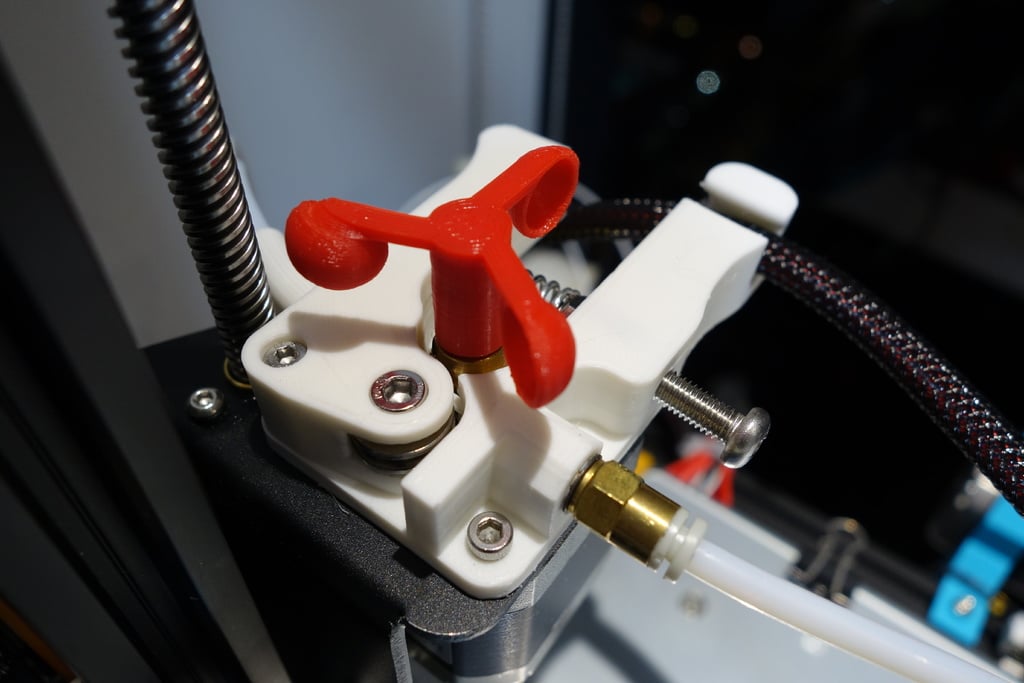
**Intro:** Exploring the usefulness of oiling the filament revealed a problem: the extruder was slipping due to the smoothness after oiling. Realizing that the current design lacks a way to tune the tension of the extruder gear, I designed this adjustment mechanism. After an internet search, I found no readily available designs for adjusting spring tension on our stock extruder. A video demonstrating how to adjust the tension can be found here: https://youtu.be/szChddRyo70. Note that my design would require sacrificing one of the mounting holes. **Note:** I recommend printing this in a material with better heat resistance than PLA, as mine warped from the heat of the extruder motor below it. This resulted in a crooked filament path. **Parts list:** - 1 x M5 30mm bolt - 1 x M5 washer - 3 x M5 nut **Assembly:** Print out the bracket (obviously!). Insert one of the nuts into the hole, making sure it goes completely in. It's easiest to screw the nut onto a bolt and use the bolt to guide the nut in. Screw in the M5 bolt almost all the way and insert the other 2 nuts. There should be a small part of the bolt exposed (2-3mm) for good hold on the spring when it is installed. Using 2 wrenches, tighten the 2 nuts against each other so that they are locked in place. When the bolt is unscrewed all the way, the nut should be more or less flush with the surface. Insert the PTFE tube with the appropriate cuts for extruding flexible filament. Install the bracket onto the z-axis bracket with the extruder arm. Insert the M5 washer against the stock arm where the spring goes (without this, the spring will turn against the plastic part when you tighten the tension which may strip the plastic). Install the spring and the bowden tube, and you're done! Note that in terms of dimensional tolerance, I used the CAD file provided by SizZLeR to jumpstart the design. However, most of the holes were too small for me (the dimensions by joshvv were perfect for me). Hence, in the .stl provided, they are sized back up to fit my tolerances. The included Fusion 360 file has many sketches inside that are used specifically just to enlarge the holes. Use that to adjust whatever hole size you need to meet your needs. I would love to hear your comments on the design and what you think about it! **Update:** *29 Oct 17*: I have included a new version for those using the extended arm, as the screw's position made it difficult to release the filament. In the extended version, I also included a cable bracket. *30 Oct 17*: I have redrawn the entire extended arm from scratch to match the bracket that has been designed. The original arm design was a little loose and caused the roller to shift off-axis resulting in the filament getting jammed. The new version 3 of both stl files are meant to be used as a pair. *2 Nov 17*: Due to some minor tolerance issues, I completely redrew from scratch the entire set of brackets and arms and modelled them parametrically so that the alignment of the filament guides would be perfect. After more than 10 iterations, I believe this is the ultimate in terms of accuracy for the filament guide. *3 Nov 17*: The screw holding the idler gets bent over time if the tension is tuned too high. Hence, I designed a version 2 that holds the screw in both the top and bottom position such that it is secured and unlikely to get bent over time. This however requires support to print (and is quite a pain to remove). A pic of the new design can be found on how it looks.
With this file you will be able to print CR-10 flexible filament extruder bracket with adjustable spring tension with your 3D printer. Click on the button and save the file on your computer to work, edit or customize your design. You can also find more 3D designs for printers on CR-10 flexible filament extruder bracket with adjustable spring tension.