CR-10 magnet mount for e3d, volcano, cr-10 stock, remix of heavy duty, MGN12
thingiverse
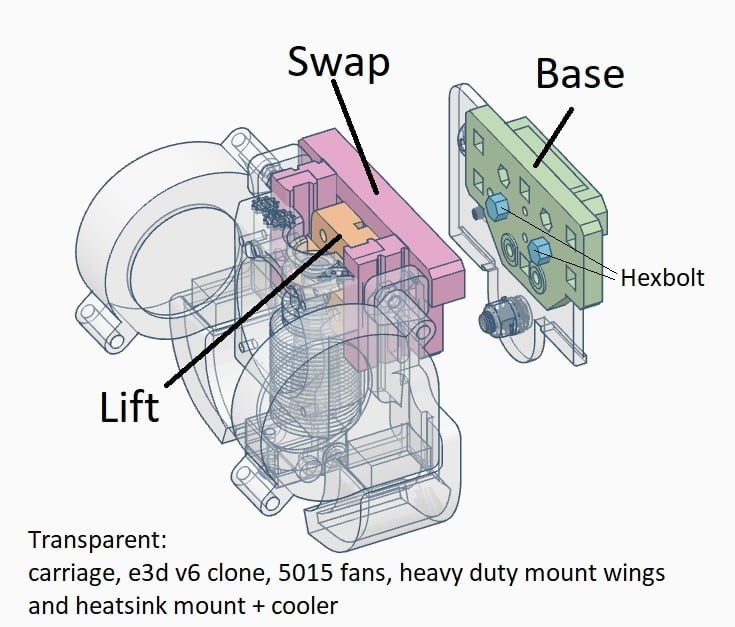
<h1>Update9: 02-Jun-2019</h1> No real update - but I repaired the SWAP part v0.16 through netfabb because it had errors. More than a year until Stalkk (thanks for the hint! ) found out that the part had errors. <h1>Update8: 23-Sep-2018</h1> Updated Lift part and added e3d-neck-holder Before that we needed long ( >20mm !!! ) M3 screws to tighten the e3d heatsink. Now the embedded nut can go deep into the Lift part. New Lift with magnetmount_e3d-neck-holder_V0.18.stl ... these two parts together will clamp the "neck" of the e3d heatsink. You will need two M3 nuts (nylock or normal) and two M3 screws with 16mm. The holder is minimal so on the side there is enough space that the "tighten swap all down through into the carriage"-screw can be reached. <h1>Update7: 04-Sep-2018</h1> All parts with magnets now have a 1x1x5 mm slot below (while printing) or above (mounted on the printer) the magnets. Before that change it was really difficult to glue the magnets in... now just put them inside, drop of glue inside the slot, done. MGN12h Base has been improved.... now can add M3 nuts behind "third hole" and original hotend mount holes. I will change the names of the files with this and the next releases... in files view they are clipped and all seem the same. <h1>Update6: 02-Sep-2018</h1> It's been some time without an update. Now there are many updates... <h2>New parts:</h2> <h3>universal-aka-ironcage:</h3> still alpha but it should be compatible with "any" mount for the CR-10/Ender-2/3. <h3>laser mount:</h3> See original part https://www.thingiverse.com/thing:2552134 , thanks so much to Robert. I remixed it so that it will be centered and not on the left of the hotend. You will need universal-aka-ironcage for that mount. Both still alpha. <h3>"H":</h3> Clip in form of an "H". If you fear that the mount could fall apart you can print two of the 'H's and put them onto the mount like in the picture with the white 'H's. I had one mount that was not tight... I did not glue the magnets in... With the H clips it was absolutely tight. <h2>Changed parts:</h2> <h3>Base:</h3> Now has a hole where the carriage has a mount hole. <h3>Swap:</h3> removed the need for support. Now can slide "lift" part more up, if needed. can put a screw all the way down to the carriage for ultimate stabiity. Might even be possible to use the magnet mount without any magnets ;-) <h3>Salami:</h3> Same mount hole like Base and Swap. So salami can be fixed more stable, will never fall down. <h3>Salami wings:</h3> Stronger around the hex nut, should be stronger now. Everything is backwards compatible ! e.g. if you want to use "screw down through into the carriage"-feature you will need to reprint the base or simply drill a 3mm hole in the old base. If someone has MGN9H, take a look into the comments.... :-) I will, make better photos and show everything more clearly.... I know that my magnet mount system may look a little complicated ;-) Too many options. For a start just print Base, Swap, Lift and two hexa bolts and play with it. Heavy Duty wings will fit. Then you can add Salami with Salami Wings, use Hexa Bolts for Salami.... If there are questions, just send a message or use the comments. Or any other way like facebook, e-mail, whatever. :-) <h1>Update5: 21-Apr-2018</h1> No real update ... just a little warning because of "salami" piece. Note that it still is in beta phase. One user reported that his mount fell on his print surface. For some prints it was fine but then it fell down. He used Klipper which means that there was high acceleration and brake movements. So for Salami I highly recommend to screw Salami and Base together to the carriage. The idea of Salami is to have the fans on the Base. Just swap the "Swap" part with printer head :-) <h1>Update4: 24-Mar-2018</h1> Added a mount for MGN12 to enable it for my magnet mount system. Get the file: beta-MGN12base_cr-10_magnetmount_V0.08.stl Print upside-down. Thanks to user tsmaa for the idea and for his test - he confirmed that it fits. Endstop mount modification might be necessary. <h1>Update3: 11-Mar-2018</h1> removed salami wings with not-so-sturdy fan fixation points. Added salami wings with better fixation points. with ABL, too. <h1>Update2: 01-Mar-2018</h1> removed salami wings without fan fixation points. Added salami wings with fixation points. with ABL, too. <h1>Update1: 07-Feb-2018</h1> Changed from WIP / beta to released. It is proven functional. :-) Single parts that are new/untested/beta/alpha/pre-alpha/... are named accordingly in the files. 'salami' part has been added. This part sits between base and swap. It offers support for 'salamiwing-left' and -right. So you can mount the part cooling fans near the base and only swap the swap, carrying hotend and heatsink fan, etc. So only two 5015 fans are needed... Not two for every swap part. With salami you now have the choice to use the standard 5mm cubic magnets or 10mm x 5mm magnets. Even cylinder ones. :-) I rate it "beta" since no one but me has tested "salami" so far: beta_cr-10_magnetmount_V0.02-salami.stl The wings that attach to "salami" are alpha... until now there is no fixation point for the fans. I plugged the fan in and it keeps it position. Added a zip tie and seems to be ok. But there will be an improved version with fixation for the 5015 fan. Files: alpha_cr-10_magnetmount_V0.02-salamifan_right.stl alpha_cr-10_magnetmount_V0.02-salamifan_left.stl Alpha because I have them in use and are fine... but not final yet. And one wing for salami with ABL: pre-alpha-salami-abl-wing-left-cr-10_magnetmount_V0.03-test.stl untested and without fixation for 5015... see above :-) Longer hex-bolts for 'salami': cr-10_magnetmount_V0.03-13mm-hexbolt-for-salami.stl pre-alpha: Added support for NF THC-01 3 color hot end. --> get lift part named: pre-alpha-3color-lift-cr-10_magnetmount_V0.03-test.stl Please test and give feedback :-) <h1>initial: 15-Jan-2018</h1> The thing is work in progress. It will change. Be sure. Maybe it will change that much that it might be incompatible with an earlier version... See it as beta phase. You agree with that ? Perfect. :-) This is my remix of the fantastic CR-10 Heavy Duty customisable modular e3D V6 mount Volcano 5015 ABL found on #Thingiverse https://www.thingiverse.com/thing:2494642 To make it even more versatile I added some features that came into my mind: - magnetic attachment for quick swap between different print heads - height adjustment of heatsink to support different types without the need of re-leveling of heatbed. - support for creality cr-10 original heatsink. (as well as e3d clone and volcano) Additionally you will need: - 5mm cube neodymium magnets (12pcs) - Some M3 screws and nuts The parts are: base This is attached to the carriage with 2 screws. Stock screws may be too long. It carries up to 6 magnets and up to 4 hex bolts. hexbolt It is used to make the whole thing fit tight and wiggle free. Print up to 4 pcs. I use 2 pcs. swap It carries up to 6 magnets and connects to the base like magic. Insert some M3 nuts (normal ones... I do not have nylock nuts... So they won't fit) You may attach fan wing mount from heavy duty mount. swap carries the next piece: lift This is where your heatsink connects to. Insert two M3 nuts. Attach your original cr-10 print head... Or turn it upside down and connect e3d clone or volcano. Slide it in the swap... This way height can be adjusted. If height fits, tighten it with up to two 8mm (?) M3 screws from other side of the swap. If you are not confident just use glue. Mine did not move even with only one screw attached. For e3d and volcano you will use the 40mm cooler fan mount of heavy duty. For cr-10 original you may use this one: https://www.thingiverse.com/thing:2184575 The parts are already positioned ready for print. Support 'from build plate only' may be better. Or full support (but bridging should do well) I accidentally printed the 'swap' without support... Not beautiful but functional. I was surprised that cr-10 can print into the air. ;-) 0.2mm layer height. I used esun PLA+ filament. In 'base' you will find a vertical element inside one of the hex holes... It is used to make it printable without support. This can be cut out with filament cutter pliers after the printing. Things to come in the near future: - Part cooling fan mount at the base... The 5015 fans are too expensive to have two on every sub 5 Euros swapable print head. (depends... I learned that there are sub 1 Euro 5015 fans...) - strain relief for wires at swap part. - different swap parts for attachment of laser, knife or other tools. - any ideas and suggestions ? Feel free to drop some lines in the comments.
With this file you will be able to print CR-10 magnet mount for e3d, volcano, cr-10 stock, remix of heavy duty, MGN12 with your 3D printer. Click on the button and save the file on your computer to work, edit or customize your design. You can also find more 3D designs for printers on CR-10 magnet mount for e3d, volcano, cr-10 stock, remix of heavy duty, MGN12.