CR-10 Mini AIO All In One
thingiverse
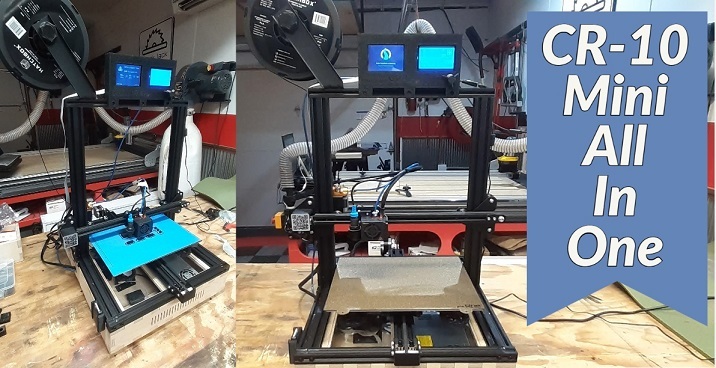
AIO Mini CR-10 Control Box ===================== ###ALL IN ONE CONTROL BOX <img src="https://i.ibb.co/X2g32f7/all-in-one.jpg" alt="all-in-one" border="0"> I didn't like the CR-10 control box so I made an all in one box out of a mix of wood and 3d printed parts. I have a CNC machine so I used the box gadget in Vcarve Pro to make the baltic birch box. ( CNC details at bottom of page ) <img src="https://i.ibb.co/yPDzFvT/20210122-235513-2.jpg" alt="20210122-235513-2" border="0"> <img src="https://i.ibb.co/cYt7fHX/20210110-162249.jpg" alt="20210110-162249" border="0"> I ended up going with a top mounted control box for now. I made a ribbon cable long enough to reach and have not had any issues with the LCD. I made two versions but only printed the half one with no back. So the full sized with a back is not tested. The only other thing is it does not fit like a glove on the 2020 extrusion. Needs to be slightly tweaked but I just make it work. Case mounting screws are low profile m5 with m5 t-nut PI/Touchscreen and LCD screws are m3 * * * #Dual Screen - ###Top Mounted 2020 Extrusion Two versions - half version and full with back. Holds stock CR-10 12864 screen and fitted for Inno-Maker 3.5 Touch Screen docked on Raspberry PI 3 Model B Requires a longer 10wire ribbon cable <img src="https://i.ibb.co/0XYWQYL/20210122-221619.jpg" alt="20210122-221619" border="0"> <img src="https://i.ibb.co/9TvtnVc/20210122-221536.jpg" alt="20210122-221536" border="0"> * * * #Large Dual Screen - ###Front Mounted <img src="https://i.ibb.co/J36WPRm/20210124-105023.jpg" alt="20210124-105023" border="0"> Holds stock CR-10 LCD and also Raspberry PI with Inno-Maker 3.5" touchscreen for running OctoDash - you need to print the PI case to hold it inside the control box. NOTE: the screw nubs on the inside of the case are larger than a 3mm screw. I ended having to drill out to 4mm and put a 3mm brass inserts in. I would probably revise it so that brass inserts are not needed - i.e. make nub holes 3.25mm to accept a 3mm screw. <img src="https://i.ibb.co/xqtqBNS/20210124-110159.jpg" alt="20210124-110159" border="0"> * * * #Small Dual Screen - ###Front Mounted <img src="https://i.ibb.co/ggJysJk/20210124-110045.jpg" alt="20210124-110045" border="0"> Uses Fysetc Mini 12864 LCD and the Inno-Maker 3.5 touchscreen but the pi is remotely mounted so would need to use a extension header ribbon cable. I did test the PI 3 Model B with Inno-Maker 3.5 LCD and a 20cm header extension and it worked. Inno-Maker said may have to make a change to clock speed but worked just fine for me. The reason for the PI ribbon header is to have the PI mounted inside the case and cut a slot in the bottom front or front and run it to the screen mounted in the case. This control box does not have a mounting system for the touch screen. I was just going to place the screen and then hit the corners with some hot glue to hold it in place. Or redesign it with hold down tabs. Also, I never tested the Fysetc Mini 12864 with the Ezboard Lite but Fysetc did provide schematics for wiring it up and also detailed the needed firmware changes if using the Unified Firmware. Details can be found at the git hub: (https://github.com/FYSETC/FYSETC-Mini-12864-Panel/tree/master/examples/TH3D-EZBOARD) * * * #Links to products I used: ###RPI - Touchscreen - Power - Adapters Raspberry PI 3 Model B - https://www.amazon.com/Raspberry-Pi-RASPBERRYPI3-MODB-1GB-Model-Motherboard/dp/B01N13X8V1 12v to 5v Stepdown for PI Power - https://www.amazon.com/gp/product/B01MEESLZ6/ Inno-Maker 3.5 Touchscreen - https://www.amazon.com/gp/product/B07MCP6QGS Octodash - https://unchartedbull.github.io/OctoDash/index.html I did have problems getting the screen to work initially as the Inno-Maker instructions are not accurate. If someone goes this route message me and I will explain what I did if you cannot figure it out. Raspberry PI Header Extension Ribbon Cable - https://www.amazon.com/gp/product/B07CGM83QL If you want to use the small form factor control box with the Fysetc Mini 12864 LCD this is the ribbon cable I tested and it worked with the Inno-Maker 3.5 Up/Down Angle USB connectors - https://www.amazon.com/gp/product/B07F7Y21GW Micro USB Extension Right Angle - https://www.amazon.com/gp/product/B06Y4FDVNN ###3D Printer Controller Board and Parts EzBoard Lite - https://www.th3dstudio.com/product/ezboard-lite/ 10 Wire Ribbon Cable - https://www.amazon.com/Connectors-Pro-Meters-1-27mm-Conductors/dp/B08435GF42 10 Wire Ribbon Cable connectors - https://www.amazon.com/Antrader-10-Pack-FC-10P-Sockets-Connector/dp/B07S1NFG4S Noctua 60mm Fan - https://www.amazon.com/gp/product/B00VXTANZ4 I used this to cool the EzBoard Lite. Wired directly to PSU so it runs all of the time. Mosfet - https://www.th3dstudio.com/product/high-amp-12v-24v-mosfet-heated-bed-or-hotend/ SD Card Extension - https://www.amazon.com/gp/product/B07YHN83NJ I did notice this didn't want to click and stay in on my Ezboard Lite. I ended up ordering the creatlity one off of Amazon but have not tried it yet. What I eneded up doing was putting the Lanmu into the slot and then taped it in with kapton tape. <img src="https://i.ibb.co/nj2Hctp/20210124-110336-1.jpg" alt="20210124-110336-1" border="0"> PCB board stand off and screws - https://www.amazon.com/gp/product/B00X7BY1D6 https://www.amazon.com/gp/product/B07D7828LC Power Supply - https://www.amazon.com/gp/product/B07VTLJS18 M3 bolts - https://www.amazon.com/gp/product/B01J7NM9JA M5 bolts - https://www.amazon.com/gp/product/B01G9HUYHQ/ M5 T Nuts - https://www.amazon.com/gp/product/B01FOC6A8E 4x3/8 Pan Head Sheet Metal Screws (used for the power panel on the back of the box) - Local Ace Hardware or Big Box 8 x 3/8 Pan Head Sheet Metal Screws (used for holding down the plates for the control board, mosfet, fans, power supply and cable ties.) Local Ace Hardware or Big Box ###Small Form Factor 12864 LCD Fysetc Mini 12864 - https://www.amazon.com/gp/product/B08K8GHGDP ###CNC Software and Hardware CAD Software I used for making the wood control box - https://www.vectric.com/products/vcarve-pro Using Box Gadget - https://gadgets.vectric.com/V9/box_creator.html CNC Machine I used : https://cnc4newbie.com/store/en/new-carve-cnc-p104/ CNC Controller I used: https://openbuildspartstore.com/blackbox-motion-control-system/ CNC Machine Interface Software I used: https://software.openbuilds.com/
With this file you will be able to print CR-10 Mini AIO All In One with your 3D printer. Click on the button and save the file on your computer to work, edit or customize your design. You can also find more 3D designs for printers on CR-10 Mini AIO All In One.