CR-10(S) Brace 2020 extrusions
thingiverse
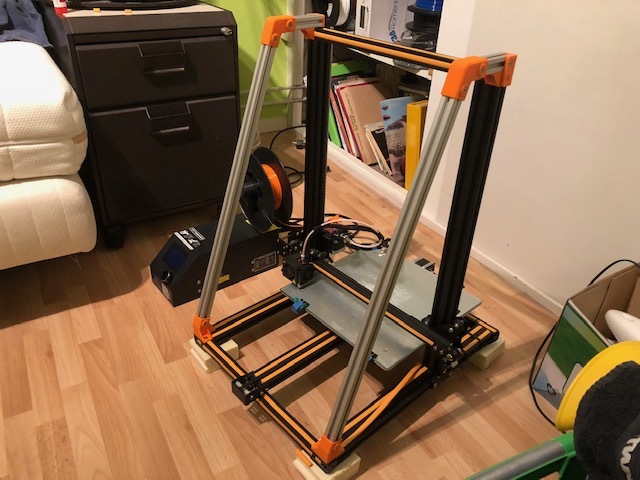
This is a brace or strut for the CR-10(S) X-Z assembly. As I noticed the layer quality of my prints deteriorated as the prints got taller, I decided I needed a brace to stabilize the X-Z assembly. I looked around on thingiverse but I could not find any attractive solutions. some used threaded rods or shafts with hinges on both ends, I felt these didn't line up with the design of the CR-10. also, these solutions started the brace triange directly at the top of the X-Z frame, which decreased the overall Z-height because the hotend assembly couldn't move under the hinge. This design makes use of 2020 extrusions so it fits in with the overall design of the CR-10 (I used blank aluminium extrusions as I don't have acces to black ones right now). The top of the brace stretches horizontal for a few centimeters, allowing the Z-height to go up to 362mm. What's required: You'll need to print each part twice, except for the base parts which are labelled "part 3" and "part 3 mirrored" 2x90mm 2020 extrusion 2x 580mm 2020 extrusion 26x M4 T-nuts suitable for 2020 extrusions 26x M4x8mm countersunk screws (the length of 8mm is overall screw length) How to install: First, unscrew the bearing blocks that hold the leadscrews in place at the top and take them off. these parts, in contrary to popular belief, actually decrease the surface quality of the prints because the leadscrews can be slightly bent, thus forcing the entire frame to bend and ruining your prints. The leadscrews should be unconstrained and free turning at the top. Assemble the 90mm and 580mm 2020 extrusions with the "part 2" angled brackets. I added an arrow to the inside of the "elbow" of "Part 2". this arrow should point to the short extrusion as seen on the CAD picture (white background) otherwise the frame will not assemble correctly. Thanks to *TommyGun3D* for helping me solve this issue. Assemble the bottom parts named "part 3" and "part 3 mirrored" using 3 screws and T-nuts each, then place the assembed extrusions in these parts. Lastly, assembly the angled brackets and part 1's on the top of the frame. Make sure the Z-axis is square to the baseframe! (you might wish to tap the ends of the 90mm extrusions aswell as the horizontal frame member of the CR-10) Also remember that you can easily remove the endcaps of the extrusions on the CR-10! I hope this thing will help your CR-10(S) prints get better and I hope you like it! Please share a make, I'd love that!
With this file you will be able to print CR-10(S) Brace 2020 extrusions with your 3D printer. Click on the button and save the file on your computer to work, edit or customize your design. You can also find more 3D designs for printers on CR-10(S) Brace 2020 extrusions.