CR-10 V2/V3 Hemera (BLtouch,EZABL Pro Mini, no print loss volume)(KLIPPER)(ADXL345 SUPPORT)
thingiverse
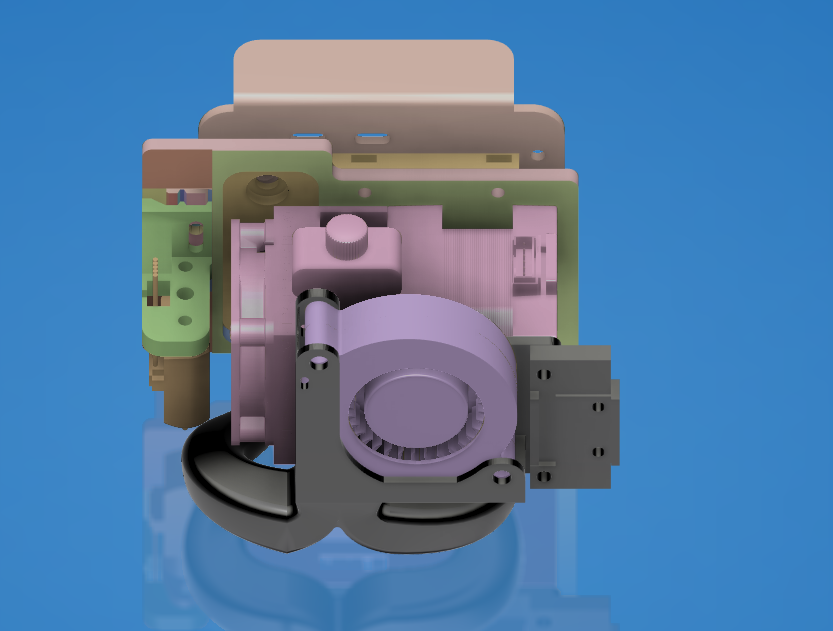
This is a customized plate and bl touch sensor, I remixed stuff here and there to make it as close as possible to the original design, so no print loss volume. Thingiverse won't allow me to remix, so I will give credit to owners at the end. Klipper firmware that I currently use with the hemera setup + bltouch You can use either v1 duct and v1 duct mount or use v2 fanduct(print it rotated 45 degrees, with duct channels up) 5015 fam My cr10 v3 has everyting stock hardware side, besides the hemera and the thermistor. You can use the following klipper config(you should only change the [gcode_macro CUSTOM_OFFSET]): https://pastebin.com/kWY1sNWe https://youtu.be/w0l0j5wfm5c MARLIN: firmware installation and general info: https://youtu.be/sn0mLLTGF28 There is already compiled firmed for the hemera in one of the Facebook groups, gently made by nic. Write up "Nic's Creality 3D Printer Firmware & 3D Printing Support" in Facebook search bar. firmware Offsets: NOZZLE_TO_PROBE_OFFSET { -36, 0, 0 } YOU WON'T need to modify #define X_MAX_POS or X_MIN_POS Load unload values: https://pastebin.com/G4fdBPyf (your bl touch offsets will be different from 3d printing Canada video, also, in the latest marlin bugfix, grab the cr10 v2 config instead of cr10s as 3d printing canada says.) (I highly suggest drilling all holes slightly larger than the screw, so the mounting plate has some wobble/adjustability when screwed all the way, USE 3,5MM drill bit) READ CAREFULLY⇊⇊⇊⇊⇊⇊ Note1: buy extra M3x5.5mmx2mm square nuts, your screws should align PERFECTLY with those nuts, if they are too long/too short it WON'T Work. Note2: I can't help you with the screw lengths, just buy a kit and cut if needed. For the mounting plate: Buy m3 hex Head screws and nuts kit, and some flat head m3, so you can cut them if needed. Note3: your hemera heatbreak, heat block, and nozzle should be preinstalled (meaning, you should have everything in place before mounting it to my plate, you can do the hot tightening later) HOWTO: https://e3d-online.zendesk.com/hc/en-us/articles/360016355298-Hemera-Direct-Assembly Note4: I hate the e3d plug thermistor, so I cut the wires and directly soldered to old thermistor wires, you can use it, I just don't like it. V1 Fans used: https://www.thingiverse.com/thing:4042492 V2, remixed by me, original stl: https://www.thingiverse.com/thing:4039235 REMIXED mount incorporated into the plate: https://www.thingiverse.com/thing:3148733 Mainplate: (Source: 3D Printing Canada Github) Added EZABL pro mini mount.(Stl gently made by Peter)
With this file you will be able to print CR-10 V2/V3 Hemera (BLtouch,EZABL Pro Mini, no print loss volume)(KLIPPER)(ADXL345 SUPPORT) with your 3D printer. Click on the button and save the file on your computer to work, edit or customize your design. You can also find more 3D designs for printers on CR-10 V2/V3 Hemera (BLtouch,EZABL Pro Mini, no print loss volume)(KLIPPER)(ADXL345 SUPPORT).