CR10/Ender 3 MicroSwiss DirectDrive Dual 40mm Part Cooling Fan Duct
prusaprinters
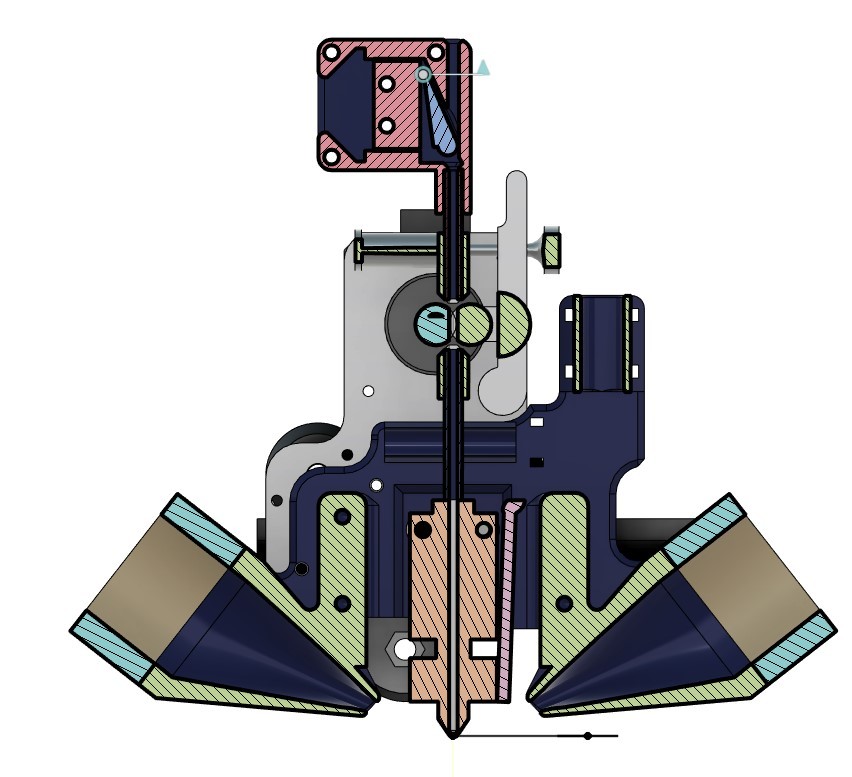
<p>Disclaimer: These versions of the FanDuct won't receive any updates or adjustments!<br/> .<br/> FOR IMPROVED PERFORMANCE USE THE NEW V4 INSTEAD: <a href="https://www.thingiverse.com/thing:4886226">https://www.thingiverse.com/thing:4886226</a><br/> .<br/> .<br/> .<br/> .<br/> .<br/> I designed this Fan Duct after upgrading my CR10 with the MicroSwiss DirectDrive Extruder and All Metal Hotend<br/> (<a href="https://store.micro-swiss.com/collections/extruders/products/micro-swiss-direct-drive-extruder">https://store.micro-swiss.com/collections/extruders/products/micro-swiss-direct-drive-extruder</a>)<br/> For easy installation and access to the hotend it consists of two parts:<br/> -The main part including the part cooling ducts and backplate<br/> -The removable front adapter<br/> It uses two 40mm Fans mounted to the sides for Part Cooling and another 40mm Fan mounted to the front adaptor for cooling the heatbreak/cooling block. All parts are connected with standard M3 screws.<br/> .<br/> .<br/> .<br/> V1 (Original Version):</p> <p>All mounting holes are designed with a 2.8mm inner diameter, so screwing in standard M3 screws will easily create an M3 thread. To get the length of the screws right, roughly add the following bore hole lengths to the thickness of the used fan:<br/> Mounting holes for the part cooling fans: 5mm<br/> Mounting holes for the front fan: 15mm<br/> Additionally use M3x12 cylinderhead screws to mount the adapter to the main part.<br/> For mounting the whole Fan Duct to the Aluminium Plate from MicroSwiss I recommend using two more M3 screws with M3 washers to better spread the force on the printed surface.<br/> .<br/> .<br/> .<br/> V2 (With BLTouch and Dial Gauge mount):</p> <p>If needed, all new features of this version also use standard M3 screws, nuts and washers. Added in this version:<br/> -removable BLTouch adapter<br/> -integrated Dial Gauge mount for manual bed leveling<br/> -cable management fixtures for use with zip-ties<br/> -better ground clearance to avoid hitting bed clips,...</p> <p>I also included some photos for the X- and Y-offsets between the nozzle and BLTouch.</p> <p>For my setup the offsets were be as follows:</p> <p>define NOZZLE_TO_PROBE_OFFSET {31, 18, -2.62}</p> <p>I also added some airflow simulation results from Fusion360 Analysis to show a possible behaviour.</p> <p>As of request, now there's also a v2 version of the fan duct without the dial gauge mount!<br/> That version includes two holes (which are 65mm apart and 30mm above the nozzle) at the front for your own creations!<br/> .<br/> .<br/> .<br/> V3 (Reworked version with the BLTouch mount at the front):</p> <p>This version is a rework from the v2 without the dial gauge mounts but has the BLTouch at the front now for easy installation and to fix any clearance issues with the x-axis extrusion!</p> <p>-Update: Did some minor tweaks to the airflow, the corresponding V3 files have been replaced! A clip on BLTouch protector has also been added!</p> <p>The new offsets for V3 are:</p> <p>define NOZZLE_TO_PROBE_OFFSET {35, -44, -2.62}<br/> .<br/> .<br/> .<br/> V4 (more modular design, better cooling potential):</p> <p>THE 4TH VERSION OF THE FANDUCT CAN BE FOUND HERE: <a href="https://www.thingiverse.com/thing:4886226">https://www.thingiverse.com/thing:4886226</a><br/> .<br/> .<br/> .<br/> I also have a complete model of the MicroSwiss Assembly on my thingiverse: <a href="https://www.thingiverse.com/thing:4791971">https://www.thingiverse.com/thing:4791971</a><br/> So You can design your own fanduct for your setup if needed!</p> <p>If you decide to print the fan duct please consider posting your print as a make or if you did some changes/adjustments or added your own mounts for it, share it as a remix please, so that everybody can profit from it!</p> <p>Cheers</p> <h3> Print Settings</h3> <p>I added some Screenshots of the print settings i used in Cura.</p> <p>Some more basic information:<br/> Nozzle diameter: 0.4mm<br/> Printed on my CR10 with PLA (v1) and PETG (v2), but you might want to prefer ABS, ASA or PETG to protect the parts close to the hotend from getting too warm and deforming.</p> <p>I used Cura's Experimental 'Tree support' and it turned out great. If you don't have that option, just use your standard support configuration or try without.</p> <p>I recommend using the print orientation with the rear laying down to reduce the need of support structures.</p> <p class="detail-image"><img src="https://cdn.thingiverse.com/assets/ce/b3/dd/7f/79/Print\_Settings\_1.png"/></p> <p class="detail-image"><img src="https://cdn.thingiverse.com/assets/01/89/76/05/71/Print\_Settings\_2.png"/></p> <p class="detail-image"><img src="https://cdn.thingiverse.com/assets/da/17/7c/fd/1b/Print\_Settings\_3.png"/></p> <p class="detail-image"><img src="https://cdn.thingiverse.com/assets/41/df/10/8a/b6/Print\_Settings\_4.png"/></p> Category: 3D Printer Accessories
With this file you will be able to print CR10/Ender 3 MicroSwiss DirectDrive Dual 40mm Part Cooling Fan Duct with your 3D printer. Click on the button and save the file on your computer to work, edit or customize your design. You can also find more 3D designs for printers on CR10/Ender 3 MicroSwiss DirectDrive Dual 40mm Part Cooling Fan Duct.