CR6 Cable Chain Including Filament Guide and PTFE Guide
thingiverse
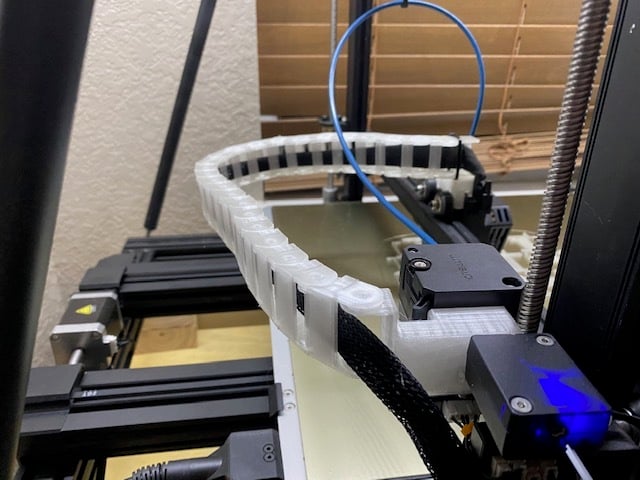
*EDIT* captainknut's remix fixes a couple of major issues with my design. I'd suggest using his remix: https://www.thingiverse.com/thing:5156639 This is a basic cable chain mount for the CR6 series printer. I have the CR6 Max and the X-axis cable in particular has a habit of falling down into the print area while the printer is printing. I ended up with a melted and shorted cable that took out my main board, so I designed and printed this as soon as my printer was back up and running. This was designed based very loosely on the excellent cable chain system designed by Johnny Whiskey for the Ender 3 ( https://www.thingiverse.com/thing:2920060 ). Instructions: The X Carriage Body clips onto the roller spacers on the X carriage. The X Carriage Cable Chain Mount screws into the X Carriage Body using 8mm long m4 screws. The Hot End Retainer Clip clips around the X Carriage Cable Chain Mount to help retain the cable chain to prevent the weight of the cable chain from popping itself out of the bracket. The X Carriage Cable Chain Mount also includes a couple of holes to thread a small zip tie to hold the hot end cable fixed in place at the hot end side. When printing the X Carriage Body, I printed with supports in all locations, but manually blocked supports everywhere except for in the slot that slides over the X carriage mounting plate. Everything else I printed with supports only from the bed. The Filament Guide and X Cable Chain Mount slides onto the Z Axis carriage just like any other filament guide, but includes the X axis cable chain termination point. There's a hole in the bottom of the mount to use a 4mm screw to hold the mount in place, though at least for my printer it's not really necessary. The Z cable upper end is designed to float and isn't tied down. The Z axis Bottom End bolts to the left side 4040 extrusion a couple of inches behind the z rail. Print as many links and snap covers as you need. For the CR6 Max, this was 46 - 26 for the X axis chain and 20 for the Z axis chain. Print one of each other STL. You'll need to correct the orientation of the STLs before printing. I've included the F360 file in case anyone wants to remix or tweak the design. All parts were printed on the CR6 Max. **EDIT: Turn the link that attaches to the X-end carriage backwards so that it folds in when the X axis homes.
With this file you will be able to print CR6 Cable Chain Including Filament Guide and PTFE Guide with your 3D printer. Click on the button and save the file on your computer to work, edit or customize your design. You can also find more 3D designs for printers on CR6 Cable Chain Including Filament Guide and PTFE Guide.