CR6-MAX Direct Drive Conversion Plate
thingiverse
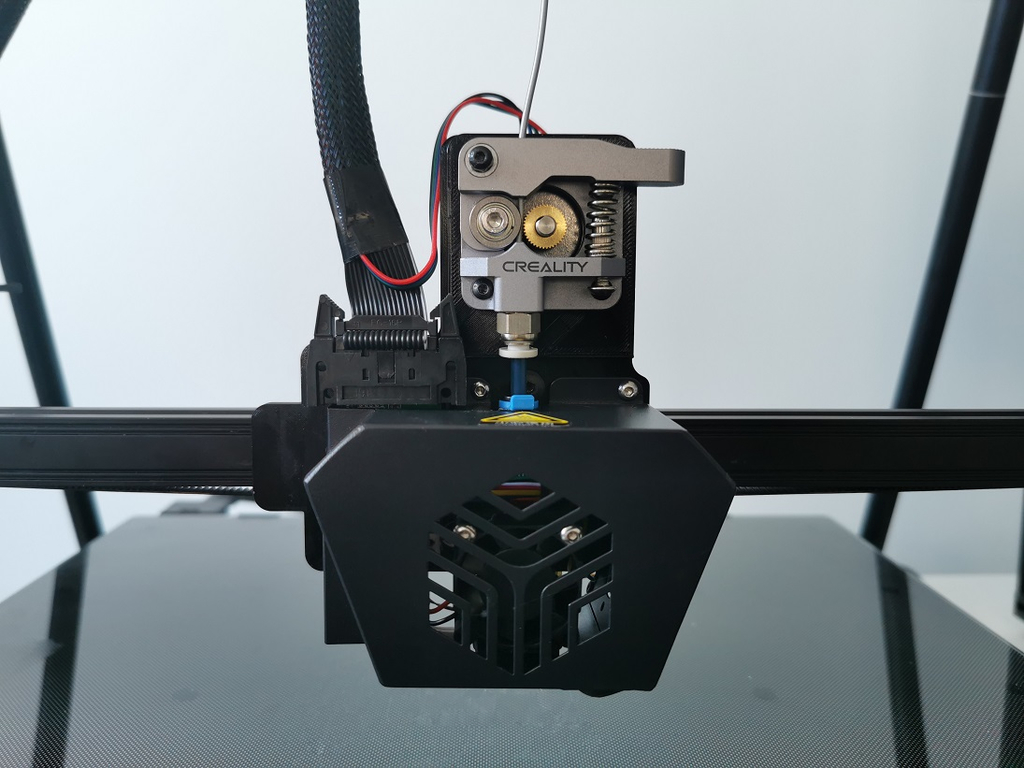
Update - I have added a second STL of the plate with strain relief for the ribbon cable. You can choose if you want that or not. :-) This is my conversion plate for the CR6-Max. I was having all sorts of extrusion problems with the long Bowden tube and decided I wanted my CR6-MAX to be a direct drive unit. This plate would probably work on a CR6-SE as well, but I haven’t tested it, and I don’t ever have problems with my SE printers like I do the Max. This plate is designed to take the standard Creality all metal extruder that you can purchase for around 25 Ozyyy Dollery Doos. I have a link below that you can take a look at to see exactly what I am talkin about. This of cos will require you to slow down your prints. Lets be honest though, if your trying to be a speed demon, the CR6-MAX bed slinger is the wrong platform to be using anyway. Go make yourself a Voron son. You need to print out the direct drive plate, as well as the spacer in PETG. You could probs use PLA of some kind, but I myself am a little concerned about the plate warping due to the heat produced by the stepper motor. I might try a carbon fibre impregnated filament as well at some stage, however I have placed extra plastic structures on the back to try and keep it ridged. So far for me, PETG works just fine. I have tried using a thinner pancake motor, however it didn’t seem to have enough grunt for me and skipped steps a lot. When mounting the full sized stepper, mount it with the plug facing up. Other wise it will need more space from the left wall and will not make it to the X-Axis end stop. Speaking of the X-Axis, you will need to modify the firmware to make the X-Axis 370mm to be safe. Because the stepper motor needs extra space than the original Bowden setup, you lose the width on the other side. It shifts the printable area of the X-Axis 20mm to 30mm to the right. You could change the X-Axis to 380mm, but just watch your clearances when it starts leveling the bed. The plate is 3mm thick for the screws and 5mm thick for the extruder, So you will need to find some slightly longer M3 screws and nuts. I use nuts, you could use the melt in brass inserts, but I didn’t bother this time. When all the screws are in place, you might need to grind them down a little as the clearances between the plate and the X-Axis Aluminium extrusion are very small. I found with a single washer and nut, the screw could be ground flush and this was a perfect fit. See how you go though. Smaller screws could always be used, its just all I had on me. The M4 screws for the two to V-groove wheels will need to be screwed in. I have done this on purpose. The holes are nice and snug so that when placing the carriage onto the X-Axis extrusion, it holds the screws tightly and you can place the wheels on easily without the screws falling out all over the place. For the stepper motor, you will need to find a longer stepper motor cable. The one from an Ender 5 plus works just fine for me, but you will need to swap some pins as they are inverted. Your extruder will work in reverse. Other wise you could just cut your cables in half and extend them with extra cable and solder them. I did have to shorten the 2GT belt. I just did this with a zip tie and it holds really well. Simply put the belt into the grooves and zip tie it where you feel its right. Build Video Link: https://www.youtube.com/watch?v=EexA4gnAUT8 Please note the video has the previous version of the plate. The new version has more meat to keep it from flexing. Part Links: Creality All metal Extruder: https://www.creality3dofficial.com/products/creality-mk8-extruder-1 M3 screw for extruder lever (M3X30mm): https://www.aliexpress.com/item/1005002357962115.html?spm=a2g0o.productlist.0.0.1bdd5dd1PiJ3a8&algo_pvid=b3e647fc-841a-4bbd-b5a0-dc24edfc863a&aem_p4p_detail=2022012222412812672179671484400018608189&algo_exp_id=b3e647fc-841a-4bbd-b5a0-dc24edfc863a-0&pdp_ext_f=%7B%22sku_id%22%3A%2212000020286938101%22%7D&pdp_pi=-1%3B2.0%3B-1%3B-1%40salePrice%3BAUD%3Bsearch-mainSearch M3 Screw for fan cover, Bottom of extruder, hot end backet (M3X12mm): https://www.aliexpress.com/item/1005002357962115.html?spm=a2g0o.productlist.0.0.1bdd5dd1PiJ3a8&algo_pvid=b3e647fc-841a-4bbd-b5a0-dc24edfc863a&aem_p4p_detail=2022012222412812672179671484400018608189&algo_exp_id=b3e647fc-841a-4bbd-b5a0-dc24edfc863a-0&pdp_ext_f=%7B%22sku_id%22%3A%2212000020286938101%22%7D&pdp_pi=-1%3B2.0%3B-1%3B-1%40salePrice%3BAUD%3Bsearch-mainSearch M3 nut for all screws: https://www.aliexpress.com/item/1005001484129317.html?spm=a2g0o.productlist.0.0.4d4fb34bHmBTeN&algo_pvid=03b97fdf-963f-4814-b001-33cc9e070687&algo_exp_id=03b97fdf-963f-4814-b001-33cc9e070687-10&pdp_ext_f=%7B%22sku_id%22%3A%2212000016294831591%22%7D&pdp_pi=-1%3B2.13%3B-1%3B-1%40salePrice%3BAUD%3Bsearch-mainSearch M3 washers for all screws: https://www.aliexpress.com/item/33052324071.html?spm=a2g0o.productlist.0.0.21752f6d3fR0Mw&algo_pvid=38a6dbdf-fbc2-4393-9662-c63f51f43b0f&algo_exp_id=38a6dbdf-fbc2-4393-9662-c63f51f43b0f-1&pdp_ext_f=%7B%22sku_id%22%3A%2267422579261%22%7D&pdp_pi=-1%3B0.8%3B-1%3B-1%40salePrice%3BAUD%3Bsearch-mainSearch
With this file you will be able to print CR6-MAX Direct Drive Conversion Plate with your 3D printer. Click on the button and save the file on your computer to work, edit or customize your design. You can also find more 3D designs for printers on CR6-MAX Direct Drive Conversion Plate.